
To achieve a deep, dark color, you can make black icing by starting with a chocolate base and adding a large amount of concentrated gel food coloring. Because white or vanilla frosting requires an excessive amount of dye to reach a true black, using cocoa powder first reduces the total volume of coloring needed. This guide explains how to balance the intensity of the pigment with the stability of your frosting so you don’t ruin the flavor or texture.
How to make black icing darker
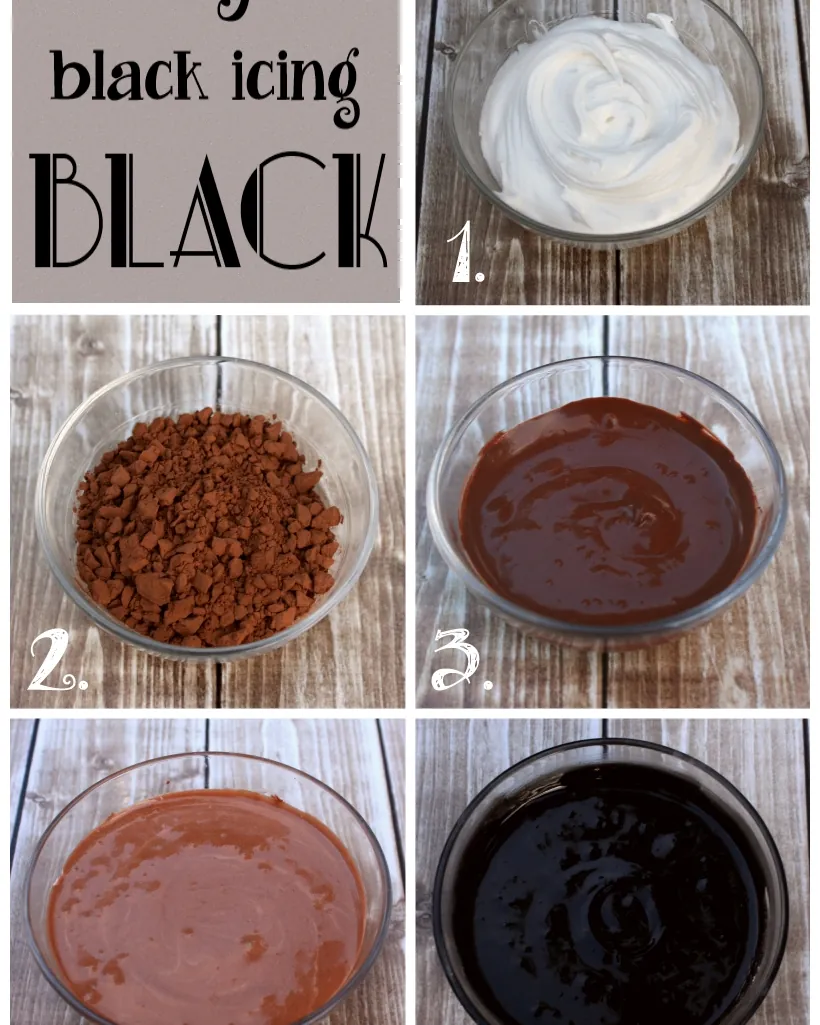
Black icing is essentially a high-saturation mixture that relies on the contrast between dark ingredients and concentrated pigments. Most people mistakenly try to turn standard white buttercream black by adding liquid food coloring, which is a mistake that causes the icing to become runny, bitter, and thin. This happens because liquid dyes are water-based, and adding enough to reach a deep black will break down the structural fats in your butter or shortening.
The mechanism here is saturation. To reach a true black, you need to minimize the “white” space in the mixture. Cocoa powder provides a dark foundation, which acts as a head start for the color. By using one-quarter cup of dark cocoa powder per two cups of frosting, you reduce the amount of synthetic dye required by nearly half. This prevents the bitter chemical aftertaste that ruins high-volume coloring projects.
If you’re using a standard American buttercream, the fat content is the most important factor. If you use too much dye, the icing will lose its structure and slide off your cake. You can verify the quality of your base by checking that it’s firm enough to hold a peak before you start adding color.
The decision rule is simple: if your base is white, use gel or paste colors exclusively. Liquid drops contain too much water for high-pigment applications. If your base is already chocolate, you can use oil-based colors to maintain the emulsion.
A common error is rushing the process. Pigment needs time to hydrate and deepen. If the icing looks dark gray after mixing, cover the bowl and let it sit at room temperature for two hours. The color will darken significantly as the dye molecules fully disperse into the fat. If it remains gray after this wait, add a tiny pinch of violet or blue dye to neutralize the remaining yellow undertones. This small adjustment often makes the difference between a dull charcoal and a professional, deep black finish.
Simple Steps for Dark Frosting
Follow these steps to prepare your icing without compromising the texture or the taste of your dessert.
- Prepare 2 cups of chocolate buttercream using dark cocoa powder, as this provides a darker starting point than standard cocoa.
- Add 2 tablespoons of concentrated black gel food coloring to the bowl.
- Mix the frosting on a low speed using a paddle attachment until the color is evenly distributed.
- Let the mixture sit for 30 minutes in a cool place, as the color will deepen significantly as it hydrates.
- Check the shade; if it’s still a dark grey, add 1 additional teaspoon of gel and mix again.
- If the icing becomes too soft, place the bowl in the refrigerator for 15 minutes to firm up the fats before piping.
The judgement call that decides the final result is the rest time. If you don’t let the dye hydrate, you’ll keep adding more color until the frosting tastes like chemicals. Always wait at least half an hour before deciding if you need more pigment. If you require professional-grade results for a large event, consult the food safety guidelines provided by the Food and Drug Administration regarding color additives to ensure your ingredients meet safety standards.
Reference Guide for Color Intensity
The table below shows how different base mixtures react to black gel coloring. This assumes a standard batch of 2 cups of frosting.
| Base Type | Starting Color | Gel Amount | Resulting Shade |
|---|---|---|---|
| Vanilla | White | 4 tablespoons | Dark Grey |
| Milk Chocolate | Light Brown | 3 tablespoons | Dark Brown |
| Dark Chocolate | Dark Brown | 2 tablespoons | True Black |
| Vegan/Shortening | White | 5 tablespoons | Charcoal |
Mastering the Texture and Tone
Experienced bakers often prepare their black icing a full day before they intend to use it. This strategy is effective because the pigments have time to fully bond with the fats in the butter, resulting in a much deeper color without the need for extra dye. Beginners often rush this process and end up with a bitter, metallic-tasting frosting because they used too much coloring in a short time.
You must also consider the temperature of your kitchen. If the room is above 75 degrees Fahrenheit, the butter in your frosting will soften, making it difficult to maintain sharp edges when piping. If you notice the icing getting warm, stop immediately and put it in the fridge. Don’t try to fix a “broken” or melted frosting by adding more powdered sugar, as this will only dilute your black color and turn it back into a dull grey.
Another detail is the choice of dye. Only use high-quality gel or paste colors. Avoid water-based drops found in grocery store aisles, as they aren’t strong enough to provide the saturation needed for black. If you aren’t for the faint of heart, recognize that black food coloring will stain teeth and lips temporarily; this is a common trade-off for high-impact visual designs.
Troubleshooting Common Issues
Use this table to identify why your icing might not be reaching the desired shade or consistency.
| What you notice | What it usually means | What to do first |
|---|---|---|
| Icing is runny | Too much liquid dye | Chill for 20 minutes |
| Icing tastes bitter | Over-saturation of dye | Add a teaspoon of cocoa |
| Color is still grey | Insufficient base color | Use dark cocoa powder |
| Texture is grainy | Too much food dye | Add more room-temp butter |
If your icing remains runny after chilling, you have likely compromised the structure of the fat. In this case, don’t add more sugar. Instead, whisk in one tablespoon of powdered sugar at a time until the mixture holds a stiff peak. If you continue to add liquid dye, you’ll only accelerate the breakdown of the butter.
Bitter flavors often stem from using too much blue or black dye. These colors are highly concentrated. If you’re aiming for a deep navy or black, start with a chocolate base rather than white vanilla frosting. This reduces the total amount of dye required by nearly half.
Many beginners mistake grainy icing for a lack of mixing. However, if you see small beads of liquid, the dye has likely separated from the fat. To fix this, place the bowl over a warm water bath for ten seconds. The gentle heat helps the dye integrate back into the emulsion.
Use this decision rule: if the icing is warm to the touch, chill it before adding more fat. If the icing is cold but still grainy, it needs more agitation. Adding extra butter to a cold, separated mixture will only create larger, more noticeable lumps. Always test a small dollop on a plate before adjusting the entire batch.
Regulations and Safety Limits
When working with concentrated food dyes, you must follow the usage limits set by the Food and Drug Administration. While gel food coloring is generally recognized as safe, there are specific maximum concentrations for certain synthetic dyes like Red 40 or Blue 1, which are often mixed to create black. You can find the specific limits for your region on the official website of your local food safety authority.
The most common mistake is assuming that “concentrated” means you can use an unlimited amount to achieve a deeper shade. If your icing tastes like chemicals, you have already crossed the safety threshold.
If you’re coloring a large volume of frosting for a professional contract, always maintain a log of the dye brands used. This is critical if you’re serving individuals with specific food sensitivities. If the icing starts to separate or releases oil, it’s likely that the temperature is too high.
Use this decision rule: If the ambient temperature in your kitchen exceeds 75 degrees Fahrenheit, you must keep the frosting bowl inside an ice bath while mixing. This prevents the fats from breaking down and keeps the dye stable.
At this point, the dairy content is no longer safe for consumption.
The cost of a wasted bowl of frosting is negligible compared to the liability of serving a contaminated product to your clients.
Long-Term Storage and Maintenance
Once your black icing is finished, store it in an airtight container to prevent it from drying out or absorbing odors from the refrigerator. It will stay stable for up to 5 days in the fridge. When you’re ready to use it again, the fats will be very firm, so let the container sit on the counter for 20 minutes to reach a spreadable consistency.
If you have leftover icing, you can freeze it for up to 3 months. To bring it back to life, thaw it in the refrigerator overnight and then re-whip it with a paddle attachment. If the color seems to have faded slightly after freezing, a tiny drop of fresh gel will bring the intensity back. Always check for a fresh, clean smell before using thawed icing; if it smells like the inside of your freezer, it’s best to discard it.
The most common mistake is failing to account for condensation. When you remove a cold container from the fridge, moisture beads on the surface. If you open the lid immediately, this water drips into the icing and ruins the texture. Always wipe the exterior dry before opening.
Use this decision rule to determine if your icing is salvageable. If the icing is merely stiff, a quick stir will fix it. If you see visible separation or oil pooling on the surface, you must re-whip it on low speed for two minutes. However, if the icing has developed a grainy, crystalline texture, the emulsion has broken permanently. Don’t attempt to save it, as the grit will be impossible to smooth out on a cake.
For best results, store the icing in smaller, single-use portions. This prevents you from repeatedly warming and cooling the entire batch, which degrades the stability of the cocoa butter. If you notice the black color shifting toward a dull grey, your storage container is likely letting in too much light. Wrap the container in foil to maintain the deep, dark pigment.
When to Choose Alternatives
Sometimes, black icing isn’t the right choice for your project. If you’re creating a cake that requires a very high amount of frosting, the bitterness of the black dye will overpower the flavor of the cake. When your design covers more than 30 percent of the cake’s surface area, the chemical load of the dye becomes a culinary liability.
In these cases, it’s better to use a thin layer of black-colored fondant or a dark chocolate ganache. Ganache provides a natural, rich black color without the need for massive amounts of chemical dyes. It also offers a superior mouthfeel compared to heavily dyed buttercream, which can become gritty or waxy when saturated with pigment.
If the design is for a small child, keep in mind that high concentrations of synthetic dyes can lead to temporary staining. Parents often find this alarming, especially during birthday parties where photos are a priority.
Use this decision rule to guide your choice: If the cake flavor is delicate, such as vanilla or lemon, avoid high-dye buttercream entirely. The bitterness will ruin the profile. Instead, use a dark chocolate base and paint the exterior with a food-grade black luster dust.
A common mistake is attempting to reach “true black” by adding more liquid dye to a standard batch. This thins the consistency, forcing you to add more powdered sugar, which makes the frosting overly sweet and dense. If the icing begins to lose its structure or feels tacky to the touch, stop adding dye immediately. Switch to a pre-colored commercial paste or a cocoa-based ganache to maintain the structural integrity of your piping.
Frequently asked questions
How long does it take for black icing to darken?
Black icing typically takes 30 to 60 minutes to reach its deepest color after the gel is mixed in. The pigments need time to hydrate and bond with the fat molecules in the butter or shortening base. If you check the color immediately after mixing, it will often look like a dark grey, but it will deepen significantly as it rests in a cool, dark place.
Is it safe to eat a lot of black icing?
Yes, it’s safe to eat in standard portion sizes, provided you use food-grade gel colors. The Food and Drug Administration regulates the additives used in these dyes, and they’re safe for consumption when used according to the manufacturer’s directions. However, consuming a very large quantity may cause temporary staining of the tongue or digestive issues, which is common with any highly concentrated food coloring.
Can I make black icing without gel food coloring?
No, you can’t reach a true black color using only natural ingredients like cocoa powder or activated charcoal. While dark cocoa powder gets you closer to a deep brown, it lacks the blue and red undertones necessary to neutralize the natural yellow tint of butter and turn the mixture black. If you must avoid synthetic dyes, a dark chocolate ganache is the only effective alternative that provides a rich, dark finish.
How much black food coloring do I need for 1 cup of frosting?
You need approximately 1 to 2 tablespoons of concentrated gel dye for 1 cup of frosting to achieve a deep black. This assumes you’re starting with a chocolate buttercream base; if you’re starting with a white vanilla base, you’ll need significantly more dye, which will likely ruin the texture of the frosting. Always start with a smaller amount and let the icing rest before adding more.
What happens if I use liquid food coloring instead of gel?
Your frosting will likely become a runny, unusable mess if you use liquid food coloring to reach a black color. Liquid dyes are water-based, and the amount required to achieve deep saturation will break the emulsion of the butter and sugar. This results in a thin, soupy liquid that won’t hold its shape when piped or spread on a cake.
Why is my black icing turning green or purple?
Your icing is turning green or purple because the base color of the frosting is interacting with the undertones of the black dye. Most black dyes are made by mixing red, blue, and yellow; if your frosting has a yellow butter base, it can shift the final color toward green or brown. Using a dark chocolate base helps mask these undertones, keeping the final color closer to a true black.
Conclusion
After you have achieved your desired shade and texture, keep your finished decorations out of direct sunlight. Even the best black food coloring can fade if left in a bright, sunny window for several hours, which can turn your deep black accents into a dull, washed-out grey.
Related guides
- How Do I Make Icing: A Simple Buttercream Recipe
- How Can I Make Icing: Simple Recipes and Pro Ratios
- How To Make Icing: A Simple Recipe for Perfect Glaze

Hello, This is Annie Walker, a 38-year-old blogger, founder, and editor of Cookware Guider from NY, USA. I am a cookware fanatic and passionate cooker. I love to cook with different types of cooking appliances (example: all types of cookware, rice cookers, slow cookers, etc) almost every day in my kitchen. I love to share my experience with my readers in my blog. Also, I enjoy helping people to solve their problems through my website. You can follow me on Twitter & Pinterest. To know details about my blog please check the about us page.