
Cooking rice may seem easy, but getting perfect, fluffy grains is a challenge for many. If you’ve ever faced mushy, undercooked, or burnt rice, you’re not alone. The pressure cooker can be a game-changer for home cooks, making rice preparation quicker, more consistent, and surprisingly simple. Whether you’re new to the kitchen or want to save time on busy weekdays, learning how to cook rice in a pressure cooker is a skill worth mastering. This guide will walk you through every step, answer common questions, and share tips that make a real difference—even if you’ve struggled with rice before.
Why Use A Pressure Cooker For Rice?
Pressure cookers are popular in many kitchens around the world, not just for speed but for reliability. Here’s why they stand out when it comes to cooking rice:
- Faster cooking time: Regular rice cookers or stovetop pots can take 20–40 minutes. A pressure cooker often cuts this to 5–10 minutes (plus a little time for pressure to build and release).
- Consistent results: The sealed environment means even cooking, less evaporation, and fewer surprises.
- Energy efficiency: Shorter cooking times use less electricity or gas.
- Hands-off convenience: You don’t need to watch the pot or stir constantly—just set and wait.
Many people think pressure cookers are only for tough meats or stews, but they’re excellent for grains. In fact, some of the fluffiest rice in Asian and Middle Eastern cuisines is made this way.
Types Of Pressure Cookers
There are two main types of pressure cookers you might use:
- Stovetop Pressure Cookers
- Manual control over heat.
- Often reach higher pressure, so rice cooks even faster.
- Require more attention, especially at the end (to release pressure safely).
- Electric Pressure Cookers
- Examples include Instant Pot or similar brands.
- Digital timers and preset programs.
- Easier for beginners—automatic pressure release and safety features.
Both types can deliver great rice, but their methods and timing may differ. It’s important to know which you have and check the manual for specific settings.
Choosing The Right Rice
Not all rice is created equal. Each type absorbs water differently and needs unique cooking times. Here’s a quick overview of common rice varieties and what makes them special:
| Rice Type | Texture | Common Uses | Pressure Cooking Time |
|---|---|---|---|
| White Long Grain (e.g., Basmati, Jasmine) | Fluffy, separate grains | Indian, Thai, general use | 3–5 min (high pressure) |
| White Short/Medium Grain | Sticky, soft | Sushi, risotto, paella | 4–6 min |
| Brown Rice | Chewy, nutty | Health-focused meals | 20–22 min |
| Wild Rice | Firm, earthy | Salads, pilafs | 25–30 min |
Tip: New cooks often forget that brown and wild rice need much longer than white rice. This is because their outer layers are tougher and need more time to soften.
Ingredients And Tools Needed
Before you start, gather everything you’ll need:
- Rice: Any variety (see previous section)
- Water: Clean, filtered if possible
- Salt: Optional, for flavor
- Oil or butter: Optional, prevents sticking and adds richness
- Pressure cooker: Stovetop or electric
- Measuring cups: For rice and water
- Fine mesh strainer: To rinse rice (reduces excess starch)
- Spoon or paddle: For stirring and serving
Pro insight: The kind of water you use can affect flavor. Hard water sometimes makes rice less tender, while soft water can make it a bit sticky.
The Golden Ratio: Rice To Water
Getting the water-to-rice ratio right is the single most important factor in pressure cooker rice. Too much water leads to mushy grains; too little leaves them hard.
Here’s a simple guide to follow:
| Rice Type | Rice:Water Ratio | Notes |
|---|---|---|
| White Long Grain | 1:1 | For firmer rice, use slightly less water |
| White Short/Medium Grain | 1:1.1 | Sticky rice needs a little more water |
| Brown Rice | 1:1.25 | Needs more water for the bran layer |
| Wild Rice | 1:2 | Soak for best results |
Beginner mistake: Many people use the same ratio for all rice types. Always double-check!
Step-by-step: How To Cook Rice In Pressure Cooker
Let’s break down the full process so you can get it right from the start.
1. Measure And Rinse The Rice
Measure the amount of rice you need. One cup of uncooked rice usually serves 2–3 people. Place the rice in a bowl or directly in a fine mesh strainer, then rinse under cold water. Swirl the rice with your hand until the water runs clear.
This step removes excess starch, so your rice is less sticky and more fluffy.
Extra tip: If you skip rinsing, you might get a gummy texture, especially with long-grain rice.
2. Add Water And Flavorings
Transfer the rinsed rice to your pressure cooker pot. Add the correct amount of water (see the earlier table). If you want, add a pinch of salt and a teaspoon of oil or butter. The fat helps prevent the rice from foaming too much or sticking to the pot.
3. Seal And Set The Pressure Cooker
- For stovetop models: Lock the lid, set the cooker to high pressure, and place over medium-high heat. Wait for the cooker to come up to pressure (steam will build and the valve will seal).
- For electric models: Secure the lid, select the “Rice” program or manual high pressure, and set the timer based on your rice type.
4. Cook For The Correct Time
Use the timing in the earlier chart. For example, white rice cooks in 3–5 minutes at high pressure, while brown rice needs about 20 minutes. The timer starts once full pressure is reached (not when you first turn on the heat).
Non-obvious insight: The actual “cooking” time is short, but total time includes pressure build-up (5–10 minutes) and release (5–15 minutes).
5. Release Pressure Safely
There are two methods to release pressure:
- Natural release: Let the pressure drop on its own. This takes 10–15 minutes and is best for brown or wild rice.
- Quick release: Carefully move the valve to venting for an immediate release of steam. Best for white rice to avoid overcooking.
Warning: Always keep your face and hands away from the vent. Hot steam can cause burns.
6. Fluff And Serve
Open the lid away from your face. Use a fork or rice paddle to fluff the rice gently. This separates the grains and releases excess steam. Serve immediately, or keep warm for up to 30 minutes in the cooker.
Professional tip: Letting rice rest for 5 minutes before fluffing improves texture, as excess moisture redistributes.

Credit: www.loveandlemons.com
Cooking Different Types Of Rice
Each rice type has its own quirks. Here’s how to handle the most popular kinds:
White Long-grain Rice (basmati, Jasmine)
- Ratio: 1 cup rice to 1 cup water
- Pressure: High
- Time: 3–5 minutes
- Release: Quick for firmer, natural for softer
Basmati and Jasmine are great for pilafs, stir-fries, or as a side. Rinsing is crucial for fluffy results.
Brown Rice
- Ratio: 1 cup rice to 1¼ cups water
- Pressure: High
- Time: 20–22 minutes
- Release: Natural
Brown rice’s bran layer takes longer to soften. Don’t rush the release, or the rice will be chewy.
Wild Rice
- Ratio: 1 cup rice to 2 cups water
- Pressure: High
- Time: 25–30 minutes
- Release: Natural
Wild rice benefits from soaking for 30 minutes before cooking. This shortens cooking time and improves texture.
Sushi Rice
- Ratio: 1 cup rice to 1.1 cups water
- Pressure: High
- Time: 4–5 minutes
- Release: Natural
Add a splash of rice vinegar, sugar, and salt after cooking for authentic sushi rice.
Common Mistakes And How To Avoid Them
Many cooks make the same errors, especially when new to pressure cookers. Here’s how to sidestep them:
- Using too much water: Leads to mushy rice. Always check your ratio.
- Not rinsing rice: Results in sticky or clumpy rice.
- Opening the cooker too soon: Causes splattering and undercooked grains.
- Forgetting to add oil: Some rice types foam up. A small amount of oil reduces this.
- Overfilling the cooker: Never fill more than halfway with rice and water. Rice expands and needs space.
- Ignoring elevation: At high altitudes, you may need a bit more water and a longer cooking time.
Less-known tip: The age of your rice matters. Older rice can be drier and need a tiny bit more water.
Pressure Cooker Rice Vs. Other Methods
Is pressure cooking truly better? Here’s a direct comparison:
| Method | Cooking Time | Texture | Ease of Use |
|---|---|---|---|
| Pressure Cooker | 5–22 min + pressure time | Fluffy, consistent | Very easy, hands-off |
| Stovetop Pot | 15–40 min | Varies, needs supervision | Medium, watch closely |
| Microwave | 10–25 min | Often uneven | Easy but inconsistent |
| Rice Cooker | 15–30 min | Good, but needs a dedicated device | Very easy |
Pressure cookers win for speed and reliability, especially if you’re cooking more than just rice.
Adjusting For Elevation And Batch Size
Most recipes assume you’re cooking at sea level. At higher elevations, water boils at lower temperatures, so grains take longer to cook. If you live more than 3,000 feet above sea level, add an extra 2–3 minutes of cooking time and a few tablespoons more water.
When making larger batches, keep the rice-to-water ratio the same, but don’t exceed the maximum fill line in your cooker. For very small batches (less than 1 cup), add an extra tablespoon of water to prevent drying out.
Insider tip: The more rice you cook, the longer the pressure takes to build and release. Total time goes up, but the rice itself cooks the same.

Credit: www.youtube.com
Cleaning And Maintenance Tips
Rice starch can leave a film or sticky residue in your pressure cooker. Here’s how to keep your cooker in top shape:
- Clean the lid and sealing ring after each use. Starch buildup can cause odors or poor sealing.
- Wipe the inner pot with a soft sponge—avoid harsh scrubbers that damage the surface.
- Check the pressure valve regularly to ensure it’s not clogged with rice bits.
- Dry thoroughly before storing to prevent rust or mold.
Little-known fact: Some pressure cookers have a “rice” button, but manual control often gives better results. Experiment to find what works best for you.
Creative Ideas: Flavored Rice In The Pressure Cooker
Plain rice is just the beginning. You can easily add flavor by tossing in a few extras:
- Sauté onions or garlic in the pot with oil before adding rice and water.
- Add spices like cumin, turmeric, or bay leaves for an aromatic boost.
- Use broth (chicken, vegetable, or beef) instead of water for extra richness.
- Stir in peas, corn, or diced carrots before cooking for a one-pot meal.
- Mix in coconut milk for creamy, tropical rice.
The pressure cooker locks in flavors, so even simple additions can transform your rice.
Troubleshooting: Fixing Common Issues
Even with the best guidance, problems can happen. Here’s how to rescue your rice:
- Rice too wet or mushy: Next time, use less water or reduce the cooking time by 1–2 minutes.
- Rice too dry or hard: Add a few tablespoons of water, seal, and cook for another minute.
- Burn message (in electric cookers): This usually means not enough water. Always deglaze the bottom of the pot if you sauté first.
If you’re stuck, most pressure cooker brands offer support, and online forums are full of tips from experienced users. For more in-depth science on rice cooking, check out this Wikipedia article on rice cookers.
Frequently Asked Questions
How Much Rice Can I Cook In A Pressure Cooker At One Time?
Most pressure cookers can safely cook up to 4–6 cups of uncooked rice (which becomes 8–12 cups cooked). Never fill more than halfway with rice and water, as rice expands and can block the valve.
Can I Cook Rice And Other Foods Together In The Pressure Cooker?
Yes, you can. Layering rice with vegetables or meats creates one-pot meals. Make sure everything cooks at a similar rate or cut ingredients into small pieces so they finish together.
Should I Soak Rice Before Pressure Cooking?
Soaking is optional for white rice but recommended for brown and wild rice. Soaking shortens cooking time and can improve texture, but is not required for most pressure cooker recipes.
Why Is My Rice Sticking To The Bottom Of The Pot?
Sticking often happens if you use too little water or skip oil/butter. Stainless steel pots are more prone to sticking than nonstick. Adding a teaspoon of oil and stirring before sealing usually solves the problem.
Is Pressure-cooked Rice Healthy?
Pressure-cooked rice is as healthy as rice cooked by other methods. Brown rice retains more nutrients than white. Some studies suggest pressure cooking can reduce certain contaminants (like arsenic) in rice, but the difference is small.
Cooking rice in a pressure cooker is fast, easy, and reliable when you know the right steps. With these tips, you’ll get perfectly cooked rice every time, whether you’re feeding a family or meal-prepping for the week. Try different grains, experiment with flavors, and enjoy the convenience of your pressure cooker.
Consistency and confidence in the kitchen are just a few pressure-cooked meals away.
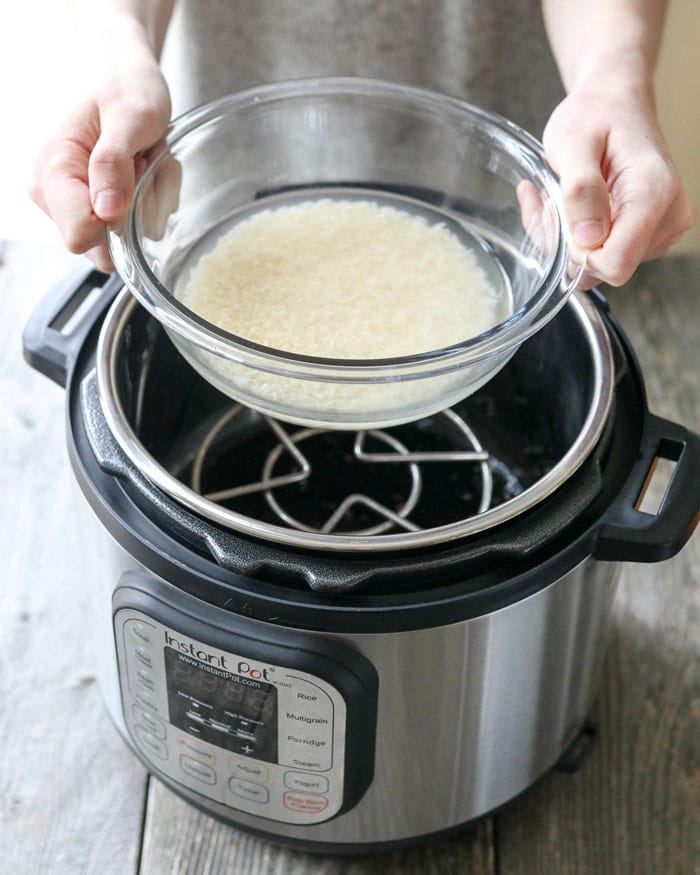
Credit: detoxinista.com

Hello, This is Annie Walker, a 38-year-old blogger, founder, and editor of Cookware Guider from NY, USA. I am a cookware fanatic and passionate cooker. I love to cook with different types of cooking appliances (example: all types of cookware, rice cookers, slow cookers, etc) almost every day in my kitchen. I love to share my experience with my readers in my blog. Also, I enjoy helping people to solve their problems through my website. You can follow me on Twitter & Pinterest. To know details about my blog please check the about us page.