Are you ready to make your desserts even better? Knowing how to melt chocolate in a saucepan is a simple skill that can transform your baking and cooking.
Whether you want to drizzle chocolate over your favorite treats or create smooth sauces, mastering this technique will save you time and frustration. Keep reading, and you’ll learn easy steps to melt chocolate perfectly every time—no guesswork, no burnt mess.
Your sweet creations are about to get a delicious upgrade!
Credit: www.craftsy.com
Choosing The Right Chocolate
Choosing the right chocolate is important for melting success. Different chocolates melt differently. Some are smooth and creamy, while others can be thick or grainy. Picking the correct type helps you get the best texture and flavor. It also makes melting easier and faster.
Types Of Chocolate For Melting
Chocolate comes in many forms. Baking chocolate is made for melting and cooking. It has no added sugar or milk. Dark chocolate has a strong cocoa flavor and melts well. Milk chocolate is sweeter and softer. White chocolate is creamy but can be tricky to melt. Choose chocolate based on your recipe and taste.
Quality Matters
Good quality chocolate melts better and tastes richer. Cheap chocolate may have fillers and less cocoa. These can cause it to burn or seize. Look for chocolate with cocoa butter, not vegetable oils. Higher cocoa content means smoother melting. Always check the ingredients before buying.

Credit: www.bbcgoodfood.com
Preparing Your Saucepan
Preparing your saucepan is the first step to melt chocolate smoothly. A clean and suitable pan helps chocolate melt evenly. It also stops burning or sticking. Take time to get your saucepan ready before melting chocolate.
Selecting The Best Saucepan
Choose a saucepan with a thick bottom. Thin pans heat unevenly and may burn chocolate. Medium size works best for small chocolate amounts. Stainless steel or heavy-duty non-stick pans are great choices. Avoid aluminum pans as they can react with chocolate.
Cleaning And Drying
Wash your saucepan thoroughly before use. Remove any grease or food residue. Even a small amount of oil can stop chocolate from melting well. Dry the pan completely with a clean towel. Water drops can cause chocolate to seize and become grainy.
Chopping Chocolate Evenly
Chopping chocolate evenly is an important step before melting it in a saucepan. Small, uniform pieces melt at the same speed. This helps avoid burning or uneven melting. It also makes stirring easier and smoother. Take your time chopping chocolate for the best results.
Why Size Matters
Chocolate pieces that are too big take longer to melt. This can cause some parts to burn while others stay hard. Small pieces melt faster and more evenly. This keeps the chocolate smooth and glossy. Even-sized pieces make heating gentle and controlled.
Safe Chopping Tips
Use a sharp knife to cut chocolate. A dull knife can slip and cause injury. Place the chocolate on a stable cutting board. Hold the chocolate firmly but carefully. Chop slowly and with light pressure. Keep fingers away from the knife path. Clean your knife between cuts for smooth chopping.
Melting Chocolate On The Stove
Melting chocolate on the stove is a classic way to get smooth, creamy chocolate for baking or dipping. It lets you control the heat better than a microwave. This method uses a simple saucepan and careful attention to prevent burning.
Using the stove helps the chocolate melt evenly. You can watch it closely and stir as needed. The key is gentle heat and steady stirring. This keeps the chocolate shiny and perfect for your recipes.
Setting The Heat Right
Start with low heat on your stove. High heat can burn chocolate quickly. Use a heavy-bottomed saucepan to spread heat evenly. Keep the heat steady and avoid sudden changes.
Watch the chocolate closely as it warms. Remove the pan from heat if it melts too fast. Slow melting keeps the chocolate smooth and thick. Patience pays off here.
Stirring Techniques
Use a wooden spoon or silicone spatula to stir. Stir gently and often to spread the heat. Scrape the sides and bottom to avoid sticking.
Stirring helps the chocolate melt evenly. It stops hot spots from forming. Keep stirring until the chocolate is fully melted and glossy.
Avoiding Common Melting Mistakes
Melting chocolate in a saucepan is simple but needs care. Small mistakes can cause chocolate to seize or burn. Avoiding common errors saves time and keeps chocolate smooth and shiny. Focus on heat and moisture control for best results.
Preventing Overheating
Chocolate burns easily if the heat is too high. Use low heat on your stove. Stir chocolate often to spread the heat evenly. Remove the pan from heat as soon as chocolate starts to melt. Keep checking so it does not get too hot.
Handling Moisture Issues
Water can ruin melted chocolate. Even a small drop causes chocolate to seize. Make sure your saucepan and spoon are dry. Avoid steam near the chocolate. If chocolate clumps, add a tiny bit of oil or butter to smooth it out.
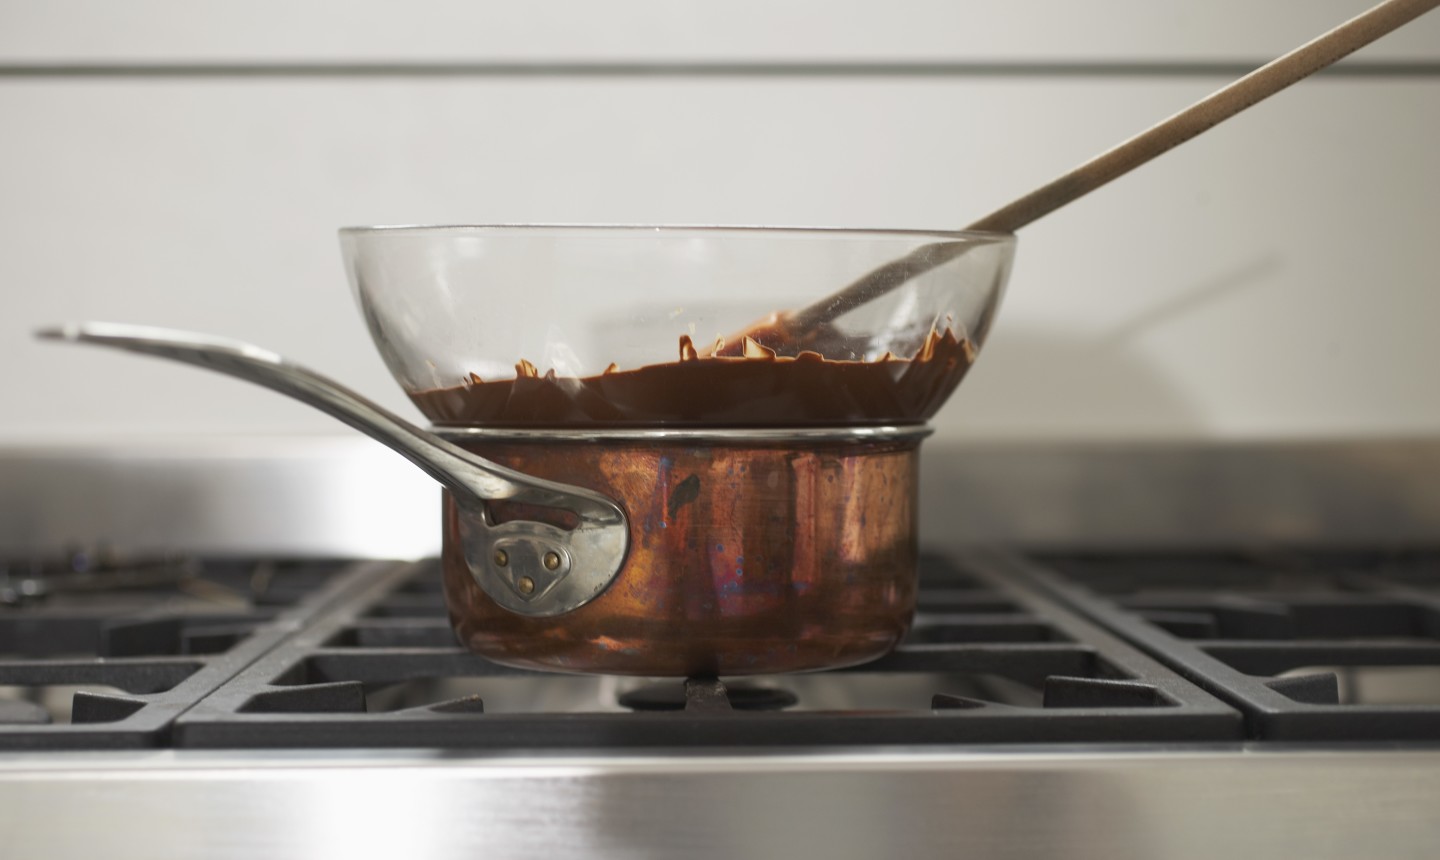
Using A Double Boiler Alternative
Melting chocolate needs care to avoid burning or seizing. A double boiler is often used, but not everyone has one. You can easily mimic this setup using common kitchen items. This method is safe and gentle, giving you smooth, melted chocolate every time.
Simulating A Double Boiler
Find a saucepan and a heatproof bowl that fits on top. Fill the saucepan with a few inches of water. Make sure the water does not touch the bottom of the bowl. Place the bowl on top of the saucepan. Heat the water gently on low to medium flame. Put chopped chocolate in the bowl. Stir the chocolate slowly as it melts. The steam heats the bowl, melting the chocolate without direct heat.
Benefits For Chocolate
This method prevents chocolate from burning or clumping. It melts the chocolate evenly and keeps it smooth. The gentle heat stops the chocolate from drying out. It is easy to control the temperature using this setup. You avoid the risk of water mixing with chocolate. This results in shiny, creamy melted chocolate perfect for recipes.
Testing For Perfect Smoothness
Testing for perfect smoothness is key to melting chocolate in a saucepan. It ensures the chocolate is ready for use in recipes or as a dip. Smooth melted chocolate has a glossy look and flows easily. You want to avoid grainy or thick chocolate, which means it overheated or seized. Checking the chocolate often helps catch the perfect moment to stop heating.
Visual And Texture Checks
Look closely at the chocolate’s surface. It should be shiny and even. No lumps or dry patches should appear. Stir the chocolate gently with a spatula. The texture should feel silky and fluid. If it looks clumpy or thick, the chocolate needs more gentle heating. Smooth chocolate coats the spatula without sticking or breaking.
When To Stop Heating
Stop heating once the chocolate is fully melted and smooth. Keep the heat low to avoid burning. Remove the saucepan from heat just before the last bits melt. Stir those bits off the heat until smooth. Overheating causes the chocolate to become grainy or hard. Perfectly melted chocolate stays warm but flows easily.
:max_bytes(150000):strip_icc()/Southern-Living_SEOBatch46_Chocolate-lava-cake_Step1_4065-469fc4e50e28484ead16afe04282374a.jpg)
Credit: www.southernliving.com
Tips For Storing Melted Chocolate
Storing melted chocolate correctly keeps it smooth and ready for use. Improper storage can cause it to harden or form lumps. Follow simple steps to keep melted chocolate fresh and easy to work with later.
Cooling Down Safely
Let melted chocolate cool at room temperature. Avoid putting it in the fridge or freezer right away. Rapid cooling can cause the chocolate to seize or become grainy. Pour chocolate into a clean, dry container. Cover it loosely to keep dust out. Keep it away from heat and moisture until fully cooled.
Reheating Without Clumps
Reheat melted chocolate gently to avoid lumps. Use a double boiler or low heat on the stove. Stir often with a spatula for even melting. Never use high heat; it burns chocolate quickly. If chocolate thickens, add a small amount of vegetable oil or butter. Stir well to restore smoothness and shine.
Frequently Asked Questions
How Do You Melt Chocolate In A Saucepan?
To melt chocolate in a saucepan, use low heat and stir constantly. Avoid direct high heat to prevent burning. Add small water drops if needed for smoothness. Stir until fully melted and glossy for best results.
Can I Melt Chocolate Directly On The Stove?
Melting chocolate directly on the stove is risky. Use low heat and stir frequently to avoid burning. Alternatively, use a double boiler method for more control and even melting.
How Long Does It Take To Melt Chocolate In A Saucepan?
Melting chocolate in a saucepan takes about 5 to 10 minutes. Use low heat and stir continuously. Time varies based on chocolate type and quantity. Avoid overheating to keep chocolate smooth.
Should I Add Water When Melting Chocolate In A Saucepan?
Avoid adding water when melting chocolate directly in a saucepan. Even small amounts can cause chocolate to seize. Use dry utensils and a low heat setting for smooth melting.
Conclusion
Melting chocolate in a saucepan is simple and quick. Use low heat to avoid burning. Stir often to keep chocolate smooth. Small pieces melt faster and more evenly. Watch closely to stop melting at the right time. This method works well for baking and cooking.
Now, you can add melted chocolate to many recipes. Enjoy making treats with your perfectly melted chocolate!

Hello, This is Annie Walker, a 38-year-old blogger, founder, and editor of Cookware Guider from NY, USA. I am a cookware fanatic and passionate cooker. I love to cook with different types of cooking appliances (example: all types of cookware, rice cookers, slow cookers, etc) almost every day in my kitchen. I love to share my experience with my readers in my blog. Also, I enjoy helping people to solve their problems through my website. You can follow me on Twitter & Pinterest. To know details about my blog please check the about us page.