Using a food slicer can make meal prep faster, easier, and more consistent. Whether you want perfect potato chips, thin deli meats, or even slices of fruit for a salad, a food slicer is your friend in the kitchen. But many beginners feel uncertain about how to use a slicer safely, which types to choose, and how to get the most from this handy tool. This article covers everything you need to know: from choosing the right slicer to step-by-step usage, cleaning, safety, and practical slicing tips. Read on to master your food slicer and make your kitchen routines smoother and smarter.
What Is A Food Slicer?
A food slicer is a kitchen tool designed to cut food items into even slices. The most common types are manual slicers and electric slicers. Manual slicers often look like simple boards with adjustable blades, while electric slicers usually resemble small machines with spinning blades.
Food slicers are used for:
- Slicing vegetables (potatoes, cucumbers, carrots)
- Cutting bread
- Preparing deli meats
- Making cheese slices
- Creating fruit slices
The main benefit is uniformity. Each slice is the same thickness, improving both presentation and cooking consistency. For example, when you bake potato chips, even slices mean every chip cooks at the same rate. In sandwiches, uniform meat or cheese slices prevent lopsided stacking and give each bite the same taste and texture. Beginners often notice that their knife-cut slices are uneven, which can lead to burnt edges or undercooked centers. Using a slicer solves this common problem.
Another overlooked advantage is speed. Slicing large amounts of vegetables or meat by hand can take a long time, especially if you want thin, precise pieces. With a food slicer, you can process more food in less time, making it easier to prepare meals for family gatherings or weekly meal prep.
Types Of Food Slicers
Choosing the right slicer starts with knowing the types available. Here’s a closer look at the most popular slicers.
Manual Slicers
Manual slicers are affordable, easy to store, and simple to use. They don’t require electricity. The most common manual slicer is the mandoline.
Mandoline slicers have a flat surface with an adjustable blade. You slide food across the blade to make slices. Some mandolines come with attachments for julienne or wavy cuts. Many models also offer different blade materials, like ceramic or stainless steel, which affect sharpness and durability. Stainless steel is generally more durable and stays sharp longer, making it a better investment for frequent use.
Other manual slicers include:
- Cheese slicers: For slicing blocks of cheese.
- Egg slicers: For cutting boiled eggs into even slices.
Manual slicers are great for small kitchens because they take up little space and are usually quick to clean. They’re handy for daily salad prep or quick snacks.
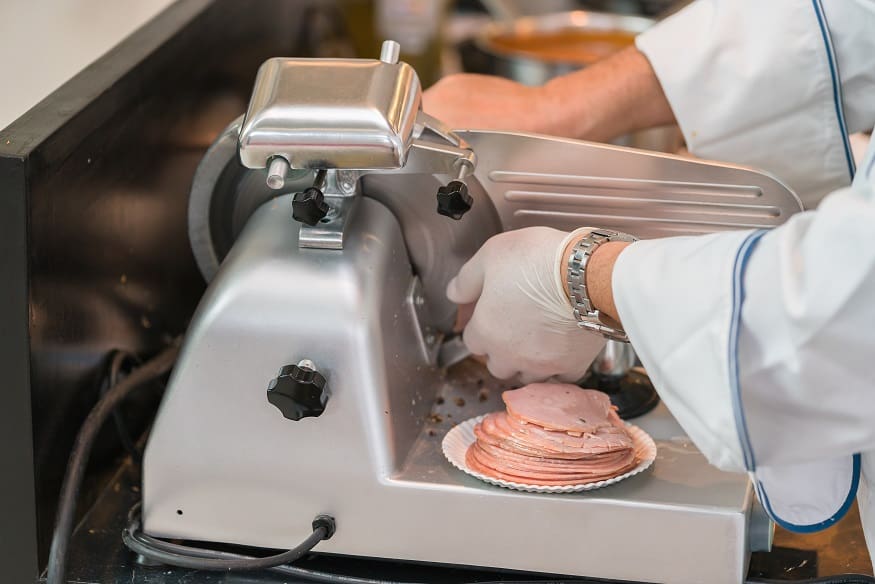
Electric Slicers
Electric food slicers are more powerful and precise. They work well for slicing large quantities or tougher foods like meat and bread.
Common features:
- Adjustable thickness dial
- Rotating blade powered by a motor
- Safety guard for hands
Electric slicers are often used in delis or restaurants, but many home models are available. One non-obvious benefit is the ability to slice large items, such as whole roasts or big blocks of cheese, which would be difficult or unsafe with a manual slicer.
Electric slicers also maintain steady speed and pressure, resulting in very consistent slices.
Some electric slicers offer extra features like removable trays, suction feet for stability, and even self-sharpening blades. If you plan to slice different types of foods often, these features can save you time and effort.
Specialty Slicers
Some slicers are made for specific foods:
- Tomato slicers: Designed for soft fruits and vegetables
- Meat slicers: Heavy-duty, often electric, for raw or cooked meat
- Vegetable spiralizers: For creating noodle-like shapes
Specialty slicers are useful if you make a lot of one type of dish. For example, a tomato slicer makes perfect slices without crushing the fruit, which is ideal for burgers and salads.
Comparing Types Of Slicers
Here’s a table comparing manual and electric slicers:
| Type | Best For | Cost | Ease of Use | Cleaning |
|---|---|---|---|---|
| Manual (Mandoline) | Vegetables, cheese, fruit | $15–$40 | Easy | Simple |
| Electric | Meat, bread, large volume | $70–$250 | Moderate | Requires disassembly |
| Specialty | Specific foods | $10–$60 | Very easy | Quick |
Credit: thedaringkitchen.com
How To Choose The Right Food Slicer
Picking a food slicer depends on what you plan to slice, your budget, and your kitchen space.
- Purpose: Decide what foods you want to slice. For vegetables and fruit, a manual mandoline works well. For meats and bread, an electric slicer is better.
- Size: Consider storage. Mandoline slicers are compact. Electric slicers can be large and need counter space.
- Adjustable Thickness: Look for models with easy-to-change thickness settings. This allows you to make thin or thick slices.
- Safety Features: Choose slicers with finger guards and non-slip bases.
- Cleaning: Removable blades and parts make cleaning easier.
Many beginners miss the importance of blade quality. Stainless steel blades stay sharp longer and resist rust. Also, check if replacement blades are available for your model.
If you have limited hand strength or arthritis, an electric slicer can help reduce effort. For families with kids, always pick models with strong safety features, such as a locking blade or child-proof storage.
Here’s a comparison of features to look for:
| Feature | Manual Slicer | Electric Slicer |
|---|---|---|
| Adjustable Thickness | Common | Standard |
| Finger Guard | Included | Included |
| Non-slip Base | Optional | Standard |
| Removable Parts | Blade only | Multiple parts |
How To Use A Food Slicer: Step-by-step Guide
Using a food slicer is simple once you learn the basics. Here’s a detailed guide for both manual and electric slicers.
Step 1: Prepare Your Food
Wash and dry your food before slicing. Remove stems, skins, or bones if needed. For uniform slices, cut food into manageable pieces.
- Vegetables: Peel and trim edges for better grip.
- Meat: Chill meat slightly for easier slicing.
- Bread: Use fresh or day-old bread for clean cuts.
Drying food is important—wet or slippery food is harder to control and can cause accidents. For large vegetables like cabbage or onions, cut them in half so they fit better on the slicer. If you want extra thin slices for salads or chips, use firm vegetables and avoid overripe fruits, which may fall apart.
Step 2: Set Up The Slicer
Place your slicer on a flat, stable surface. For manual slicers, attach any blade or thickness adjusters. For electric slicers, plug in and set the thickness dial.
- Ensure the non-slip base is secure.
- Attach finger guards or food holders.
A common mistake is skipping this step, which can make the slicer wobble or slide during use. Always check stability before starting.
Step 3: Adjust Blade Settings
Choose your desired slice thickness. Most slicers have a dial or lever. For thin chips, use the lowest setting. For sandwich meat, choose a thicker option.
If your slicer has multiple blade types, pick the right one for your task. For example, use a straight blade for basic slices and a julienne blade for matchstick cuts. Testing on a small piece first helps avoid wasting food.
Step 4: Start Slicing
Manual Slicer
- Place the food on the slicer surface.
- Hold the food with the safety guard.
- Slide the food smoothly across the blade, pressing gently.
- Collect slices on a plate or tray.
Move food slowly at first, then increase speed as you get comfortable. Keep your hands behind the safety guard at all times.
Electric Slicer
- Place food in the holder or tray.
- Turn on the slicer.
- Push the food toward the spinning blade using the pusher.
- Let the slices fall onto the tray.
Tip: Don’t force food through the blade. Gentle, steady pressure gives cleaner slices.
If slicing a large item, reposition it as needed to finish. For best results, keep your movements smooth—jerky motions can cause uneven cuts.
Step 5: Collect And Inspect Slices
Stack your slices and check thickness. If slices are uneven, adjust the blade and try again.
You can organize slices by size or shape, especially for recipes that need uniform pieces. If you find a lot of scraps, adjust your technique or blade. Practicing with inexpensive vegetables can help you improve before slicing expensive meats or cheeses.
Step 6: Clean Up
Turn off and unplug electric slicers before cleaning. Remove blades and wash parts with warm soapy water. Dry all parts thoroughly before storing.
Clean up right away to prevent food from drying on the blades, which makes them harder to clean and can cause rust. Use a soft brush for sharp corners, and never use your fingers to wipe the blade.
Safety Tips For Using A Food Slicer
Food slicers have sharp blades. Safety is critical.
- Always use the safety guard or food holder.
- Keep fingers away from blades.
- Never reach inside the slicer when it’s plugged in.
- Clean blades only when the slicer is off and unplugged.
- Store blades safely, out of reach of children.
Beginners often ignore the safety guard, thinking it slows them down. This is risky. One slip can cause serious injury. Also, always cut away from your body.
Another easy-to-miss tip is to avoid distractions while slicing. Focus on the task, and don’t multitask. If you need to pause, set the food and pusher down before walking away.
Cleaning And Maintenance
Proper cleaning keeps your slicer safe and long-lasting.
Manual Slicers
- Remove the blade before cleaning.
- Wash blade and frame with warm soapy water.
- Dry all parts to prevent rust.
Check if your slicer is dishwasher-safe, but hand washing is gentler on blades and plastic parts. For stuck-on food, soak parts briefly in warm water.
Electric Slicers
- Unplug before cleaning.
- Remove blade, tray, and guards.
- Wash parts separately.
- Wipe the machine’s body with a damp cloth.
Tip: Never submerge electric slicers in water. Moisture can damage the motor.
Maintenance
- Sharpen blades as needed. Most blades stay sharp for months, but dull blades make slicing harder.
- Check screws and attachments regularly.
- Lubricate moving parts (for electric slicers) with food-safe oil.
If your slicer starts making unusual noises, stop and check for trapped food or loose parts. A well-maintained slicer is quieter, safer, and lasts longer.

Credit: www.youtube.com
Common Mistakes When Using Food Slicers
Even experienced users make mistakes. Here are some to avoid:
- Skipping the safety guard: Leads to finger injuries.
- Using dull blades: Causes uneven slices and makes cutting harder.
- Wrong thickness setting: Results in slices that are too thin or thick.
- Slicing warm meat: Meat should be slightly chilled for clean slices.
- Not cleaning after use: Food residue can cause rust and odors.
Many users forget to dry all parts after cleaning, which leads to rust. Always dry blades and metal parts completely.
Another mistake is overloading the slicer. Trying to slice large or hard foods in one go can strain the machine or cause jams. Cut big items into smaller pieces first.
Practical Uses For Food Slicers
Food slicers are versatile. Here are some practical examples:
- Potato chips: Uniform slices cook evenly and look appealing.
- Deli meats: Make homemade sandwich slices with consistent thickness.
- Vegetable salads: Thin cucumber and carrot slices for a crisp salad.
- Cheese platters: Even cheese slices for serving.
- Fruit platters: Thin apple, pear, or melon slices for presentation.
You can also use slicers for meal prep, such as slicing onions or peppers for fajitas, or prepping vegetables for stir fry. If you make dehydrated snacks, a slicer helps create thin, even pieces that dry at the same rate, preventing waste.
Restaurants use electric slicers to save time and maintain quality. At home, slicers help with meal prep for parties, lunches, or healthy snacks.

Credit: www.simpleitaliancooking.com
Advanced Slicing Techniques
Once you’re comfortable with basic slicing, try these advanced techniques.
Julienne Slicing
Some mandolines have attachments for julienne cuts—thin strips used in salads and stir fries. Adjust the blade and slice food lengthwise.
Julienne carrots or zucchini for Asian dishes, or use the strips as a topping for soups and noodle bowls. This cut is difficult to do evenly by hand, but a slicer makes it simple.
Wavy And Crinkle Cuts
Special blades create wavy or crinkle shapes, perfect for chips or decorative salads.
Wavy cuts add texture to vegetables, making them more interesting for kids or party trays. Crinkle-cut potatoes hold onto sauces and dips better, so they’re great for appetizers.
Thickness Control
For layered dishes, like gratins or casseroles, adjust the thickness to match recipe needs. Thinner slices cook faster, thicker slices hold more texture.
For example, in a classic potato gratin, using slices that are 2–3 mm thick ensures they cook through but don’t turn mushy. For ratatouille, slightly thicker slices keep the vegetables from breaking apart.
Slicing Frozen Foods
Some electric slicers can handle frozen meat or bread. This is useful for preparing thin slices for stir fry or sandwiches.
If you want to slice cooked meat thinly for a hot pot or shabu-shabu, partially freeze the meat first, then slice. This technique is often used in Asian cuisines and gives professional-looking results at home.
Food Slicer Statistics And Trends
Food slicers have become more popular in recent years. According to a market report, the global food slicer market size was valued at $4.2 billion in 2026 and is expected to grow by 6% annually.
- Home use is increasing, especially for healthy meal prep.
- Electric slicers are gaining popularity due to convenience.
- Mandolines remain popular for their affordability.
A survey found that 63% of home cooks who own a slicer use it weekly, mainly for vegetables and bread.
Another trend is the rise of specialty slicers for plant-based diets. With more people eating vegetables, spiralizers and mandolines are in higher demand. Food bloggers and cooking shows often feature these tools, inspiring home cooks to try new recipes.
Comparing Popular Food Slicer Brands
When buying a food slicer, brand reputation matters. Here’s a comparison of three popular brands:
| Brand | Type | Price Range | Main Features |
|---|---|---|---|
| OXO | Manual (Mandoline) | $20–$50 | Easy thickness adjustment, sturdy guard |
| Chef’s Choice | Electric | $120–$250 | Powerful motor, multiple thickness settings |
| KitchenAid | Specialty | $30–$70 | Spiralizer attachment, quick cleaning |
Other well-known brands include Cuisinart, Borner, and Mueller. Checking reviews and warranty information helps you pick a reliable model.
Food Slicer Recipes And Ideas
You can use a food slicer for many recipes. Here are a few ideas:
- Potato Gratin: Slice potatoes thinly for even cooking.
- Homemade Chips: Slice potatoes or sweet potatoes, bake or fry.
- Cucumber Salad: Thin cucumber slices with vinegar and herbs.
- Fruit Tart: Even apple slices for topping.
- Deli Sandwich: Slice roast beef or turkey thinly for sandwiches.
Tip: For best results, use chilled foods and sharp blades.
Other creative uses include slicing beets for roasting, making zucchini ribbons for low-carb lasagna, or slicing citrus fruits for drinks and desserts. The more you use your slicer, the more ideas you’ll discover.
Troubleshooting Common Food Slicer Problems
If your food slicer isn’t working well, here’s how to fix common issues.
Uneven Slices
- Check if the food is flat against the blade.
- Adjust thickness dial.
- Sharpen or replace blade if needed.
If food is too soft, chill it before slicing. For hard foods, slow down your slicing motion for more control.
Slicer Won’t Turn On
- Ensure it’s plugged in.
- Check safety lock (many slicers won’t start unless locked).
- Clean contacts if dirty.
If the motor overheats, let it cool before restarting. Regular maintenance prevents most issues.
Food Sticks To Blade
- Use drier foods.
- Clean blade between slices.
- Use a little oil on blade for sticky foods.
For extra sticky foods like cheese, chill before slicing and wipe the blade often.
Slices Too Thick Or Thin
- Adjust dial or lever.
- Try slicing a test piece and adjust.
If your slicer doesn’t have fine adjustments, practice finding the best setting for your preferred thickness.
Slicer Accessories And Extras
Many slicers come with accessories to make slicing easier.
- Food holder: Keeps hands safe.
- Interchangeable blades: For different shapes and sizes.
- Cleaning brush: For removing food bits from blades.
- Storage case: Keeps blades organized.
Some high-end electric slicers offer self-sharpening blades. This is useful for frequent use.
Other helpful extras include suction cups for stability, storage racks, and recipe booklets for inspiration. Accessories can add value and make your slicer more versatile.
Food Slicer Myths And Facts
Many people believe slicers are only for professionals or are too dangerous. Here are some facts:
- Myth: Slicers are only for chefs.
Fact: Home models are designed for easy, safe use.
- Myth: Slicers are hard to clean.
Fact: Most modern slicers have removable parts for easy cleaning.
- Myth: Slicers waste food.
Fact: Slicers help you use every part of the food, reducing waste.
Another myth is that slicers are too expensive. In reality, there are affordable options for every budget.
Environmental Impact Of Food Slicers
Food slicers help reduce waste by allowing you to slice food evenly and use all parts. However, electric slicers use power. If you want to be more eco-friendly, use manual slicers.
Blades made from stainless steel are recyclable. Choose slicers with replaceable parts to extend their life.
Manual slicers also avoid plastic waste from pre-sliced store foods, and let you slice just what you need, reducing spoilage.
Food Slicer Alternatives
If you don’t have a food slicer, you can use a knife or a food processor. Here’s a quick comparison:
| Tool | Speed | Uniformity | Safety |
|---|---|---|---|
| Knife | Slow | Low | Moderate |
| Food Processor | Fast | Medium | High |
| Food Slicer | Fast | High | High |
Knives are versatile but require skill for even slices. Food processors are fast but don’t always give perfect shapes. Food slicers balance speed, precision, and safety.
Buying Tips And Where To Get Food Slicers
You can buy food slicers at kitchen stores, online retailers, or department stores. Look for trusted brands and check reviews. Consider warranty and return policies.
Tip: Don’t buy the cheapest model. Invest in quality for safety and durability.
Check the slicer’s size and weight if you have limited storage space. If you shop online, read customer feedback for real-life performance tips.
For more details on slicer types and safety, check Wikipedia.
Frequently Asked Questions
What Foods Can I Slice With A Food Slicer?
You can slice vegetables, fruits, bread, cheese, and meats. Some slicers have attachments for special cuts like julienne or crinkle. Always check your slicer’s manual for recommended foods.
How Do I Clean A Food Slicer Safely?
First, unplug electric slicers. Remove blades and parts. Wash with warm soapy water and dry completely. Use a brush for tough spots. Never submerge electric slicers.
Is A Food Slicer Safe For Beginners?
Yes, if you follow safety instructions. Always use the finger guard and keep hands away from blades. Read the manual and start slow.
Can I Slice Frozen Foods With A Food Slicer?
Some electric slicers can handle frozen foods, especially meats and bread. Check your model’s instructions. Slicing frozen food may require more force.
How Often Should I Sharpen Or Replace Slicer Blades?
Sharpen blades every few months if used often. If slices become uneven or blade feels dull, replace it. Stainless steel blades last longer and resist rust.
Using a food slicer can transform your kitchen routine. With the right slicer, proper safety, and a little practice, you’ll enjoy faster prep and consistent results. From crispy chips to perfect sandwiches, a slicer is a smart investment for any home cook.
Remember to choose carefully, follow safety tips, and clean your slicer well. Soon, slicing will be the easiest part of your cooking day.

Hello, This is Annie Walker, a 38-year-old blogger, founder, and editor of Cookware Guider from NY, USA. I am a cookware fanatic and passionate cooker. I love to cook with different types of cooking appliances (example: all types of cookware, rice cookers, slow cookers, etc) almost every day in my kitchen. I love to share my experience with my readers in my blog. Also, I enjoy helping people to solve their problems through my website. You can follow me on Twitter & Pinterest. To know details about my blog please check the about us page.