
You can achieve perfectly transparent results by using directional freezing to force air bubbles and impurities to the bottom of your container. This method, often called the ice chest method, works because water freezes from the top down, pushing gases into the remaining liquid below. How to make clear ice is a process that relies on a slow cooling rate to prevent cloudiness. You’ll need a small insulated cooler, fresh water, and about 24 hours of patience to see the best results.
Ideal candidates for clear ice
This method is for the home bartender or the person who wants a professional look for their drinks. You likely have a cocktail set or a love for spirits and want your ice to look like the high-end cubes found in luxury bars. You already know that standard tray ice is cloudy and melts quickly, but you might not know why.
This page serves people who have a small, portable insulated cooler and a freezer with enough space to fit it. If you’re looking for a way to make 50 cubes at once in an hour, this page isn’t for you. That isn’t possible with current home refrigeration technology. We assume you have a standard kitchen freezer that maintains a temperature near zero degrees Fahrenheit. If your freezer is colder or warmer, your timing will change. This guide focuses on the controlled, slow-freezing technique that produces the most consistent results. If you don’t have a dedicated cooler, you’ll struggle to achieve the same clarity because the insulation is what forces the directional freezing process.
Factors affecting your results
The most important factor is the speed of freezing. Slow freezing allows dissolved gases and minerals to escape the crystal structure, which is why a well-insulated container is essential. If you freeze your water too fast, the impurities get trapped in the center.
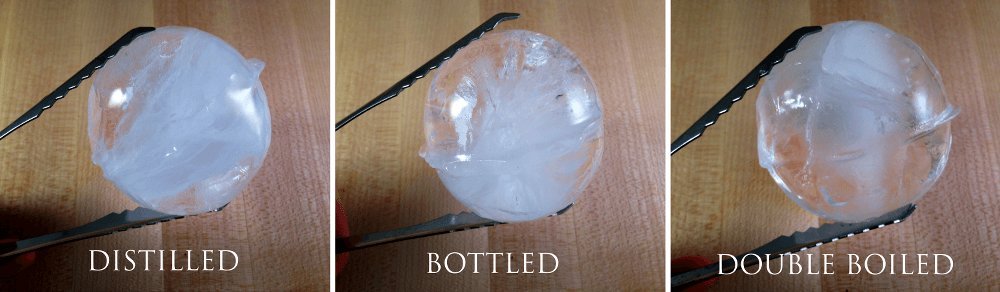
Water quality also plays a role in the final appearance. While standard tap water works for many, using filtered or distilled water can reduce the mineral content. Minerals often create a white, cloudy core even when directional freezing is used. If your tap water has high mineral content, you’ll notice a distinct difference when switching to filtered water.
The size and shape of your cooler influence the outcome. A smaller cooler will freeze faster, while a larger one allows for a slower, more complete process. Aim for a container that fits comfortably in your freezer without blocking airflow. If you block the vents, your freezer will work harder and may fluctuate in temperature.
Finally, the amount of time you leave the ice in the freezer matters. If you pull it out too early, the bottom layer will still be liquid and cloudy. If you leave it too long, the freezing front will reach the very bottom and trap the impurities against the base. Check the progress after 20 hours to find the “sweet spot” for your specific freezer. Most people make the mistake of checking too often, which lets warm air into the cooler and ruins the slow-freeze effect.
How To Make Clear Ice: Step-by-Step
- Fill your small, insulated cooler with fresh, filtered water until it’s about two inches from the top.
- Place the cooler into your freezer without a lid; the lack of a lid allows the top surface to freeze first.
- Leave the cooler undisturbed for 24 hours in a standard freezer set to zero degrees Fahrenheit.
- Remove the cooler from the freezer once the top layer is solid and the bottom remains liquid.
- Tip the block out of the cooler onto a clean towel; you’ll see the cloudy, impure ice at the bottom.
- Use a serrated bread knife or a mallet and chisel to chip away the cloudy bottom section from the clear top block.
- Cut the remaining clear block into cubes of your desired size using a sharp knife and a light tap.
- Store the finished clear cubes in a sealed freezer bag to prevent them from absorbing odors.
The judgement call here is knowing exactly when to pull the cooler. If you wait until the entire block is solid, the impurities will be frozen into the bottom of your clear ice. You want to stop when the top 70% is clear and solid, leaving the bottom 30% as slushy, cloudy water. This is the difference between a professional result and a block that’s still cloudy throughout. According to the Centers for Disease Control and Prevention, using treated or filtered water is a standard way to ensure your ice is free from unwanted particles.
Variations in ice clarity
Different situations require different approaches to manage your time and output.
| Situation | What to do | What it takes | What to watch for |
|---|---|---|---|
| Large batches | Use larger cooler | 36-48 hours | Freezer space |
| Small cubes | Use silicone mold | 12-16 hours | Mold placement |
| High mineral water | Use distilled water | Extra cost | Clarity levels |
| Fast chilling | Use thin molds | 6-8 hours | Surface cracks |
| Long storage | Use airtight bags | 5 minutes | Freezer burn |
The most common mistake is failing to account for directional freezing. If you want crystal-clear ice, you must force the water to freeze from the top down. Using a cooler with the lid removed creates this effect by insulating the sides and bottom. If you skip this, trapped air bubbles will cloud the center of your cubes.
The decision rule is simple: if you prioritize aesthetics for cocktails, use the cooler method. If you prioritize volume for everyday cooling, use standard silicone trays. You can tell which result you’ll get by checking your freezer temperature. If it’s set below -5°F, your ice will freeze too rapidly, trapping impurities regardless of the container.
If you notice a cloudy core despite these steps, your mold is likely too deep. A mold depth of three inches or less is the sweet spot for consistent, glass-like transparency. Keeping your ice in airtight bags is vital for long-term storage. Without this seal, the ice will sublimate, picking up the odors of nearby food and losing its smooth, polished finish within 72 hours.
Quality differences
Preparation and technique
The key to success is keeping the water surface exposed to the cold air while insulating the sides and bottom. If you insulate the top, you stop the directional freezing process entirely. Experienced people always ensure the cooler sits level so the ice grows evenly across the surface. Beginners often try to speed things up by turning the freezer temperature down, but this causes the water to freeze too quickly and traps bubbles.
Managing the final block
Once you have your clear block, the way you cut it defines the final quality. Always let the block sit on the counter for five minutes before you try to cut it. This tempers the ice and prevents it from shattering when you apply pressure. Use a heavy-duty serrated knife and apply steady, even force rather than trying to hack through the block in one go. If you rush this part, you’ll get uneven, jagged edges.
Common issues and fixes
| What you notice | What it usually means | What to do first | How to stop it happening again |
|---|---|---|---|
| Cloudy center | Froze too fast | Use more insulation | Turn freezer temp up |
| White streaks | Mineral content | Use distilled water | Filter your water |
| Cracked ice | Thermal shock | Let it sit | Temper before cutting |
| Ice smells bad | Freezer odors | Wash the cooler | Use airtight bags |
| Uneven block | Cooler was tilted | Level the freezer | Adjust the shelf |
The primary mistake beginners make is ignoring the rate of cooling. If the exterior of your ice block freezes solid before the core, the expanding water has nowhere to go. This trapped pressure creates the internal fractures that shatter your block when you strike it.
If your ice looks like a jagged web of white lines, you have thermal shock. You can distinguish this from mineral streaks by checking the texture. Mineral streaks feel smooth to the touch, while thermal cracks are sharp and brittle. If you see these cracks, stop immediately. Let the block sit at room temperature for fifteen minutes before you attempt to cut it.
For odor issues, the culprit is often porous plastic. If you store ice in an open container, the cooler absorbs the scent of nearby frozen onions or fish. If washing the cooler doesn’t remove the smell, the plastic has already been compromised. In that case, you must switch to food-grade silicone molds to prevent flavor transfer.
Finally, check your freezer’s levelness with a standard bubble tool. Even a three-degree tilt will cause the water to pool toward one side, resulting in a block that’s dangerously thin at one edge. If you can’t level the shelf, place a small shim under the low corner of your container to ensure a uniform freeze.
Legal and safety rules
When making ice for consumption, you must follow basic hygiene standards to prevent contamination. Always use food-grade containers that are free of BPA, as cheaper plastics can leach chemicals into the water during the long freezing process. If you’re using a cooler meant for camping, ensure it’s thoroughly cleaned with soap and hot water before use. Never use a container that previously held chemicals or non-food items, as the plastic can absorb residues that may contaminate your ice. If you’re unsure about the safety of your water source, check the local water quality report provided by your municipality.
The real cost of clear ice
Making clear ice costs you mostly in time and freezer space rather than money. You’re using the same electricity your freezer already consumes, but the process takes 24 hours of dedicated space. The cost of filtered water is negligible, usually mere cents per batch.
The real “cost” is the loss of freezer storage for other foods while the cooler is in place. A standard insulated cooler takes up roughly one-third of a typical top-freezer unit. If you have a family of four, this displacement often forces you to move frozen staples like meat or vegetables to a secondary chest freezer or risk thawing.
The decision rule is simple: if you host fewer than two events per month, don’t dedicate permanent space to a cooler. Instead, use a silicone directional freezing mold. These molds occupy only four inches of shelf space and yield four cubes at a time.
A common mistake is using tap water, which traps air bubbles regardless of the freezing method. This costs you the clarity you seek, resulting in cloudy centers despite the long wait. If your ice remains opaque, switch to distilled water. The cost difference is pennies, but the mineral profile of tap water is the primary culprit for structural cloudiness.
If you value your freezer space, this might be a luxury you only reserve for special occasions or cocktail nights. For daily use, settle for standard cubes and prioritize the quality of the spirit instead.
Keeping your ice right
Once your ice is made, store it in a way that protects its clarity. Ice acts like a sponge, absorbing volatile compounds from nearby foods. If your freezer contains open containers of onions, fish, or pungent herbs, your cubes will inevitably carry those flavors into your glass. Use a high-quality, airtight freezer bag or a sealed plastic container to create a physical barrier against these odors.
You can’t fix this, so discard those pieces and start a fresh batch.
To determine if your storage method is working, check the surface of the cube after 48 hours. If the edges appear rounded or the surface feels tacky, your container isn’t airtight.
A common mistake is storing ice in the freezer door. Frequent temperature fluctuations from opening and closing the door accelerate the sublimation process, leading to rapid freezer burn. Instead, place your container at the very back of the freezer where the temperature remains constant. If you’re hosting a party, move the ice to a dedicated cooler or a secondary freezer 30 minutes before serving. This prevents the cubes from sticking together, ensuring you can easily portion them into individual glasses without using a heavy mallet or force.
When to avoid this method
These units intentionally warm their internal coils to melt frost, causing the surrounding air temperature to fluctuate by as much as 10 degrees. These rapid shifts force the ice to melt and refreeze at the surface, creating internal fractures and a cloudy, “cracked” appearance.
If you have a busy household where the freezer door is opened constantly, the internal temperature will never remain stable enough for the slow-freeze process. Every time the door opens, the ambient air rushes in, disrupting the directional freezing required for total clarity. If your freezer is located in a high-traffic kitchen rather than a garage or basement, the constant thermal shock will ruin the crystal structure before it can fully form.
You can determine if your freezer is suitable by checking for a “frost-free” or “auto-defrost” label on the interior wall. In these cases, you’re better off buying pre-made clear ice blocks from a specialty supplier.
The decision rule is simple: if you can’t maintain a steady temperature for 24 hours without the compressor cycling or the door opening, the method will fail.
Frequently asked questions
Can I use tap water for clear ice?
Yes, you can use tap water, but it often contains minerals that create a white core. If you want the clearest results, start with distilled or filtered water to remove the particles that cause cloudiness.
How long does it take to freeze?
It usually takes 24 hours for a standard-sized insulated cooler to freeze the top layer correctly. This assumes your freezer is set to zero degrees Fahrenheit and the cooler isn’t blocked by other items.
Is it safe to use a camping cooler?
Yes, as long as it’s food-grade and thoroughly cleaned. Avoid using coolers that have held non-food items, as the plastic can trap odors and chemicals that will contaminate your ice.
What happens if I freeze it for too long?
If you leave the ice in the freezer for more than 24 to 30 hours, the freezing front will reach the bottom. This traps all the impurities in the base of your block, which ruins the clarity.
Does the cooler lid need to stay off?
Yes, the lid must be removed so the top surface of the water is directly exposed to the freezing air. This promotes the directional freezing process that drives the bubbles and impurities downward.
Why is my ice still cracking?
Cracking usually happens because you’re trying to cut the ice while it’s too cold or too hard. Let the block sit at room temperature for five minutes to temper before you start cutting.
Does the shape of the cooler matter?
Yes, a square or rectangular cooler is best because it’s easier to cut into uniform cubes. Round containers work fine for clarity, but you’ll have more waste when cutting them into standard shapes.
Clear Ice, in short
Start by placing your cleaned, food-grade cooler in the back of your freezer where the temperature is most stable. You should see a clear, solid layer of ice on top after 24 hours. If the ice remains cloudy, stop and check that your freezer isn’t set too cold or that your water filter is working properly.
Related guides

Hello, This is Annie Walker, a 38-year-old blogger, founder, and editor of Cookware Guider from NY, USA. I am a cookware fanatic and passionate cooker. I love to cook with different types of cooking appliances (example: all types of cookware, rice cookers, slow cookers, etc) almost every day in my kitchen. I love to share my experience with my readers in my blog. Also, I enjoy helping people to solve their problems through my website. You can follow me on Twitter & Pinterest. To know details about my blog please check the about us page.