Installing an electric cooktop is an exciting home upgrade. It can make your kitchen more modern and efficient. But many people worry about the process because it involves electrical work and precise measurements. The truth is, installing a cooktop electric is possible for most homeowners, especially if you prepare well and follow each step carefully.
This guide will show you how to do it safely, explain common mistakes, and share tips that even some professionals forget. You’ll also learn what to expect during the process so you feel confident at every stage, from planning to turning on your new appliance for the first time.
Preparing For Installation
Before you start, it’s important to plan. Installing an electric cooktop requires both electrical knowledge and careful measurements. A little extra time spent preparing can save you hours of frustration later.
Checking Power Supply
Most electric cooktops need a 240-volt power supply. Check your kitchen’s electrical outlet. If you only have a standard 120-volt outlet, you will need to upgrade. This usually requires a licensed electrician. Never use an extension cord or try to modify the plug yourself.
Key data: Most electric cooktops use between 30–50 amps. Check your cooktop’s manual for the exact requirement.
You’ll often find a double breaker labeled “range” or “cooktop” in your main panel for this circuit. If your breaker panel is already full, adding a new circuit might require upgrading your electrical service—a step that could impact your budget and timeline.
Measuring The Space
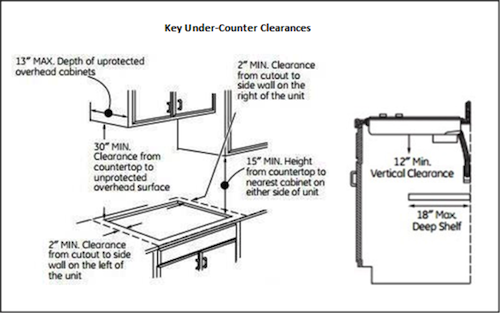
Measure the width, depth, and height of the space in your countertop. Add at least 1/4 inch extra on each side for easy fitting. Compare this to the cooktop’s dimensions.
If you’re replacing an existing unit, don’t assume new models are exactly the same size. Even a small difference can create gaps or require extra trimming. If you have a stone countertop (like granite or quartz), cutting it may need a special blade or a professional installer.
| Cooktop Size | Minimum Countertop Opening | Clearance Needed |
|---|---|---|
| 30 inches | 28.5 x 19.5 inches | 2 inches on all sides |
| 36 inches | 34.5 x 21.5 inches | 2 inches on all sides |
Also, check the depth below the counter. Some cabinets have drawers or supports that can interfere with wiring or the cooktop body. Most cooktops need at least 4 inches of open space underneath for ventilation and wiring.
Gathering Tools And Materials
You will need:
- Tape measure
- Level
- Screwdriver
- Wire stripper
- Drill (if cutting new holes)
- Electrical tester
- Safety gloves and goggles
If replacing an old cooktop, check for existing wiring and condition.
It’s also smart to have a vacuum handy for cleaning up dust after cutting, and a flashlight to check under the counter. For stone or tile counters, painter’s tape along the cut lines can help prevent chips.
Removing The Old Cooktop
If you are replacing an existing unit, follow these steps for safe removal:
- Turn off power at the circuit breaker.
- Use an electrical tester to confirm there is no power at the cooktop.
- Remove screws or brackets holding the old cooktop.
- Disconnect the wires carefully, noting their colors and positions.
- Lift the cooktop out of the countertop.
Tip: Take a photo of the wiring before you disconnect anything. This can help with reconnecting later.
Sometimes, old cooktops are sealed with adhesive or caulk. Use a utility knife to gently cut the seal before lifting. If the cooktop feels stuck, wiggle it gently—never force it, as this can crack the countertop.
Credit: www.naturalhandyman.com
Cutting The Countertop Opening
If you are installing a cooktop for the first time, you may need to cut a hole in your countertop.
Marking The Cut
Lay the cooktop’s template (usually included with the product) on your countertop. Use a pencil to outline the area.
If your cooktop did not come with a template, measure carefully and create your own using cardboard. Double-check your lines before cutting, since mistakes are hard to fix.
Cutting Safely
Use a jigsaw or circular saw to cut along the lines. Wear safety goggles and gloves. Go slowly to avoid chipping the countertop.
Common mistake: Not checking for wires or pipes under the cutting area. Always look underneath before cutting.
If your countertop is made of laminate, use a fine-toothed blade to prevent chipping. For tile, drill starter holes in the corners to insert the jigsaw blade. If you’re unsure about cutting stone or quartz, it’s worth hiring a pro—fixing a cracked stone counter is expensive and difficult.
A vacuum attachment near the cut can help reduce dust. Always have someone help support the cut-out piece so it doesn’t fall and damage the cabinet below.
Connecting The Electrical Wiring
This is the most important step. Safety first: If you are not comfortable with wiring, hire a licensed electrician.
Identifying Wires
Most electric cooktops have three or four wires:
- Black (hot)
- Red (hot)
- White (neutral)
- Green or bare (ground)
Check the wire insulation for labels, and compare with the wiring diagram in your cooktop’s manual. If the wires look damaged or corroded, replace them before installing the new cooktop.
Wiring Steps
- Turn off power at the breaker again, even if you did earlier.
- Strip about 1/2 inch of insulation from each wire.
- Connect wires from the cooktop to the home wiring using wire nuts:
- Black to black
- Red to red
- White to white
- Green/bare to ground
- Tighten all connections and cover with electrical tape.
- Secure wires so they don’t touch hot surfaces.
Some cooktops have a metal junction box under the unit. Make sure all connections fit inside, and attach the cover securely to protect the wires.
| Wire Color | Function | Typical Connection |
|---|---|---|
| Black | Hot | Black wire in house |
| Red | Hot | Red wire in house |
| White | Neutral | White wire in house |
| Green/Bare | Ground | Ground wire in house |
Non-obvious insight: Older homes may have only three wires. If this is the case, consult the cooktop manual and consider an upgrade. Newer cooktops require four-wire connections for safety.
Another detail: Some manufacturers use a copper bonding strap between neutral and ground in the cooktop’s wiring box. If your home has four wires, remove this strap. Leaving it can create a shock hazard.
Credit: www.youtube.com
Installing The Cooktop Into The Countertop
Once the wiring is done, it’s time to set the cooktop in place.
Positioning
Lower the cooktop gently into the opening. Make sure it sits flat and level. Use a level to check. Adjust as needed.
Even a slight tilt can cause pots to slide or liquids to pool on one side. If the cooktop doesn’t sit flush, check for wires or debris underneath.
Securing
Most cooktops have brackets or screws to hold them in place. Follow the manufacturer’s instructions. Tighten screws but don’t over-tighten, as this can crack the glass.
Tip: Run a bead of heat-resistant silicone around the edge to seal gaps and prevent spills from leaking below.
If your counter is uneven, foam strips or shims can help stabilize the cooktop. Never use regular caulk—choose a type rated for high temperatures.
Testing And Final Adjustments
Now it’s time to test your installation.
- Turn on power at the breaker.
- Switch on each burner to check if it heats up.
- Check for any unusual smells, sounds, or smoke.
- Test all controls (temperature, timer, etc. ).
- Confirm the cooktop is stable and doesn’t move.
If anything seems wrong, turn off the power and check connections again.
Data point: According to the National Fire Protection Association, electrical cooking equipment causes about 43% of home kitchen fires. Testing carefully can help prevent accidents.
Also, check for warm spots around the wiring box—overheating wires are a red flag. Let the cooktop run for at least 5–10 minutes on low and high settings to ensure stable operation.
Extra tip: Save your cooktop’s manual and wiring diagram in a kitchen drawer. This helps with future repairs or troubleshooting.
Comparing Electric Cooktop Types
Not all electric cooktops are the same. Here are the main types and their differences:
| Type | Heating Method | Efficiency | Price Range |
|---|---|---|---|
| Coil | Metal coils heat up | Moderate | $200–$500 |
| Radiant (Glass) | Under-glass heating element | High | $300–$1,000 |
| Induction | Magnetic field heats pan | Very high | $500–$2,000 |
Non-obvious insight: Induction cooktops need special magnetic pans. If you don’t own these, factor in extra cost.
Radiant glass cooktops are easier to clean but can show scratches more than coil types. Coil cooktops are the cheapest, but some people find them less stylish. Induction is the fastest and most energy-efficient, but only works with compatible cookware (cast iron, most stainless steel).
Safety Tips And Common Mistakes
Safety Tips
- Always work with the power off.
- Use insulated tools.
- Wear gloves and goggles.
- Double-check all connections.
- If unsure, call an electrician.
A fire extinguisher rated for electrical fires should be nearby any kitchen. Don’t use water on electrical fires.
Common Mistakes
- Incorrect wire connections: Mixing up hot and neutral wires can cause fires or shocks.
- Poor measurements: Cooktop doesn’t fit, leading to costly countertop repairs.
- Skipping grounding: Grounding prevents electrical shock.
- Ignoring local codes: Some areas require permits or inspections.
- Not sealing edges: Spills can damage cabinets below.
Example: One homeowner forgot to seal the edge, leading to water damage under the cooktop after several months.
Another common error: Not checking if the breaker matches the amperage of the new cooktop. If the breaker is too small, it will trip often; if too large, it may not protect your wiring.
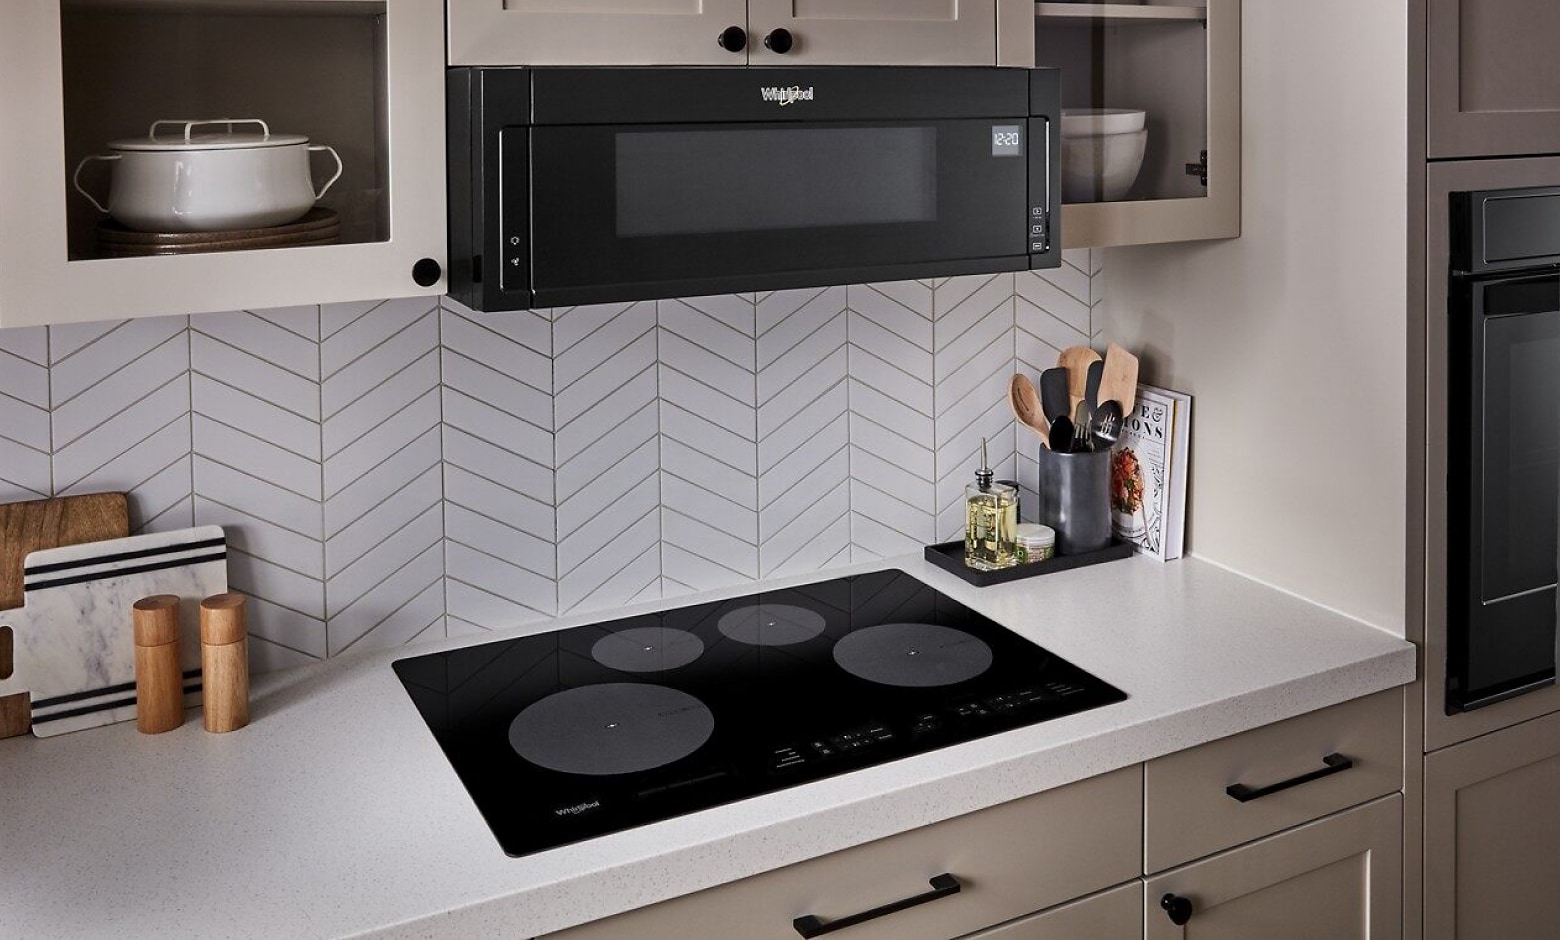
Credit: www.whirlpool.com
Maintaining Your Electric Cooktop
Proper maintenance keeps your cooktop working well and safe.
- Clean with a soft cloth and mild cleaner.
- Avoid abrasive pads that scratch glass.
- Check wires yearly for signs of wear.
- Make sure controls respond smoothly.
- Replace damaged parts quickly.
Tip: Register your cooktop online for warranty support and safety recalls. You can find more details at Consumer Reports.
For glass cooktops, use cleaners made for glass-ceramic surfaces to avoid residue. For coil types, remove and clean drip pans regularly.
Non-obvious insight: Spills left on radiant or induction cooktops can bake onto the surface and become hard to remove. Clean up messes as soon as the surface is cool.
Frequently Asked Questions
How Long Does It Take To Install An Electric Cooktop?
Most installations take 2–4 hours. Replacing an old cooktop is faster. Cutting a new opening or upgrading electrical wiring may take longer.
In older homes with outdated wiring, plan for extra time—sometimes a full day if new circuits are needed.
Can I Install An Electric Cooktop Myself?
Yes, if you have basic electrical skills and proper tools. For complex wiring or new circuits, hire a licensed electrician.
What Is The Safest Way To Connect Wiring?
Always turn off power at the breaker, use wire nuts, and follow the cooktop’s manual. Never use tape alone or twist wires without nuts.
Do I Need Special Cookware For Electric Cooktops?
For induction cooktops, you need magnetic pans. For coil or radiant types, any flat-bottomed cookware works.
How Do I Know If My Kitchen Has The Right Power Supply?
Check the outlet under your countertop. Electric cooktops need a 240-volt outlet with the correct amperage. If unsure, ask a professional to inspect it.
Installing an electric cooktop can make your kitchen more functional and stylish. With careful planning, the right tools, and attention to safety, you can do it yourself and save money. If you ever feel unsure, don’t hesitate to get help.
Enjoy your new cooktop, and remember to maintain it for lasting performance. The extra time spent planning and checking details will pay off for years of safe, enjoyable cooking.

Hello, This is Annie Walker, a 38-year-old blogger, founder, and editor of Cookware Guider from NY, USA. I am a cookware fanatic and passionate cooker. I love to cook with different types of cooking appliances (example: all types of cookware, rice cookers, slow cookers, etc) almost every day in my kitchen. I love to share my experience with my readers in my blog. Also, I enjoy helping people to solve their problems through my website. You can follow me on Twitter & Pinterest. To know details about my blog please check the about us page.