Slicing apples with a food processor is a game-changer for anyone who wants to save time in the kitchen. Whether you’re making apple pie, preparing snacks, or storing apples for later use, learning to use your food processor for slicing delivers consistent results quickly.
Many people still use knives for slicing apples, but once you discover how efficient a food processor can be, you’ll never go back. This guide will help you understand every step, from choosing the right apples to cleaning your machine after slicing.
You’ll also learn practical tips, common mistakes, and how to get perfect slices every time. Even if you’re new to kitchen appliances, you’ll find this article easy to follow.
Choosing The Best Apples For Slicing
Not all apples are the same. When you slice apples in a food processor, the type and freshness matter.
Firm apples work best. They hold their shape and produce even slices. Soft apples often get mushy, and the slices are less attractive and harder to use.
Popular choices include:
- Granny Smith: Tart and crisp, perfect for pies and salads.
- Honeycrisp: Sweet, juicy, and holds its shape.
- Fuji: Firm and sweet, good for snacks.
- Gala: Slightly softer but still holds up well if fresh.
Avoid apples that are bruised or soft. They can clog your processor or produce uneven slices.
Insider tip: If you want very thin slices for chips or drying, choose apples that are extra firm, such as Granny Smith or Pink Lady. These varieties are less likely to break apart during slicing.
Preparing Apples Before Slicing
Proper preparation is essential for clean, safe slicing. Follow these steps:
- Wash apples thoroughly: Dirt or pesticide residue can end up in your slices. Rinse under cold water, and use a brush if needed.
- Peel apples (optional): Peeling is not required, but some recipes and snacks taste better without skin. If you prefer skinless slices, use a vegetable peeler.
- Remove the core: The core contains seeds and tough parts. Use an apple corer or a small knife. If you don’t have a corer, slice the apple into quarters and cut out the core by hand.
- Cut apples to fit the processor feed chute: Most food processors have a narrow chute. Cut apples into halves, quarters, or smaller pieces if needed.
Non-obvious tip: Don’t cut apples too small. Overly small pieces can slip through the slicing disc and result in uneven slices or jams. Aim for pieces that are just small enough to fit comfortably in the chute.
Setting Up Your Food Processor
Before you start slicing, make sure your food processor is ready. The right setup prevents mistakes and saves time.
- Choose the slicing disc: Most food processors come with several discs. Look for the one labeled as “slicing.” It usually has a flat, sharp blade.
- Select slice thickness: Some processors offer adjustable discs. Common thicknesses are 1/8 inch, 1/4 inch, and 1/2 inch. For pies and snacks, 1/8 or 1/4 inch is ideal.
- Assemble the processor: Place the slicing disc onto the spindle inside the processor bowl. Secure the lid tightly.
- Place a bowl under the chute: If your processor ejects slices through a chute, use a bowl to catch them.
Practical tip: Double-check the disc is locked in place. Loose discs can cause uneven slices or damage the machine.
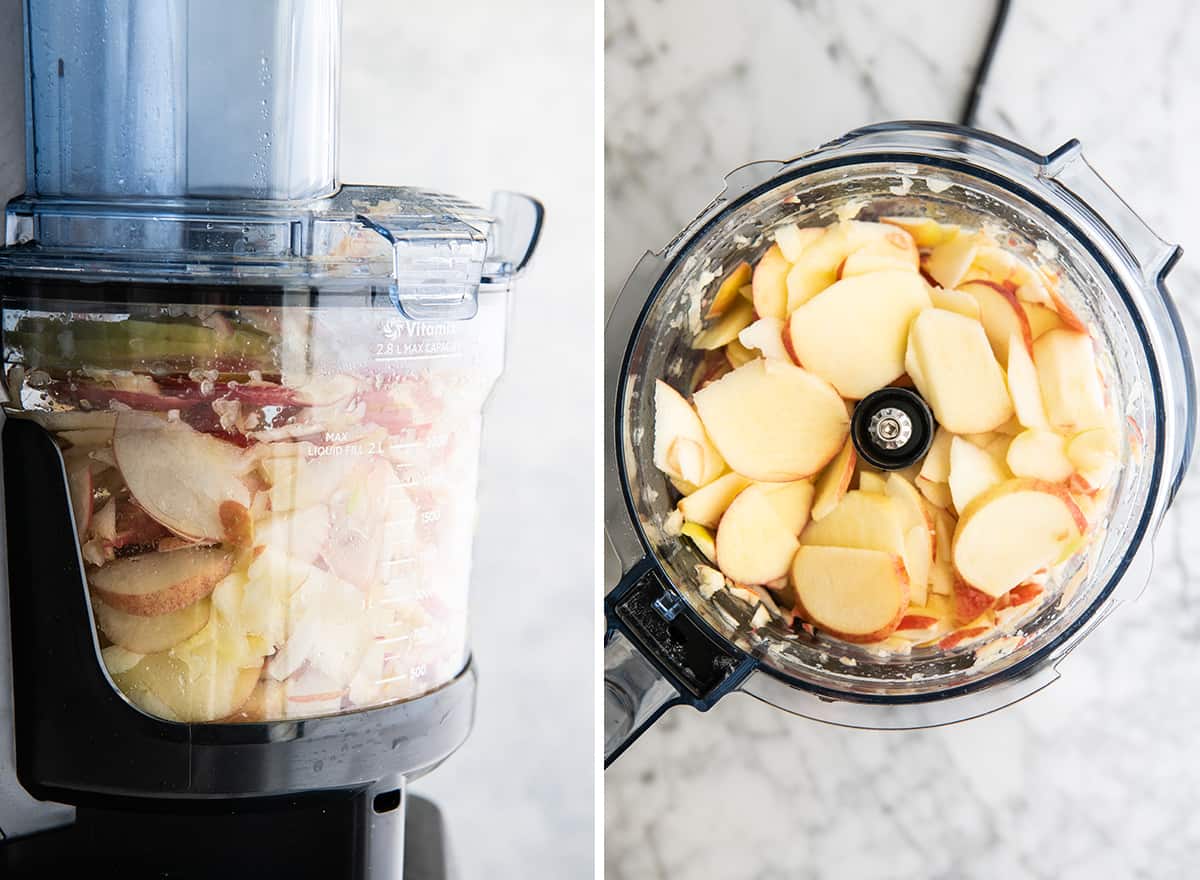
Slicing Apples In The Food Processor
Now comes the main step: slicing apples. This process is fast and simple if you follow these instructions.
- Turn on the processor: Start with the lowest speed setting if your processor offers speed control.
- Feed apple pieces into the chute: Use the pusher tool to gently guide apples onto the slicing disc. Don’t force them.
- Collect the slices: As apples are sliced, they fall into the bowl or processor container. Stop and check the slices for size and thickness after the first batch.
- Repeat until finished: Continue feeding apples until you have enough slices.
Common mistake: Overloading the chute or pushing apples too fast. This can jam the machine or result in broken slices. Always feed apples gently.
Example: For making apple pie, you might need 6 apples. You can slice all 6 in less than two minutes using a food processor, compared to 10–15 minutes by hand.
Comparing Hand Slicing Vs. Food Processor Slicing
Many people wonder if using a food processor is better than slicing apples by hand. Here’s a clear comparison:
| Method | Time Needed (6 apples) | Slice Consistency | Safety |
|---|---|---|---|
| Food Processor | 2 minutes | Very consistent | Safer (no sharp knife) |
| Hand Slicing | 10–15 minutes | Variable | Risk of cuts |
Key takeaway: Food processors are faster and safer. Slices are uniform, which helps with even cooking and better presentation.
Adjusting Slice Thickness And Texture
The thickness of your apple slices affects their texture and use. Here’s how to adjust:
- Thin slices (1/8 inch): Ideal for drying, making chips, or layering in pies.
- Medium slices (1/4 inch): Great for salads and snacking.
- Thick slices (1/2 inch): Suitable for roasting or grilling.
Some food processors allow you to change the disc or use a dial for thickness adjustment. If your model doesn’t have this feature, you’ll need to use the standard disc.
Non-obvious insight: Thicker slices often stay juicier when cooked, while thin slices crisp up faster. If you want apples to maintain their shape in baking, use medium or thick slices.
Cleaning And Maintaining Your Food Processor
After slicing apples, cleaning your processor is important. Apple juice and bits can stick to the blades and bowl.
- Unplug the processor: Always start by unplugging to avoid accidents.
- Remove the slicing disc carefully: The blade is sharp. Hold it by the edges.
- Wash all parts: Use warm, soapy water for the disc, bowl, lid, and pusher. Rinse well.
- Dry thoroughly: Moisture can cause rust on metal parts and attract mold.
- Inspect for stuck pieces: Check under the blade and around the spindle for apple bits.
Practical tip: If you slice many apples at once, rinse the disc and bowl halfway through. Sticky buildup can affect slicing quality and speed.
Using Sliced Apples: Storage And Recipes
Once you have perfectly sliced apples, you can use them in many ways. Here are some ideas:
- Apple pie: Uniform slices cook evenly and look beautiful in the crust.
- Apple chips: Thin slices can be baked or dried for a healthy snack.
- Salads: Medium slices add crunch and flavor to green salads or fruit salads.
- Roasted apples: Thick slices are great for roasting with cinnamon and sugar.
Storage tips:
- Refrigerate slices: Place in a sealed container with a few drops of lemon juice to prevent browning.
- Freeze slices: Lay slices on a tray, freeze, then store in bags. Frozen apples are good for smoothies or baking.
Insider tip: Sliced apples can turn brown quickly due to exposure to air. To keep slices fresh, use lemon juice or a mix of water and salt for a quick dip before storing.
Troubleshooting Common Slicing Problems
Even with the best setup, issues can happen. Here are solutions for common problems:
Apples Jam In The Chute
- Cut apples to fit the chute but not too small.
- Avoid feeding apples too quickly.
- Use firm apples for easier slicing.
Uneven Slices
- Make sure the slicing disc is installed correctly.
- Don’t overload the processor.
- Feed apples one piece at a time.
Slices Sticking Together
- Clean the disc and bowl if juice builds up.
- Separate slices gently after processing.
Processor Not Slicing
- Check if the disc is dull or damaged.
- Ensure the machine is fully assembled.
- Confirm apples are not too soft.
Non-obvious tip: Dull slicing discs are a hidden cause of bad results. Replace or sharpen discs every year if you use your processor often.
Comparing Popular Food Processor Brands For Apple Slicing
Choosing the right food processor can make apple slicing easier. Here’s a comparison of top brands:
| Brand | Disc Adjustability | Feed Chute Size | Ease of Cleaning |
|---|---|---|---|
| Cuisinart | Adjustable (1/8–1/2 inch) | Wide | Easy (dishwasher safe) |
| KitchenAid | Fixed & adjustable options | Medium | Easy |
| Hamilton Beach | Fixed discs | Wide | Moderate |
Practical advice: If you plan to slice apples often, choose a processor with a wide chute and adjustable slicing disc. Brands like Cuisinart are popular for their flexibility and ease of cleaning.
Credit: joyfoodsunshine.com
Safety Tips For Slicing Apples In A Food Processor
Food processors are safer than knives, but you should still follow basic safety rules.
- Always use the pusher tool: Never push apples with your hands.
- Keep fingers away from the blade: Slicing discs are very sharp.
- Don’t overload the processor: Too many apples can cause jams.
- Unplug before cleaning: Prevents accidental start.
- Inspect discs regularly: Replace if they show signs of wear.
Non-obvious insight: Many injuries happen when people clean the slicing disc. Always handle blades with care, and store them safely when not in use.
Real-life Example: Slicing Apples For A Large Event
Imagine you’re preparing apples for a school bake sale. You need to slice 30 apples quickly for several pies. Using a food processor, you can finish in under 10 minutes. By hand, it would take nearly an hour. You’ll also get even slices, which bake evenly and look professional.
Key lesson: When time matters, or you need many slices, a food processor is the best tool.
Apple Slicing Disc Types: What’s Best?
There are several types of slicing discs. Here’s how they compare:
| Disc Type | Slice Thickness | Best Use |
|---|---|---|
| Standard Slicing Disc | 1/4 inch | General slicing |
| Thin Slicing Disc | 1/8 inch | Chips and salads |
| Adjustable Disc | Varies (1/8–1/2 inch) | Flexible use |
Advice: If your processor offers an adjustable disc, it’s worth using. You can control the thickness and adapt for different recipes.
Avoiding Browning And Keeping Slices Fresh
Apple slices turn brown because of oxidation. Here’s how to keep them fresh:
- Dip slices in lemon juice: Acid slows browning.
- Soak in salt water: Use 1/2 teaspoon salt per quart of water for 5 minutes, then rinse.
- Store in airtight containers: Air exposure increases browning.
- Refrigerate immediately: Slows the browning process.
Practical tip: Apple slices used for pies can be stored in lemon water until ready to bake. The lemon flavor is mild and won’t affect the pie taste.

Credit: www.breville.com
Making Apple Chips: A Step-by-step Guide
If you want to use your sliced apples for chips, here’s a simple recipe:
- Slice apples thinly (1/8 inch) in the food processor.
- Dip slices in lemon water to prevent browning.
- Arrange slices on a baking sheet lined with parchment paper.
- Sprinkle with cinnamon or sugar (optional).
- Bake at 200°F for 2–3 hours, turning once. Chips are ready when dry and crisp.
- Cool and store in an airtight container.
Serving size: 2–3 apples make about 30 chips.
Insider tip: For extra crispiness, dry apple slices with a paper towel before baking. This removes excess moisture.
Slicing Apples For Freezing
If you want to freeze apple slices for later use:
- Slice apples to desired thickness.
- Dip in lemon water or salt water to prevent browning.
- Lay slices on a tray and freeze for 2 hours.
- Transfer frozen slices to bags and store up to 6 months.
Advice: Frozen apple slices are best used in baking, as they lose some crispness when thawed.

Credit: www.youtube.com
When Not To Use A Food Processor
While food processors are excellent for slicing apples, there are times when a knife is better:
- Decorative slices: If you need fancy shapes or garnishes.
- Very small quantities: For one apple, it’s faster to slice by hand.
- Soft or overripe apples: These can clog the machine.
Practical tip: For special dishes or presentation, use a sharp knife for more control.
Frequently Asked Questions
Can I Slice Apples With The Skin On?
Yes, you can slice apples with skin. The food processor handles both peeled and unpeeled apples. Some recipes work better without skin, but it’s optional.
What Thickness Is Best For Apple Pie?
For pies, 1/4 inch slices are ideal. They cook evenly and hold their shape. Too thin slices can turn mushy, while thick slices may not cook through.
Do Food Processors Work For All Apple Varieties?
Most processors work well with firm apple varieties. Soft apples may break apart or jam the machine. For best results, use apples like Granny Smith, Honeycrisp, or Fuji.
How Do I Keep Apple Slices From Browning?
Dip slices in lemon juice or salt water right after slicing. Store in airtight containers and refrigerate. This slows oxidation and keeps slices fresh.
Is It Safe To Clean The Slicing Disc By Hand?
Yes, but be careful. Slicing discs are sharp. Wash with a sponge or brush, not bare hands. Always unplug the processor before cleaning.
Slicing apples in a food processor is efficient and simple. With the right apples, preparation, and setup, you can get perfect slices every time. Whether you’re baking, snacking, or storing apples, this method saves time and gives consistent results. Remember to clean your processor well and follow safety tips. For more information about food processors, you can check Wikipedia’s food processor page. With these steps and insights, you’ll feel confident using your food processor for apples—and many other foods.

Hello, This is Annie Walker, a 38-year-old blogger, founder, and editor of Cookware Guider from NY, USA. I am a cookware fanatic and passionate cooker. I love to cook with different types of cooking appliances (example: all types of cookware, rice cookers, slow cookers, etc) almost every day in my kitchen. I love to share my experience with my readers in my blog. Also, I enjoy helping people to solve their problems through my website. You can follow me on Twitter & Pinterest. To know details about my blog please check the about us page.