
Sharpening a knife with a sharpening stone is a skill that makes cooking safer, easier, and more enjoyable. A sharp knife cuts cleanly and reduces the risk of accidents, while a dull blade can slip and cause injuries. Many people think sharpening is complicated or only for professionals, but anyone can learn it with some guidance.
This article will give you clear, step-by-step instructions for sharpening a knife with a stone, along with useful tips, mistakes to avoid, and answers to common questions. Whether you’re new to sharpening or want to improve your technique, you’ll find practical advice here.
Why Knife Sharpening Matters
A sharp knife is more than just a kitchen tool—it’s essential for good cooking. When a knife is sharp, it slices foods easily, which helps you work faster and keeps the food’s texture intact. Dull knives can crush ingredients, making cuts uneven and increasing the risk of injury.
Studies show that sharp knives are safer; according to the National Safety Council, kitchen accidents caused by dull knives are 2–3 times more common than those caused by sharp knives.
Sharp knives also last longer, since you don’t need to use as much force. This reduces wear and tear. If you cook often, keeping your knives sharp saves time and improves your results. Whether you’re cutting vegetables, meat, or bread, a sharp knife makes all the difference.
Understanding Sharpening Stones
Before you begin, it’s important to know about sharpening stones. These stones, also called whetstones, are blocks made from different materials. They help grind and polish the blade’s edge. There are several types of sharpening stones, each with unique qualities.
Types Of Sharpening Stones
- Oil Stones: Made from materials like aluminum oxide or novaculite. You use oil as a lubricant. They are durable and good for general sharpening.
- Water Stones: These stones require water instead of oil. They cut fast and are popular because they’re easy to clean.
- Diamond Stones: Have a layer of industrial diamond grit. They sharpen quickly and stay flat, but are usually more expensive.
- Ceramic Stones: Hard and durable, used mainly for finishing and polishing.
Here’s a simple comparison:
| Stone Type | Lubricant | Speed | Durability | Price |
|---|---|---|---|---|
| Oil Stone | Oil | Medium | High | Medium |
| Water Stone | Water | Fast | Medium | Medium-High |
| Diamond Stone | None/Water | Very Fast | Very High | High |
| Ceramic Stone | None/Water | Slow | High | Medium |
Grit Levels Explained
Sharpening stones come in different grit levels. Grit refers to how rough or smooth the stone’s surface is.
- Coarse (200–600 grit): Removes chips or fixes very dull blades.
- Medium (800–2000 grit): Used for sharpening and restoring the edge.
- Fine (3000–8000 grit): For polishing and finishing.
Choosing the right grit depends on your knife’s condition. If your knife is very dull, start with coarse. If it just needs a touch-up, use medium or fine.
Credit: www.youtube.com
Preparing To Sharpen
Getting ready to sharpen a knife is as important as the sharpening itself. Many beginners skip preparation, but it affects results.
Choose The Right Stone
Pick a stone based on your knife’s needs and your budget. For most home cooks, a water stone with 1000 grit (medium) and 6000 grit (fine) works well. Diamond stones are best for tough blades, but water stones are easier for beginners.
Gather Supplies
You’ll need:
- Sharpening stone (right grit for your knife)
- Lubricant (water or oil, depending on stone)
- Clean towel or cloth
- Bowl of water (if using a water stone)
- Angle guide (optional, helps set the sharpening angle)
- Knife (clean and dry)
Prepare Your Stone
If you’re using a water stone, soak it in water for 10–15 minutes before sharpening. The stone should stop bubbling, which means it’s ready. Oil stones need a few drops of oil spread on the surface. Diamond stones usually don’t need much preparation.
Safety First
Sharpening involves handling blades, so protect yourself:
- Keep your hands dry to avoid slipping.
- Use a stable surface, like a cutting board or countertop.
- Place a damp towel under the stone to keep it from sliding.
How To Sharpen A Knife Step By Step
Sharpening a knife is not difficult, but it does require attention and patience. Follow these steps to get a sharp, clean edge.
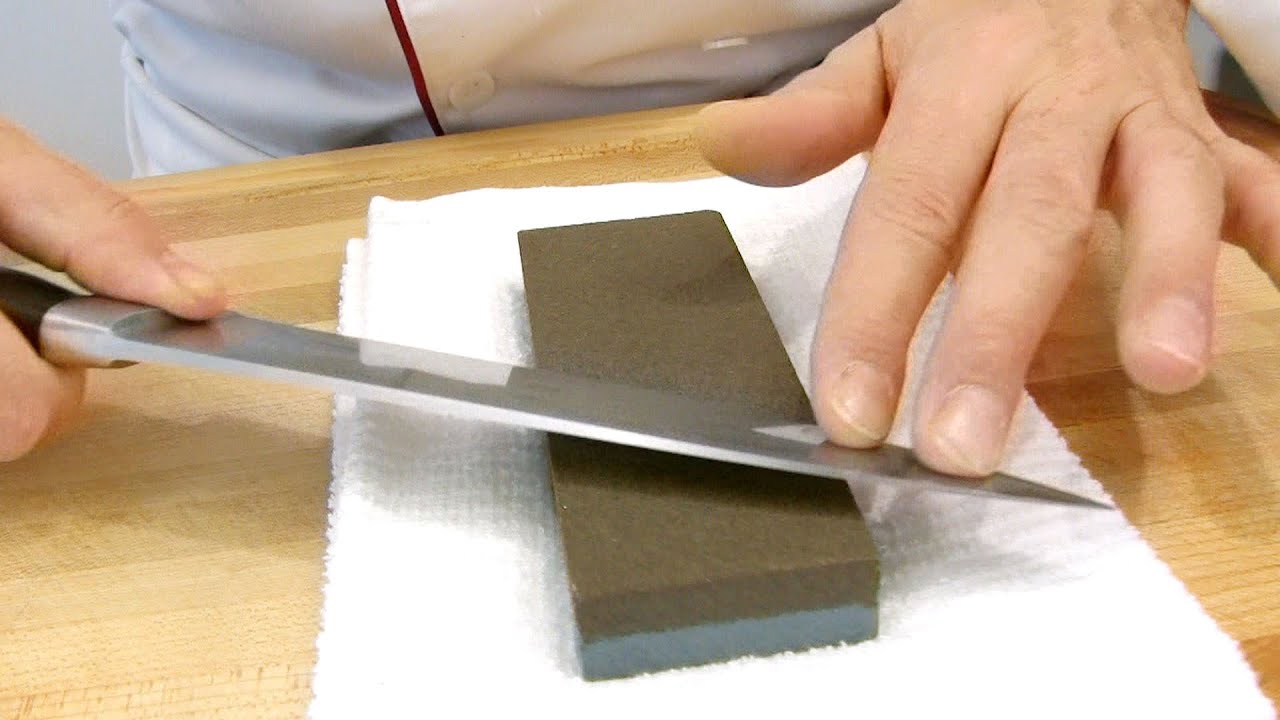
Step 1: Set The Sharpening Angle
Most kitchen knives are sharpened at a 15–20 degree angle. If you use an angle guide, attach it to the blade. If not, imagine the angle: a coin’s thickness between the blade and stone works for most knives. Japanese knives are often sharpened at 15 degrees, while Western knives use 20 degrees.
Step 2: Position The Knife
Place the knife’s heel (the part closest to the handle) on the stone. Hold the knife firmly with your dominant hand. Your other hand can rest on the blade to guide it and keep it steady.
Step 3: Start Sharpening
Push the knife across the stone, moving from heel to tip. Use gentle, even pressure. The motion should feel like slicing a thin layer off the stone. Repeat this action, keeping the angle consistent. For most knives, 10–15 strokes per side are enough.
Flip the knife and repeat on the other side. Always sharpen both sides evenly.
Step 4: Check Your Progress
After several strokes, check the blade. Run your finger lightly across (not along) the edge—if you feel a burr (a tiny ridge), you’re making progress. The burr signals the edge is forming.
Step 5: Move To Finer Grit
If you started with a coarse stone, switch to a finer stone for polishing. Repeat the sharpening process. This step removes scratches and smooths the edge.
Step 6: Clean And Test
Wipe the blade with a damp cloth. Test sharpness by slicing a sheet of paper or a tomato. A sharp knife should cut easily without crushing.
Here’s a simple summary of the process:
| Step | Action | Tip |
|---|---|---|
| 1 | Set angle | 15–20 degrees |
| 2 | Position knife | Heel on stone |
| 3 | Sharpen both sides | 10–15 strokes each |
| 4 | Check burr | Feel for ridge |
| 5 | Switch to fine grit | Repeat process |
| 6 | Clean and test | Paper or tomato |
:max_bytes(150000):strip_icc()/how-to-sharpen-knife-with-whetstone-995817_FINAL-5c3facdec9e77c00019976bf.png)
Credit: www.thespruceeats.com
Practical Sharpening Tips
Learning to sharpen takes practice. Here are tips to help you get better results and avoid common mistakes.
Use Consistent Pressure
Applying too much or too little pressure changes the edge. Aim for gentle, steady pressure. Think of the force needed to slice a cucumber—not too hard, not too soft.
Keep The Angle Steady
Changing the angle during sharpening makes the edge uneven. Beginners often tilt the knife, which creates a “wave” instead of a sharp line. Use an angle guide or watch your hand closely.
Don’t Rush
Sharpening is not a race. Slow, careful strokes give better results. Rushing can damage the blade or stone.
Clean The Stone Often
Metal shavings build up on the stone’s surface. Rinse or wipe the stone every few strokes to keep it effective.
Check For Burrs
A burr is a sign you’ve sharpened enough on one side. It’s a tiny metal ridge formed at the edge. When you feel it, switch sides. Many beginners miss this step, but it’s important for a sharp blade.
Finish With A Fine Grit
Polishing with a fine stone (3000–8000 grit) gives the knife a smooth, shiny edge. It also helps keep the knife sharper for longer.
Dry Your Knife And Stone
After sharpening, dry both items well. Water can cause rust, and oil can make knives slippery. Store your stone in a dry place.
Common Mistakes And How To Avoid Them
Even experienced cooks make errors when sharpening. Here are mistakes to watch for, plus solutions.
Using The Wrong Angle
Sharpening at too steep or too flat an angle can ruin the edge. Always use 15–20 degrees unless your knife’s instructions say otherwise.
Not Using Enough Strokes
Some people stop too soon, leaving the knife dull. Make sure you use enough strokes—usually at least 10 per side.
Ignoring The Burr
If you don’t check for a burr, the edge won’t be sharp. Run your finger gently across the blade after sharpening each side.
Skipping The Fine Grit
If you finish with a coarse stone, the edge will be rough. Always polish with a fine stone.
Sharpening Dirty Knives
Dirt or food particles scratch the stone and make sharpening harder. Clean your knife first.
Forgetting To Clean The Stone
A clogged stone won’t sharpen well. Rinse or wipe it often.
Using A Damaged Stone
Cracked or uneven stones can damage your knife. Inspect your stone before use.
How Often Should You Sharpen Your Knife?
The frequency of sharpening depends on how often you use your knife and the type of foods you cut. For most home cooks, sharpening every 2–3 months is enough. If you cook daily or use your knife for tough jobs (like cutting bones), sharpen more often.
Some signs your knife needs sharpening:
- It crushes food instead of slicing.
- You need to use more force to cut.
- The blade slips off tomatoes or onions.
- The edge feels dull to the touch.
Professional chefs sharpen their knives weekly or even daily, but for home use, regular maintenance is more important than frequency.
Knife Maintenance After Sharpening
Sharpening is only part of knife care. Keeping your knife sharp and safe requires ongoing attention.
Honing Vs Sharpening
Many people confuse honing with sharpening. Honing uses a steel rod to straighten the edge, while sharpening removes metal and restores the blade. Honing should be done every few days, sharpening every few months.
Storing Your Knife
Store knives in a knife block, sheath, or magnetic strip. Avoid drawers, which can dull the edge.
Cleaning Your Knife
Wash knives by hand with warm water and mild soap. Avoid dishwashers—they can damage the blade and handle.
Avoid Hard Surfaces
Don’t use knives on glass, metal, or stone surfaces. Stick to wood or plastic cutting boards.
Regular Honing
Use a honing rod to keep the edge straight. This doesn’t sharpen but helps keep the blade effective.
Sharpening Special Types Of Knives
Not all knives are the same. Some need special care.
Serrated Knives
Serrated knives (like bread knives) require a different method. Use a ceramic rod or special sharpener that fits into the serrations. Don’t use a stone, as it can damage the teeth.
Japanese Knives
Japanese knives are often thinner and made of harder steel. Sharpen them at a 15-degree angle and use a fine water stone for best results.
Pocket And Outdoor Knives
These knives are used for tough jobs. Use a diamond stone and sharpen at a 20-degree angle for durability.
How To Flatten And Clean Your Sharpening Stone
Sharpening stones can wear unevenly over time, which affects results. To fix this, you need to flatten the stone.
Flattening Your Stone
Use a flattening plate or a coarse diamond stone. Rub the plate across the stone’s surface in circles. Check for evenness—if the stone is flat, it will sharpen properly.
Cleaning Your Stone
Clean your stone after each use:
- Rinse with water or oil.
- Scrub with a brush if needed.
- Dry completely before storing.
Here’s a quick comparison of maintenance methods:
| Task | Tool | Frequency |
|---|---|---|
| Flattening | Flattening plate/diamond stone | Every 10–20 uses |
| Cleaning | Brush/water/oil | After each use |
| Drying | Towel/air | After each use |
Sharpening Stone Alternatives
Sharpening stones are the best for most knives, but alternatives exist.
Pull-through Sharpeners
These devices have abrasive wheels. They’re quick and simple, but can damage knives over time.
Electric Sharpeners
Electric sharpeners use rotating stones. They’re convenient, but not as precise as manual stones.
Professional Services
If you don’t feel confident, professional sharpening is available. Many local stores offer this service.
Sharpening Tips For Beginners
If you’re new to sharpening, don’t worry—most people start with no experience. Here are tips that help beginners succeed.
- Practice with a cheap knife first. It’s less stressful.
- Watch videos online to see the technique in action.
- Use an angle guide until you feel comfortable.
- Start with a medium grit—coarse stones can remove too much metal.
- Sharpen slowly—speed is less important than accuracy.
- Don’t expect perfection the first time. The skill improves with practice.
- Ask for feedback from someone experienced, if possible.
Credit: www.youtube.com
Two Insights Beginners Often Miss
Many new sharpeners focus only on the blade’s sharpness, but miss other important details:
- Edge geometry matters: Sharpening isn’t just about making the blade sharp—it’s about keeping the original shape. If you change the angle too much, the knife won’t cut as intended.
- Stone maintenance is key: A dirty or uneven stone won’t sharpen well. Clean and flatten your stone often, or your results will suffer.
Data On Sharpening Stone Effectiveness
Research shows that sharpening stones produce the sharpest, longest-lasting edges. According to a study by Cook’s Illustrated, knives sharpened with water stones stayed sharp 30% longer than those sharpened with pull-through devices. Diamond stones sharpen fastest, but water stones give the best finish.
Professional chefs prefer manual stones for control and precision. Home cooks who use stones regularly report fewer accidents and better cutting results.
How To Tell If Your Knife Is Sharp
Knowing when your knife is sharp enough is important. Here are easy ways to check:
- Paper test: Try slicing a sheet of paper. A sharp knife cuts cleanly.
- Tomato test: Slice a tomato. If it cuts without crushing, it’s sharp.
- Fingernail test: Gently rest the blade on your fingernail. If it “bites” (stays on the nail), the edge is sharp.
If your knife passes these tests, you’ve done a good job.
Sharpening Stone Buying Guide
Choosing the best sharpening stone depends on your needs. Here’s what to look for:
- Grit range: Get a stone with at least two grits (medium and fine).
- Size: Larger stones are easier to use, but smaller stones are cheaper.
- Material: Water stones are ideal for beginners. Diamond stones are best for heavy-duty knives.
- Price: Good stones cost $30–$100. Cheap stones may wear quickly.
- Brand reputation: Buy from trusted brands. Cheap stones can crack or wear unevenly.
Avoid stones that are too small or thin—they’re hard to use and don’t last. For most home cooks, a 1000/6000 grit combo water stone is best.
Sharpening Stone Care And Storage
Taking care of your stone ensures it lasts. Here’s how:
- Clean after each use.
- Dry completely.
- Store in a cool, dry place.
- Avoid dropping or banging the stone.
If your stone cracks or chips, replace it. A damaged stone can ruin your knife.
Environmental Benefits Of Manual Sharpening
Manual sharpening with stones is eco-friendly. It uses no electricity and produces little waste. Compared to electric sharpeners, which use power and plastic parts, stones are sustainable. If you care about the environment, sharpening stones are a smart choice.
Frequently Asked Questions
What Is The Best Sharpening Angle For Kitchen Knives?
The best angle is 15–20 degrees. Japanese knives use 15 degrees; Western knives use 20 degrees. Using the right angle keeps your knife sharp and preserves its shape.
How Do I Know When My Knife Needs Sharpening?
Signs include difficulty cutting, crushing food, and needing more force. If your knife slips or can’t slice tomatoes easily, it’s time to sharpen.
Can I Use Oil On A Water Stone?
No, oil is only for oil stones. Using oil on a water stone can clog the pores and reduce effectiveness. Always use water with water stones.
How Long Should I Soak A Water Stone?
Soak for 10–15 minutes until bubbles stop rising. If the stone is not fully soaked, it won’t sharpen well.
Is Sharpening Dangerous?
Sharpening is safe if you follow basic safety tips: keep your hands dry, use a stable surface, and handle the knife carefully. Most accidents happen from rushing or not paying attention.
Sharpening a knife with a stone is a valuable skill for anyone who cooks. It makes kitchen work easier, safer, and more enjoyable. With practice, you can keep your knives sharp for years. Use the tips, avoid mistakes, and remember that patience pays off. If you want more details on sharpening stones, see this Wikipedia article for extra information. Sharpen your knives regularly, and you’ll notice the difference in every meal.

Hello, This is Annie Walker, a 38-year-old blogger, founder, and editor of Cookware Guider from NY, USA. I am a cookware fanatic and passionate cooker. I love to cook with different types of cooking appliances (example: all types of cookware, rice cookers, slow cookers, etc) almost every day in my kitchen. I love to share my experience with my readers in my blog. Also, I enjoy helping people to solve their problems through my website. You can follow me on Twitter & Pinterest. To know details about my blog please check the about us page.