
Sharpening a knife is a skill every cook, hobbyist, or outdoor enthusiast should learn. Whether you’re slicing vegetables in your kitchen or preparing for a camping trip, a sharp knife makes every task easier, safer, and more enjoyable. But many people struggle with sharpening, worried about damaging their blade or making mistakes. If you’ve ever used a dull knife, you know the frustration: uneven cuts, extra effort, and even increased risk of injury. The truth is, sharpening a knife with a sharpener is simple once you understand the basics and follow proven techniques.
In this guide, you’ll discover how to sharpen a knife correctly with different types of sharpeners, understand what really matters, and avoid common errors. You’ll also find practical tips, clear steps, and answers to the questions beginners often ask. By the end, you’ll feel confident sharpening any knife—whether it’s your favorite chef’s knife or a trusty pocket blade.
Why Knife Sharpening Matters
Many people underestimate the importance of a sharp knife. A dull knife is not only frustrating; it’s also dangerous. When a blade loses its edge, it requires more force to cut. This makes slips and accidents more likely. Professional chefs and experienced home cooks agree—a sharp blade is safer and more effective.
A well-sharpened knife:
- Cuts cleanly and precisely
- Reduces effort and fatigue
- Lowers the chance of accidents
- Extends the life of your knife
According to the National Safety Council, kitchen accidents caused by dull knives are more common than those caused by sharp ones. Keeping your knives sharp isn’t just about performance—it’s about safety and longevity.
Understanding Knife Sharpeners
Before you sharpen your knife, it’s important to know the types of sharpeners and how they work. Not all sharpeners are equal, and choosing the right one can make your task easier.
Types Of Knife Sharpeners
- Manual Sharpeners (Pull-through)
- Electric Sharpeners
- Sharpening Stones (Whetstones)
- Honing Rods (Sharpening Steels)
Let’s compare the main types:
| Sharpener Type | Ease of Use | Best For | Price Range (USD) |
|---|---|---|---|
| Manual Pull-through | Easy | Home cooks | $10–$50 |
| Electric | Very Easy | Frequent sharpening | $40–$200 |
| Whetstone | Intermediate | Precision sharpening | $20–$100 |
| Honing Rod | Easy | Maintenance | $10–$40 |
Which Sharpener Should You Use?
Most beginners start with a manual pull-through sharpener. It’s simple and affordable. If you have expensive knives or want a perfect edge, a whetstone is best, but it requires practice. Electric sharpeners suit busy kitchens but are pricier. Honing rods are for maintaining sharpness, not full sharpening.
A key insight: Honing rods do not actually sharpen—they straighten the edge. Many beginners confuse honing with sharpening. You need both for a sharp, long-lasting blade.
How Often Should You Sharpen Your Knife?
How often you sharpen depends on how much you use your knife. If you cook daily, sharpen every 2–4 weeks. For occasional use, every 2–3 months is enough. Regular honing can stretch the time between sharpening.
Professional chefs sharpen their knives weekly. Home cooks can get by with monthly sharpening. Over-sharpening can wear down your blade, so balance is important.
Preparing Your Knife For Sharpening
Before sharpening, clean your knife thoroughly. Remove food residue, oils, or dirt using warm water and mild soap. Dry the blade completely—moisture can cause rust or interfere with sharpening.
Inspect the blade for chips, bends, or severe wear. If your knife has deep damage, sharpening might not fix it. Sometimes, professional repair is needed.
A practical tip: Never sharpen a dirty knife. Particles can scratch your blade and affect the sharpener.
Step-by-step Guide: Sharpening A Knife With A Sharpener
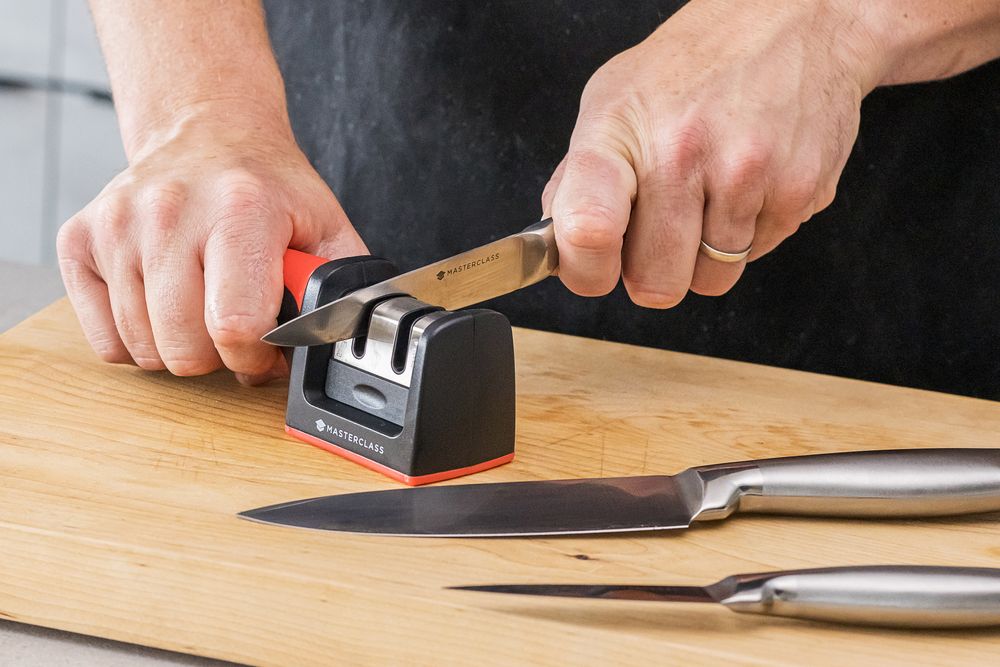
Let’s focus on manual pull-through sharpeners, since they are the most common for beginners. The process is similar for electric sharpeners, but stones and rods require extra skill.
Step 1: Choose The Right Sharpener
Pick a sharpener suited for your knife. If your blade is serrated, use a sharpener designed for serrated edges. Most standard sharpeners work for straight blades.
Step 2: Place The Sharpener On A Stable Surface
Put your sharpener on a flat, non-slip surface. Stability is key to safety and results. Some sharpeners have rubber feet or suction cups to prevent sliding.
Step 3: Set The Blade Angle
Most sharpeners have preset angles, usually between 15–20 degrees. For Western knives, 20 degrees is standard. Japanese knives use 15 degrees. Check your knife’s manufacturer for the recommended angle.
A non-obvious insight: Using the wrong angle can make your knife duller. Always match the angle to your knife type.
Step 4: Insert The Knife Blade
Hold the knife by its handle. Place the heel of the blade (the part closest to the handle) into the sharpener slot. Keep the blade vertical or at the angle suggested by the sharpener.
Step 5: Pull The Knife Through
Apply gentle, even pressure. Pull the blade smoothly from heel to tip through the slot. Do not press too hard; let the sharpener do the work.
Repeat this process 3–6 times, depending on how dull your knife is. More passes are needed for very dull blades.
Step 6: Test The Sharpness
After sharpening, test your knife’s edge. Try slicing a sheet of paper—if the blade cuts cleanly, it’s sharp. If it tears or skips, repeat steps 4–5.
Another way: Slice a tomato. A sharp knife should cut without squashing the fruit.
Step 7: Clean The Knife
After sharpening, wipe the blade with a damp cloth. Metal shavings may be left on the edge. Never rinse the knife before wiping—water can spread shavings.
Step 8: Store Safely
Store your knife in a block, sheath, or on a magnetic strip. This protects the edge and keeps your knife sharp longer.
Sharpening With Electric Sharpeners
Electric sharpeners are quick and easy. They work well for busy kitchens and multiple knives. The steps are similar:
- Plug in the sharpener and turn it on.
- Insert the knife into the slot, following the angle guide.
- Pull the blade through slowly and evenly.
- Repeat as needed.
- Wipe and test the blade.
Electric sharpeners are faster but may remove more material from the blade. Use them sparingly for expensive knives.
Credit: www.cookserveenjoy.com
Sharpening With A Whetstone
Whetstones require skill, but give the best results. Here’s how to use one:
Step 1: Soak The Stone
If your stone is water-based, soak it in water for 10–15 minutes. Oil stones require a few drops of honing oil.
Step 2: Set The Angle
Hold the knife at the correct angle—usually 15–20 degrees. Use an angle guide if you’re unsure.
Step 3: Sharpen One Side
Place the blade on the stone. Move the knife across the stone, from heel to tip, in a sweeping motion. Repeat 10–15 times.
Step 4: Sharpen The Other Side
Flip the blade and repeat for the other side.
Step 5: Use Finer Grit
If your stone has two sides (coarse and fine), repeat the process on the fine side for a polished edge.
Step 6: Clean And Test
Wipe the blade and test as before.
A tip many miss: Don’t rush. Slow, steady strokes give a better edge. Rushing leads to uneven sharpening.
Sharpening Serrated Knives
Serrated knives need special care. Only sharpeners designed for serrated edges should be used. Many serrated knives don’t require frequent sharpening. If yours is dull, use a ceramic rod or a sharpener with a serrated slot.
Insert each serration into the sharpener or rod, moving gently back and forth. Test the edge after sharpening.

Credit: www.youtube.com
Honing Vs. Sharpening
Many beginners confuse honing and sharpening. Honing straightens the blade’s edge; sharpening removes material to create a new edge.
Use a honing rod weekly to maintain sharpness. Sharpen only when the blade is dull.
| Process | Purpose | Frequency |
|---|---|---|
| Honing | Straighten edge | Weekly |
| Sharpening | Restore edge | Monthly or as needed |
A common mistake: Many people only hone, thinking their knife is sharp. But honing cannot fix a dull edge.
How To Maintain A Sharp Knife
Sharpening is only half the battle. Proper care keeps your knife sharp longer.
- Always wash knives by hand. Dishwashers dull blades.
- Dry immediately after washing.
- Use a cutting board. Avoid glass, stone, or metal surfaces.
- Store knives safely to protect the edge.
- Hone regularly.
A non-obvious insight: Wooden or plastic cutting boards are best. Hard surfaces damage the blade faster.
Common Knife Sharpening Mistakes
Even experienced users make mistakes. Here are errors to avoid:
- Using the wrong angle: Always match the sharpener angle to your knife.
- Applying too much force: Let the sharpener do the work.
- Sharpening dirty knives: Clean first to avoid scratches.
- Ignoring the whole blade: Sharpen from heel to tip.
- Not testing sharpness: Always check with paper or tomato.
- Over-sharpening: Only sharpen when needed.
A non-obvious insight: Over-sharpening wears out your blade faster. Sharpen only when performance drops.
Sharpening Specialty Knives
Some knives, like Japanese chef knives or high-carbon blades, need special attention.
- Japanese knives usually need a 15-degree angle.
- High-carbon steel is softer and can be sharpened more easily, but rusts faster.
- Use a whetstone for specialty knives for best results.
If you own expensive knives, follow manufacturer instructions carefully. Some brands even provide sharpening services.

Credit: www.wikihow.com
Knife Sharpening Safety Tips
Sharpening can be risky if done incorrectly. Protect yourself by:
- Keeping fingers away from the blade during sharpening
- Using stable surfaces
- Wearing cut-resistant gloves if you’re unsure
- Working slowly and carefully
Most accidents happen when people rush or use unstable sharpeners. Take your time.
When To Seek Professional Sharpening
Sometimes, DIY sharpening isn’t enough. If your knife has deep chips, bends, or you want a perfect edge, professionals can help. Many kitchen supply stores offer sharpening. It costs $5–$10 per knife, depending on blade size.
Professional sharpening is recommended once a year for expensive knives. For everyday blades, home sharpening is usually enough.
Comparing Sharpeners: Which Is Best?
Choosing the best sharpener depends on your needs, budget, and skill level. Here’s a comparison:
| Sharpener | Pros | Cons |
|---|---|---|
| Manual Pull-through | Easy, fast, affordable | Less precise, can wear blade |
| Electric | Very fast, consistent | Expensive, removes more metal |
| Whetstone | Precise, custom edges | Requires skill, slower |
| Honing Rod | Quick maintenance | Does not sharpen |
For most people, a manual sharpener works well. If you want perfect results or have expensive knives, a whetstone is worth learning.
Practical Tips For Sharpening Success
- Use light, even pressure.
- Clean your sharpener regularly.
- Practice with less valuable knives first.
- Don’t rush the process—slow strokes are better.
- Check your sharpener for wear. Replace if the abrasives are worn out.
A tip many miss: Sharpeners wear out. Replace yours every 2–3 years for best results.
Environmental Factors
Humidity and temperature can affect sharpening. Moisture can cause stones to swell, affecting the edge. Always sharpen in a dry area and store stones properly.
If you live in a humid climate, oil stones are often better than water stones. This prevents rust and stone damage.
Knife Sharpening Myths
Many myths surround knife sharpening. Here are a few:
- “Honing rods sharpen knives.” False. They only straighten the edge.
- “All knives use the same angle.” False. Japanese and Western knives differ.
- “You must sharpen weekly.” Not true. Only sharpen when needed.
Understanding these myths helps you avoid mistakes and care for your knives properly.
How Sharpening Affects Knife Longevity
Sharpening removes metal from the blade. Over time, this can shorten the knife’s lifespan. Proper technique and not over-sharpening are key.
A well-maintained knife can last decades. Many chefs use the same knives for 10–20 years by sharpening and caring for them correctly.
Sharpening Outdoor And Pocket Knives
Sharpening isn’t just for kitchen knives. Pocket knives and outdoor blades need regular care too.
- Use compact sharpeners for outdoor knives.
- Match the angle to the blade type (usually 20 degrees).
- Clean after sharpening to prevent rust.
Outdoor knives often face tougher tasks, so sharpen more frequently.
Knife Sharpening For Left-handed Users
Most sharpeners are designed for right-handed people. If you’re left-handed, look for models that work both ways or practice using your dominant hand.
Some whetstones and electric sharpeners are ambidextrous. Always check before buying.
Sharpening Knives For Special Uses
If you use knives for sushi, bread, or carving, follow specific sharpening instructions.
- Sushi knives: Use a whetstone, 15-degree angle.
- Bread knives: Sharpen only if very dull, using a serrated sharpener.
- Carving knives: Manual sharpeners work well, but check the angle.
Specialty knives require more care. Always check manufacturer instructions.
Where To Learn More
If you want to improve your sharpening skills, many online resources and videos are available. For scientific details and history, visit Wikipedia.
Frequently Asked Questions
How Do I Know When My Knife Needs Sharpening?
If your knife struggles to cut paper or squashes tomatoes, it’s time to sharpen. Dull knives require more force and are less safe.
Can I Sharpen A Serrated Knife With A Regular Sharpener?
No. Serrated knives need special sharpeners or ceramic rods. Regular sharpeners may damage the serrations.
What Angle Should I Use For Sharpening?
Most Western knives use a 20-degree angle. Japanese knives usually require 15 degrees. Check your knife’s instructions for the best result.
Is It Safe To Sharpen Knives At Home?
Yes, if you follow proper steps and safety guidelines. Use stable surfaces, keep fingers clear, and work slowly.
How Long Does Sharpening Take?
Manual sharpeners take 5–10 minutes. Electric sharpeners take 2–3 minutes. Whetstones may take 15–20 minutes, especially for a perfect edge.
Sharpening a knife with a sharpener is a skill worth mastering. It improves your cooking, saves money, and keeps you safe. With the right sharpener, proper technique, and a little practice, your knives will always be ready for any task.
Remember, patience and precision are key. As you gain experience, sharpening will become second nature—a simple step that makes every meal or project easier and more enjoyable.

Hello, This is Annie Walker, a 38-year-old blogger, founder, and editor of Cookware Guider from NY, USA. I am a cookware fanatic and passionate cooker. I love to cook with different types of cooking appliances (example: all types of cookware, rice cookers, slow cookers, etc) almost every day in my kitchen. I love to share my experience with my readers in my blog. Also, I enjoy helping people to solve their problems through my website. You can follow me on Twitter & Pinterest. To know details about my blog please check the about us page.