
Sharpening a knife is more than just maintenance—it’s about safety, efficiency, and getting the best from your blades. If you own a kitchen, hunting, or pocket knife, you know how a dull edge can slow you down. But sharpening can feel confusing, especially if you’re new. The Lansky Knife Sharpener is a popular system that solves many of the problems people face. With controlled angles, guided rods, and a range of hones, it makes sharpening easier, even for beginners. Still, most people miss a few small steps that make a big difference. In this guide, you’ll learn how to use a Lansky Knife Sharpener from start to finish, see how it compares to other tools, and discover tips that help you avoid common mistakes. Whether you want a razor-sharp chef’s knife or a reliable camping blade, this article gives you everything you need.
What Is A Lansky Knife Sharpener?
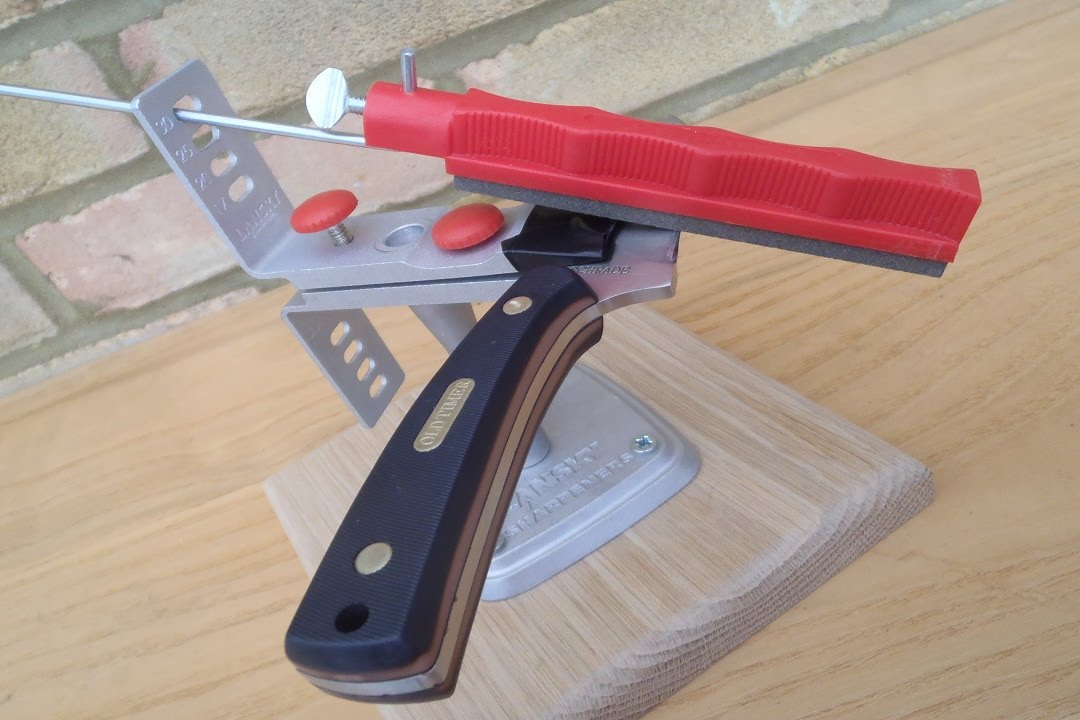
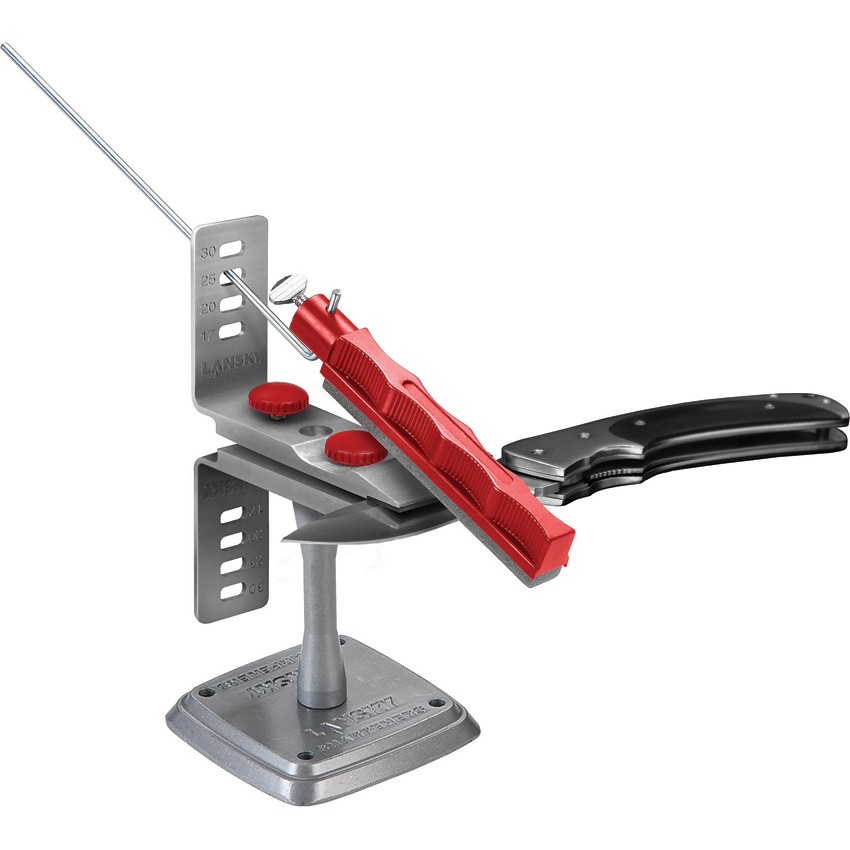
The Lansky Knife Sharpener is a guided sharpening system. Unlike pull-through sharpeners or freehand stones, Lansky gives you a clamp, several sharpening stones (called hones), and rods that keep your angle steady. This makes it easier to get a consistent edge, even if you’ve never sharpened a knife before.
You clamp your knife in the system, choose the right angle for your blade, and then use the rods and hones to grind the edge. The system comes in several kits—some have three hones, others five, with different grits from coarse to ultra-fine.
Key Parts Of The Lansky System
- Knife clamp: Holds the blade firmly and has holes for angle selection.
- Guide rods: Attach to hones and slide through the clamp’s holes to keep your angle steady.
- Sharpening hones: Stones of different grits for shaping, sharpening, and polishing.
- Honing oil: Used for lubrication on the stones (for most kits).
- Carrying case: Keeps everything organized.
The Lansky system is popular with home cooks, outdoor enthusiasts, and anyone who wants a repeatable, reliable edge. It works for most knives up to about 7 inches long.
Why Use A Lansky Knife Sharpener?
Many people ask why they should choose a Lansky over other sharpeners. The answer comes down to precision, control, and repeatability.
- Consistent angle: The guide rods prevent guessing, so you always sharpen at the angle you choose.
- Versatility: Works on most straight-edged knives, from small pocket knives to kitchen blades.
- Safety: The clamp and guided motion reduce the risk of slipping and cutting yourself.
- Better results: Even beginners can achieve a near-professional edge.
How Lansky Compares To Other Sharpeners
Here’s a quick look at how the Lansky system stands next to other common sharpeners.
| Sharpener Type | Edge Quality | Skill Needed | Price Range |
|---|---|---|---|
| Lansky System | Very High | Low to Moderate | $35–$80 |
| Pull-Through | Moderate | Very Low | $10–$40 |
| Freehand Stone | High (if skilled) | High | $20–$200 |
| Electric Sharpener | Moderate | Very Low | $40–$200 |
Insight: Beginners often think a more expensive sharpener means a sharper edge, but the angle control is what really matters. Lansky’s guided system is why even experienced chefs use it for important knives.
Credit: www.youtube.com
Getting Started: What You Need
Before you start, gather your tools and set up a safe workspace. Here’s what you’ll need:
- Lansky Knife Sharpener kit (with hones, rods, clamp, and oil)
- Your knife
- Paper towels or rags (for cleaning oil and metal filings)
- A flat, stable surface
- Good lighting (so you can see the edge clearly)
- Optional: Magnifying glass (helps check your progress)
Tip: Always read the instruction booklet in your Lansky kit for any specific advice. Some kits are for ceramic knives or special blade types, so follow their instructions if you have those.
Step-by-step: How To Use A Lansky Knife Sharpener
Let’s break the process into clear steps. Each is important for getting the best results, so don’t rush.
1. Assemble The Guide Rods And Hones
Each hone has a hole for a guide rod. Screw or slide the rod into the hone and tighten it so it’s straight. Make sure the rod is flush with the hone’s surface—any bend can affect your angle.
Non-obvious insight: Wipe each rod with a little oil before inserting. It helps them glide smoothly through the clamp and reduces wear.
2. Attach The Knife In The Clamp
Open the clamp wide enough to fit your blade. Place the knife so about half the blade sticks out. Tighten the clamp evenly, making sure the blade sits straight and doesn’t wobble.
- The edge should point up, away from the clamp.
- The spine should be flush with the clamp’s top surface.
- If your blade is curved, center the main cutting area.
Tip: For very thin or thick blades, adjust the clamp’s thumb screw to get a firm grip without damaging the knife.
3. Select The Sharpening Angle
The clamp has several holes, each marked with a different angle—usually 17°, 20°, 25°, and 30°. The angle affects sharpness and durability:
- 17°: Razor-sharp, but less durable (good for fine slicing)
- 20°: Standard kitchen knives (good balance)
- 25°: Outdoor and hunting knives (tougher edge)
- 30°: Heavy-duty blades (axes, machetes)
Insert the guide rod into the hole for your chosen angle on both sides. Always use the same angle on both sides of the blade.
Example: If you want a sharp kitchen knife, pick the 20° setting.
Beginner’s mistake: Some people switch angles mid-sharpening, which creates a double bevel. Always stick to one angle per session.
4. Lubricate The Sharpening Stone
Put a few drops of Lansky honing oil or light mineral oil on the stone’s surface. Spread it evenly with your finger or a cloth. This reduces friction and carries away metal filings.
- For diamond hones, use water instead.
- Don’t over-oil; a little goes a long way.
5. Start With The Coarsest Stone
Begin sharpening with the coarsest hone (usually gray or dark blue). This reshapes the edge and removes chips or dull spots.
- Attach the hone’s guide rod to the clamp at your chosen angle.
- Hold the knife and clamp steady.
- Move the hone along the edge, from the heel (near the handle) to the tip, in smooth, even strokes.
- Apply light to moderate pressure—let the stone do the work.
- Count your strokes (e.g., 10 per side) for even sharpening.
Pro tip: On a very dull knife, you may need 50+ strokes per side at first. For routine sharpening, 10–20 per side is enough.
6. Check For A Burr
A burr is a tiny fold of metal that forms on the edge when one side is sharpened enough. Gently run your finger (perpendicular, not along the edge) to feel for a rough spot.
- When you feel a burr along the whole edge, switch to the other side.
- Repeat the same number of strokes.
Non-obvious insight: If you don’t feel a burr, you haven’t sharpened enough. Don’t move to finer hones until you do.
7. Progress To Finer Stones
Move to the next finer hone (medium, then fine, then ultra-fine if included). Repeat the same process—lubricate, attach, and sharpen with even strokes.
- Each finer stone removes scratches from the previous one and polishes the edge.
- Use slightly lighter pressure as you progress.
Tip: After the final hone, use very gentle strokes—like you’re brushing dust. This polishes the edge to a mirror finish.
8. Clean The Blade And Stones
Wipe the knife with a clean rag or paper towel to remove oil and filings. Clean the hones with a little oil and a paper towel, or a nylon brush if needed.
- Don’t let metal filings build up—they can scratch your blade and reduce sharpening efficiency.
9. Test The Edge
Carefully test your knife’s sharpness. Some safe methods:
- Slice a piece of paper. A sharp knife will cut cleanly, not tear.
- Shave a little hair from your arm (if comfortable).
- Slice a tomato or onion skin.
Never run your finger along the edge—this leads to injury.
Pro tip: If your edge isn’t sharp enough, repeat the process with fine hones, focusing on even strokes and a consistent angle.
Common Mistakes To Avoid
Even with a guided system like Lansky, it’s easy to make mistakes. Here are the top errors and how to avoid them:
- Uneven pressure: Pressing too hard or too soft can create an uneven edge. Use consistent, gentle pressure.
- Skipping grits: Don’t move from coarse to fine too quickly. Each grit removes the scratches from the last.
- Changing angles: Always use the same angle for the whole sharpening session.
- Over-clamping: Tightening the clamp too much can damage thin blades. Just enough pressure is best.
- Not cleaning stones: Dirty hones don’t cut well. Clean after each session.
- Ignoring the burr: The burr tells you when to switch sides or move to the next stone.
- Rushing: Quality sharpening takes time—especially on a dull knife.
Beginner tip: Take notes on your process—how many strokes, which stones, what angle. This helps you repeat success and avoid past mistakes.
Lansky Kit Types: Which One To Choose?
Lansky offers several sharpening kits. Here’s a quick guide to help you pick the right one for your needs.
| Kit Name | Hones Included | Best For | Price Range |
|---|---|---|---|
| Standard 3-Stone | Coarse, Medium, Fine | Basic home use | $35–$45 |
| Deluxe 5-Stone | Extra-Coarse, Coarse, Medium, Fine, Ultra-Fine | Kitchen, outdoor, collectors | $60–$80 |
| Diamond System | Diamond hones (various grits) | Hard steel, fast sharpening | $80–$120 |
| Arkansas Kit | Natural stones | Finishing and polishing | $80–$120 |
Insight: For most users, the Deluxe 5-Stone kit gives the most flexibility—it handles dull knives and produces a polished edge. Diamond hones are great for modern super steels, but most kitchen knives do fine with standard stones.

Credit: ireviewgear.com
Advanced Techniques For Sharpening
After you master the basics, there are a few advanced tricks that can help you get even better results.
Micro-beveling
Some experts add a micro-bevel for extra durability. After sharpening at, say, 17°, make a few very light strokes at 20°. This creates a tiny support edge.
- Only do 2–3 strokes per side.
- Works well for knives used on hard materials (e.g., chopping garlic).
Polishing For A Razor Edge
If you want a razor edge (for shaving or fine slicing), finish with the ultra-fine hone and use a leather strop. Lansky sells an optional strop hone, or you can use a leather belt.
- Strop away from the edge to avoid rolling it.
- Use a light touch—just enough to polish.
Sharpening Serrated Blades
The Lansky system has special serrated hones for bread or rescue knives.
- Use the triangular hone to fit into each serration.
- Sharpen each groove separately, then lightly deburr the flat side.
Maintaining The System
- Clean hones regularly with oil and a nylon brush.
- Check that rods are straight and not bent.
- Lubricate the clamp’s moving parts occasionally.
Non-obvious insight: A dirty hone or bent rod causes poor sharpening even if your technique is perfect.
Lansky Knife Sharpener Vs. Other Systems
You might wonder if Lansky is the best choice for you. Here’s how it compares to other leading systems.
| System | Precision | Ease of Use | Portability | Price |
|---|---|---|---|---|
| Lansky | High | Easy | Good | Moderate |
| Spyderco Sharpmaker | Medium | Very Easy | Excellent | Moderate |
| Wicked Edge | Very High | Moderate | Poor | Expensive |
| Freehand Stones | Varies | Hard | Good | Varies |
Insight: Lansky gives you the repeatability of much more expensive systems, but in a smaller, affordable package. For most users, it’s a smart balance of performance and price.
Care And Maintenance Of Your Lansky System
Taking care of your Lansky system means it will last for years.
Cleaning The Hones
- Wipe with a paper towel after every use.
- For deep cleaning, use a drop of oil and scrub with a nylon brush.
- Don’t use water on non-diamond stones.
Storing The System
- Keep all parts in the case.
- Don’t lose the small guide rods—they’re easy to misplace.
- Store hones dry and clean.
Replacing Worn Parts
- Hones wear down after hundreds of uses. Replace them if they become smooth or uneven.
- Lansky sells individual hones, rods, and clamps.
Tip: Write the date on new hones so you can track usage.
Safety Tips When Using Lansky
Even with safety features, caution is important.
- Always clamp the knife securely before sharpening.
- Keep your fingers behind the stone’s path.
- Work on a stable surface—never sharpen on your lap.
- Don’t rush. Most injuries happen when people hurry.
- Clean up oil spills right away (they’re slippery).
Real-world Example: Sharpening A Chef’s Knife
Let’s see the process in action.
- Assemble the rods and stones.
- Clamp the knife with about ½ inch of blade exposed.
- Choose 20° angle (standard for kitchen knives).
- Lubricate the coarse hone with a few drops of oil.
- Sharpen one side: 20 strokes from heel to tip.
- Check for burr—continue if needed.
- Switch sides, repeat 20 strokes.
- Move to medium hone, repeat 15 strokes per side.
- Use fine hone for polishing, 10 strokes per side.
- Clean the knife and hones.
- Test sharpness—knife should slice paper easily.
Insight: Most home cooks don’t need the ultra-fine hone unless they want a mirror polish. For daily use, coarse-medium-fine is enough.
When To Sharpen Your Knife
How often should you sharpen? It depends on usage.
- Home kitchen: Every 2–4 months, or as soon as slicing feels dull.
- Outdoor knives: Before and after each trip.
- Professional kitchens: Weekly or even daily.
Non-obvious insight: Honing (using a steel rod) maintains the edge between sharpenings but doesn’t replace real sharpening.
Troubleshooting: If Your Knife Isn’t Getting Sharp
If your knife still feels dull after sharpening, check these points:
- Did you use enough strokes with the coarse stone? Dull knives need more time.
- Did you maintain a consistent angle?
- Did you clean the hones?
- Are you using the right angle for your knife type?
- Is the knife steel too hard for standard stones? Try diamond hones.
Tip: Sometimes, the edge looks shiny but isn’t sharp. Always test by slicing paper or food, not just by appearance.
Lansky System: Pros And Cons
Every sharpener has strengths and weaknesses.
Pros
- Consistent angles for reliable results
- Affordable compared to pro systems
- Works on most knives
- Safe and easy for beginners
Cons
- Takes longer than pull-through sharpeners
- Not ideal for very large knives (over 7 inches)
- Needs assembly and cleaning after each use
- Requires storage space for the kit
Where To Buy And Learn More
You can find Lansky sharpeners at most outdoor, kitchen, and hardware stores. For more details, see the official Lansky website.
Frequently Asked Questions
How Long Does It Take To Sharpen A Knife With Lansky?
For a moderately dull knife, expect 10–20 minutes. Heavily damaged blades may take longer. With practice, you’ll get faster.
Can I Use Lansky On Serrated Knives?
Yes, with the serrated hone. Sharpen each serration separately and gently deburr the flat side.
Do I Need To Use Oil On Every Stone?
Use oil on all stones except diamond hones (which use water). Oil reduces friction and keeps the stone clean.
What Angle Should I Use For My Knife?
- 17°: Razor-sharp, for fillet or slicing knives
- 20°: Most kitchen knives
- 25°: Outdoor/hunting knives
- 30°: Heavy blades
Match the angle to your knife’s use for best results.
How Do I Clean And Maintain My Lansky System?
Wipe the hones after use, clean with oil and a nylon brush, and store everything dry. Replace worn hones as needed.
Sharpening with Lansky isn’t just about edge maintenance—it’s about enjoying your knives, cooking safely, and working efficiently. With the right technique, a little patience, and regular care, your blades will stay razor-sharp for years to come.
Credit: www.lansky.com

Hello, This is Annie Walker, a 38-year-old blogger, founder, and editor of Cookware Guider from NY, USA. I am a cookware fanatic and passionate cooker. I love to cook with different types of cooking appliances (example: all types of cookware, rice cookers, slow cookers, etc) almost every day in my kitchen. I love to share my experience with my readers in my blog. Also, I enjoy helping people to solve their problems through my website. You can follow me on Twitter & Pinterest. To know details about my blog please check the about us page.