
Pan-frying a steak to medium rare is a skill that brings restaurant-quality flavor to your home kitchen. Many people believe you need a grill or expensive equipment, but with the right technique, a simple pan delivers a perfectly juicy, tender steak with that delicious caramelized crust.
This guide explains everything you need to know—from choosing the right cut to finishing with butter—so you get consistent, mouthwatering results every time.
Cooking steak can feel intimidating, especially if you’ve ended up with tough or dry meat before. But once you understand a few essential steps, you’ll see how easy and satisfying it is. This article covers the science behind the process, shares insider tips, and helps you avoid common mistakes.
Whether you’re a beginner or want to refine your technique, you’ll find clear, actionable advice.
Let’s start with what matters most: picking the right steak and preparing it for the pan.
Choosing The Right Steak For Pan-frying
Not every steak is ideal for pan-frying. Some cuts become tough or lack flavor when cooked this way. Focus on cuts that stay tender and taste rich with quick, high-heat cooking.
Best Cuts For Medium Rare
- Ribeye: Known for its marbling, ribeye stays juicy and flavorful.
- New York Strip: Leaner than ribeye but still tender and beefy.
- Filet Mignon (Tenderloin): Incredibly tender, though less fatty.
- Sirloin: Less expensive, a good balance of flavor and texture.
- T-bone/Porterhouse: Offers two textures (strip and tenderloin) in one steak.
What To Look For
- Thickness: Aim for 1 to 1.5 inches. Thinner steaks overcook fast; thicker ones need different methods.
- Marbling: Look for white fat streaks within the meat. Marbling means more flavor and juiciness.
- Color: Choose bright, cherry-red steaks without brown or gray spots.
- Dryness: Meat should be slightly moist, not wet or slimy.
Bone-in Vs. Boneless
Both work, but boneless steaks cook more evenly in a pan. Bone-in steaks may need a bit longer and can cook unevenly at the edges.
Data Comparison: Common Steak Cuts
| Cut | Average Price (per lb) | Fat Content | Flavor Rating (1-10) |
|---|---|---|---|
| Ribeye | $14–$20 | High | 9 |
| New York Strip | $12–$18 | Medium | 8 |
| Filet Mignon | $25–$40 | Low | 7 |
| Sirloin | $8–$12 | Medium-Low | 6 |
Non-obvious insight: Supermarket steaks often look wet because they’ve been vacuum-packed. If possible, ask your butcher for a freshly cut steak or pat store-bought steaks dry before cooking.
Essential Tools And Ingredients
You don’t need fancy gadgets, but a few key items make a big difference.
Must-have Tools
- Heavy skillet: Cast iron or stainless steel holds heat best. Nonstick pans don’t brown as well.
- Tongs: For flipping and holding the steak safely.
- Instant-read thermometer: Guarantees perfect doneness.
- Paper towels: To dry the steak.
- Timer or watch: For accuracy.
Key Ingredients
- Steak: As described above.
- Salt: Kosher or sea salt for even seasoning.
- Black pepper: Freshly ground for the best aroma.
- High-smoke-point oil: Canola, vegetable, grapeseed, or avocado oil.
- Butter: For basting and extra flavor.
- Aromatics: Optional, but garlic cloves, fresh thyme, or rosemary add complexity.
Pro tip: Avoid olive oil for searing—it smokes and burns at high heat.

Credit: www.maisongokan.com
Preparing The Steak
How you prepare your steak before it hits the pan changes everything about the final flavor and texture.
Step 1: Bring To Room Temperature
Remove the steak from the fridge 30–60 minutes before cooking. Cold steak cooks unevenly and stays tough in the center.
Step 2: Dry The Surface
Use paper towels to pat the steak’s surface until it’s very dry. Moisture creates steam and prevents that crisp, brown crust.
Step 3: Season Generously
Sprinkle both sides evenly with salt and pepper, pressing seasoning into the meat. Don’t worry about over-salting—much falls off during cooking.
Step 4: Optional—dry Brine
For even more flavor, salt the steak and leave it uncovered in the fridge for up to 24 hours. This dry brining draws moisture out, then back in, seasoning the meat deeply.
Beginner mistake: Salting right before cooking is fine, but never salt and let it sit for just 10–20 minutes. This pulls moisture to the surface, making the steak wet.
The Science Of Searing
Getting a golden, crispy crust isn’t just about looks—it’s about flavor. When a steak hits a hot pan, the Maillard reaction creates hundreds of new flavor compounds.
- Temperature: The pan must be at least 400°F (204°C) to sear well.
- Oil: Just enough to thinly coat the pan and help heat transfer.
- Contact: Press the steak gently so it makes full contact with the surface.
Non-obvious insight: Don’t move the steak around! Letting it sit still creates a better crust.
Step-by-step Guide: Pan-frying To Medium Rare
Here is a clear, practical process for achieving the perfect medium rare steak.
Step 1: Preheat The Pan
Place your skillet on medium-high or high heat for 3–5 minutes. It should be very hot before the steak goes in. Flick a bit of water onto the surface—if it sizzles and jumps, it’s ready.
Step 2: Add Oil
Pour about 1 tablespoon of oil into the pan and swirl to coat. The oil should shimmer but not smoke heavily.
Step 3: Sear The Steak
Lay the steak into the pan away from you (to avoid splashes). You should hear a loud sizzle.
- For a 1-inch steak: Sear for about 2 minutes per side.
- For a 1.5-inch steak: Sear for 3–4 minutes per side.
Don’t press down on the steak or move it around. Flip only once.
Step 4: Add Butter And Aromatics
Once you flip the steak, add a tablespoon of butter, a crushed garlic clove, and a sprig of thyme or rosemary. As the butter melts, tilt the pan and spoon the melted butter over the steak repeatedly (this is called basting).
Step 5: Check Temperature
Use your instant-read thermometer to check the center.
- Medium rare: 130–135°F (54–57°C)
Helpful temperature chart:
| Doneness | Internal Temp (°F) | Color |
|---|---|---|
| Rare | 120–125 | Cool red center |
| Medium Rare | 130–135 | Warm red center |
| Medium | 140–145 | Warm pink center |
| Medium Well | 150–155 | Slight pink center |
| Well Done | 160+ | No pink |
Remember: The steak keeps cooking after you remove it from the pan (“carryover cooking”). Pull it at 5°F lower than target.
Step 6: Rest The Steak
Transfer the steak to a plate or cutting board. Rest for at least 5–10 minutes. This lets the juices redistribute, making the steak moist and tender.
Step 7: Slice And Serve
Cut against the grain (the direction of the muscle fibers). This shortens the fibers for a softer bite.
Common Mistakes And How To Avoid Them
Even experienced cooks sometimes miss these details. Here’s how to sidestep the most frequent errors.
1. Cooking Straight From The Fridge
Cold steak cooks unevenly and ends up tough in the middle.
2. Wet Surface
If the steak is damp, you’ll steam the meat instead of searing it. Always dry thoroughly.
3. Overcrowding The Pan
Cooking multiple steaks at once cools the pan and prevents a good crust. Use a large pan, or cook in batches.
4. Wrong Oil
Butter burns fast. Use oil for searing, then add butter for flavor at the end.
5. Not Using A Thermometer
Guessing leads to overcooked or undercooked steak. A thermometer gives you control.
6. Skipping The Rest
Cutting too soon means all the juices run out—wait at least 5 minutes.
7. Slicing With The Grain
This makes the steak chewy. Always cut against the grain.

Credit: www.reddit.com
Flavor Upgrades And Variations
A great steak needs only salt and pepper, but you can add layers of flavor with simple tweaks.
Compound Butter
Mix softened butter with chopped herbs, garlic, or lemon zest. Place a pat on the hot steak to melt.
Peppercorn Crust
Press cracked peppercorns into the steak before searing for a spicy edge.
Marinades
For tougher cuts (like sirloin), marinate in olive oil, garlic, and herbs for 2–4 hours before cooking.
Pan Sauce
After removing the steak, add a splash of red wine or beef broth to the hot pan. Scrape up the browned bits and reduce for a quick sauce.
Toppings
Try sautéed mushrooms, blue cheese crumbles, or a drizzle of balsamic glaze.
Pro tip: Less is more. Let the beef flavor shine—use toppings sparingly.
Timing Guide For Different Steak Thicknesses
Cooking time depends on thickness, pan type, and temperature. Use this chart as a starting point, but always check with a thermometer.
| Thickness | First Side (min) | Second Side (min) | Total (min) |
|---|---|---|---|
| 0.75 inch | 1.5 | 1.5 | 3 |
| 1 inch | 2 | 2 | 4 |
| 1.25 inch | 2.5 | 2.5 | 5 |
| 1.5 inch | 3–4 | 3–4 | 6–8 |
Note: Thicker steaks may need a brief oven finish (at 400°F for 3–5 minutes) after searing for even doneness.
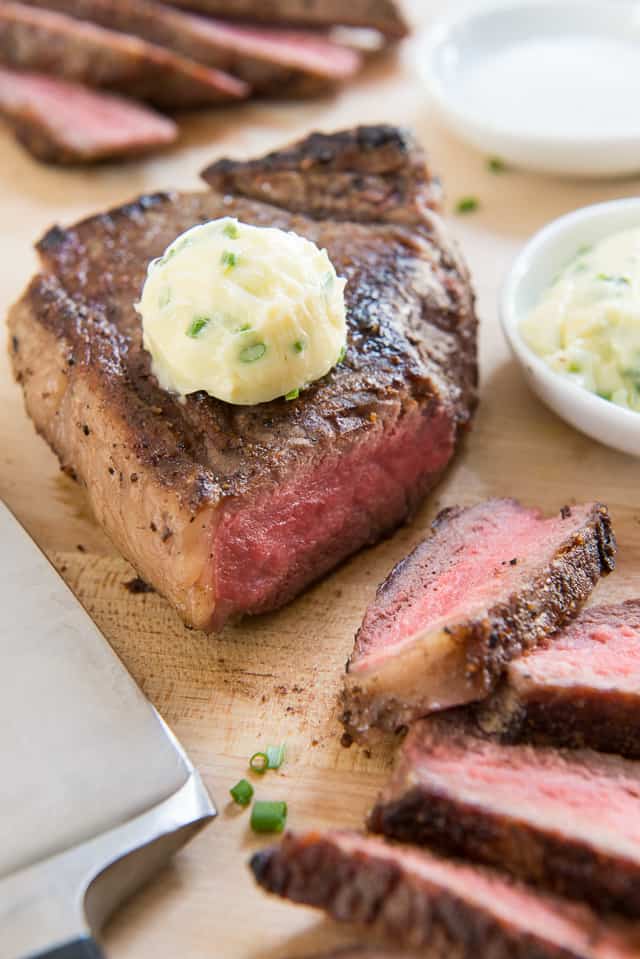
Credit: www.fifteenspatulas.com
Step-by-step Example: Ribeye Steak
Let’s walk through pan-frying a 1-inch ribeye to medium rare.
- Remove steak from fridge, rest 45 minutes.
- Pat dry. Season both sides with 1 teaspoon kosher salt and ½ teaspoon black pepper.
- Preheat cast iron skillet over high heat 4 minutes.
- Add 1 tablespoon canola oil; heat until shimmering.
- Place steak in pan; sear 2 minutes without moving.
- Flip steak; add 1 tablespoon butter, 1 crushed garlic clove, and 1 sprig thyme.
- Baste with butter for 2 minutes.
- Check internal temp—pull at 130°F.
- Rest steak 7 minutes.
- Slice against the grain, serve.
Serving suggestion: Pair with roasted potatoes and a simple salad.
Nutrition And Health Insights
Steak is rich in protein, iron, and vitamin B12, making it a nutrient-dense meal when enjoyed in moderation. Choosing leaner cuts reduces saturated fat, while grass-fed beef offers higher omega-3 content.
Average nutrition for 6 oz. cooked steak:
- Calories: 400–550
- Protein: 45g
- Fat: 25g (varies by cut)
- Iron: 20% of daily value
Health tip: Pan-frying in healthy oils and trimming excess fat can make steak a balanced part of your diet.
For more on beef nutrition, see the Beef Nutrition Facts page.
Cleaning And Caring For Your Pan
A well-maintained pan makes a difference in results and lifespan.
- For cast iron: Wipe out excess oil, scrub with coarse salt and a paper towel. Rinse lightly, dry on the stove, and rub with a little oil.
- For stainless steel: Deglaze with water (while still warm), scrub with a sponge, and dry well.
Don’t use soap on cast iron, as it strips the seasoning.
Frequently Asked Questions
How Do I Know When My Steak Is Medium Rare Without A Thermometer?
You can use the “finger test”: Press the fleshy part of your palm under your thumb. Compare it to the steak’s firmness. Medium rare should feel like when you touch your thumb and middle finger together—soft but springy. However, this method takes practice and isn’t as reliable as a thermometer.
Why Does My Steak Stick To The Pan?
Steak sticks if the pan isn’t hot enough or if you move it too soon. Wait until a crust forms (about 2–3 minutes) before flipping. Using a heavy pan and enough oil also helps prevent sticking.
Should I Oil The Steak Or The Pan?
Oiling the pan is best for pan-frying. This ensures even coverage and prevents excess oil on the steak’s surface, which can burn. For grilling, oiling the steak works well.
Can I Pan-fry Frozen Steak?
You can, but results vary. Sear the frozen steak on both sides, then finish in a 275°F oven until medium rare. You won’t get as good a crust and it’s harder to season evenly. Thawing is preferred for consistent results.
Is It Safe To Eat Medium Rare Steak?
Yes, as long as the outside is seared well, medium rare steak is safe. Harmful bacteria live on the surface, not inside the meat. Searing kills them. Avoid ground beef for medium rare, as bacteria can be mixed in.
Pan-frying a steak to medium rare combines simplicity and technique. With the right cut, good preparation, and careful attention to heat, you can enjoy a steakhouse-quality meal at home. Each step matters, from drying the meat to letting it rest, but the rewards are worth it—tender, flavorful steak that impresses every time.
Whether you’re cooking for yourself or sharing with friends, mastering this skill brings confidence and pleasure to your kitchen.

Hello, This is Annie Walker, a 38-year-old blogger, founder, and editor of Cookware Guider from NY, USA. I am a cookware fanatic and passionate cooker. I love to cook with different types of cooking appliances (example: all types of cookware, rice cookers, slow cookers, etc) almost every day in my kitchen. I love to share my experience with my readers in my blog. Also, I enjoy helping people to solve their problems through my website. You can follow me on Twitter & Pinterest. To know details about my blog please check the about us page.