
A new cast iron frying pan is like a blank canvas. It can last for generations, cook food evenly, and give a unique flavor to meals. But before you start using it, you need to season it. Seasoning is not about adding spices. It is a special process that creates a natural nonstick surface and protects the pan from rust. If you skip this step or do it wrong, your pan might stick, rust, or never reach its full potential.
Many people feel confused when they see a new cast iron pan. It looks heavy, rough, and sometimes sticky. You might wonder: Why do I need to season it? How long will it take? What oil should I use? The truth is, seasoning is simple once you know the steps. And the right seasoning can make your pan easy to clean, safer, and more enjoyable to use.
Let’s break down everything you need to know to season a new cast iron frying pan successfully. You’ll learn the science behind seasoning, step-by-step instructions, tips for choosing the best oil, and how to avoid common mistakes. By the end, your pan will be ready for anything—from crispy fried eggs to juicy steaks.
What Is Seasoning And Why Does It Matter?
Seasoning is a process where you coat your cast iron pan with a thin layer of oil and bake it. The oil bonds to the metal, turning into a hard, smooth layer called polymerized oil. This layer is what makes cast iron pans nonstick and rust-resistant.
Most new cast iron pans are not fully seasoned, even if the box says “pre-seasoned. ” The factory layer is usually thin and not strong enough for daily cooking. Doing your own seasoning will improve the pan’s performance and lifespan.
Benefits Of Proper Seasoning
- Nonstick surface: Food releases easily, so you can cook eggs, pancakes, and fish without sticking.
- Rust protection: The oil layer keeps moisture away, preventing rust.
- Easy cleaning: Seasoned pans need less scrubbing and can be wiped clean.
- Better flavor: With use, the seasoned layer adds a subtle flavor to food.
Preparing Your Cast Iron Pan For Seasoning
Before you start seasoning, you need to clean and dry your new pan. Even if it looks clean, factory oils and dust might be present.
Cleaning Steps
- Wash the pan with warm water and a few drops of dish soap. Use a stiff brush or sponge.
- Rinse thoroughly.
- Dry immediately with a towel.
- Place the pan on a stove over low heat for a few minutes to ensure it is completely dry.
*Note:* This is the only time you should use soap on your cast iron pan. Soap can break down the seasoned layer, so avoid it after this first cleaning.
Inspecting The Surface
Look for rough spots, sticky residue, or uneven areas. If you find sticky factory wax, scrub it off. If you see rust, use steel wool to gently remove it.

Credit: www.youtube.com
Choosing The Best Oil For Seasoning
Not all oils work equally well for seasoning. You want an oil that can handle high heat and will bond tightly with the iron.
Here’s a comparison of popular oils:
| Oil Type | Smoke Point (°F) | Polymerization Quality | Recommended? |
|---|---|---|---|
| Flaxseed Oil | 225 | Excellent | Yes |
| Canola Oil | 400 | Good | Yes |
| Vegetable Oil | 400 | Good | Yes |
| Olive Oil | 375 | Fair | No |
| Bacon Grease | 370 | Moderate | Sometimes |
Flaxseed oil is often recommended by experts because it forms a hard, smooth layer. Canola and vegetable oils are affordable and easy to find. Avoid olive oil—it burns at lower temperatures and doesn’t form a strong layer. Animal fats like bacon grease can add flavor but are less stable.
How To Season A New Cast Iron Frying Pan: Step-by-step
Seasoning your pan takes about 1–2 hours, but most of this is waiting. Here’s a clear guide:
Step 1: Preheat Your Oven
Set your oven to 450°F (232°C). Higher heat helps the oil bond better.
Step 2: Apply Oil
Pour about 1 tablespoon of oil into the pan. Use a paper towel to spread it over the entire surface, including the handle and outside.
Tip: Wipe off excess oil. The pan should look shiny, not wet. Too much oil can make the surface sticky.
Step 3: Bake Upside Down
Place a sheet of aluminum foil on the bottom rack to catch drips. Put your pan upside down on the middle rack.
Step 4: Bake For 1 Hour
Leave the pan in the oven for 60 minutes. The oil will smoke and bond to the metal.
Step 5: Cool In Oven
Turn off the oven and let the pan cool inside. This prevents sudden temperature changes, which can cause cracks.
Step 6: Repeat For Extra Layers
For a stronger nonstick surface, repeat steps 2–5 2–3 times. Each layer makes your pan smoother and more rust-resistant.
Here’s a quick summary of the steps:
| Step | Action | Time |
|---|---|---|
| 1 | Preheat oven | 10 minutes |
| 2 | Apply oil | 5 minutes |
| 3 | Bake upside down | 60 minutes |
| 4 | Cool in oven | 30 minutes |
| 5 | Repeat (optional) | Up to 2 hours |
Credit: www.youtube.com
Common Mistakes When Seasoning Cast Iron
Many beginners make small errors that can ruin the seasoning. Here are mistakes to avoid:
- Using too much oil: This creates a sticky, uneven layer.
- Not cleaning properly: Factory residue can stop the oil from bonding.
- Baking at low temperature: Oil won’t polymerize, leaving a weak layer.
- Skipping layers: One layer is often not enough for new pans.
- Using the wrong oil: Low-smoke-point oils burn and create bad smells.
How To Tell If Your Pan Is Properly Seasoned
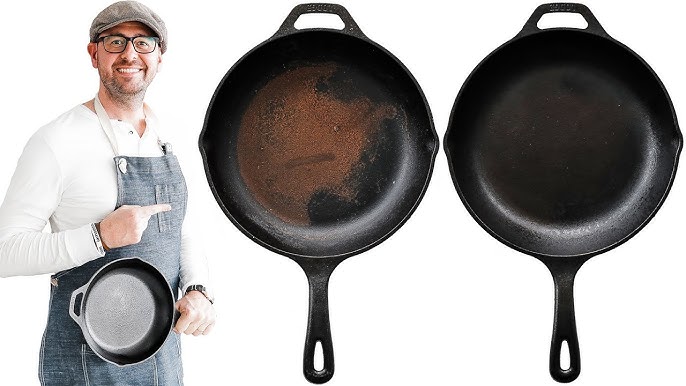
After seasoning, your pan should look dark, shiny, and smooth. It should feel slick, not sticky. If food still sticks, add another layer.
Here’s a comparison table of seasoned vs. unseasoned pans:
| Feature | Properly Seasoned | Unseasoned |
|---|---|---|
| Color | Deep black | Gray or dull |
| Surface | Smooth, slightly shiny | Rough, matte |
| Stickiness | Nonstick | Sticky or food sticks |
| Rust resistance | High | Low |
Practical Tips For Maintaining Your Cast Iron Pan
A well-seasoned pan needs care to keep its surface strong. Here’s how to maintain it:
- Avoid soap: After seasoning, clean with hot water and a brush.
- Dry immediately: Water can cause rust, so always dry your pan right away.
- Cook fatty foods first: Bacon, sausage, or fried chicken help build up the seasoning layer.
- Store in a dry place: Humidity can damage the surface.
- Re-season as needed: If your pan looks dull or food starts sticking, repeat the seasoning process.
Two Insights Most Beginners Miss
- Seasoning is a gradual process. Even after three rounds, your pan might not be perfect. Regular cooking—especially with oils and fats—will improve the surface over time.
- Don’t worry about perfection. Small spots, uneven color, or tiny imperfections are normal. What matters is the nonstick quality and rust protection, not how it looks.
How Often Should You Re-season?
For most users, seasoning once every few months is enough. If you cook acidic foods (like tomatoes) or wash with soap, you may need to re-season sooner. Watch for dull spots or rust—these are signs your pan needs attention.
Using Your Seasoned Cast Iron Pan
After seasoning, start with easy recipes. Fry eggs, cook bacon, or sauté vegetables. Avoid boiling water or cooking acidic foods until the layer is strong.
Tip: The more you use your pan, the better it gets. Cooking often builds up extra layers of seasoning naturally.
The Science Behind Seasoning
When oil is heated above its smoke point, it breaks down and bonds to the iron. This creates a polymerized layer that acts like a natural nonstick coating. Over time, this layer gets thicker and tougher.
Many people think seasoning is just about oil, but it’s actually a chemical change. This is why high heat and the right oil are so important.
For more detailed science, visit Wikipedia.
Frequently Asked Questions
How Do I Fix Sticky Spots On My Cast Iron Pan?
Sticky spots usually mean too much oil was used. Scrub the sticky area with a stiff brush, rinse, dry, and re-season with a thin layer of oil.
Can I Use Butter Or Shortening For Seasoning?
Butter burns at low temperatures and doesn’t create a strong layer. Shortening works, but oils like canola or flaxseed are better for lasting results.
Is It Safe To Cook Acidic Foods In A Newly Seasoned Pan?
It’s best to wait until your pan has several layers of seasoning. Acidic foods can strip the coating. Once your pan is dark and slick, you can cook tomatoes and vinegar-based dishes.
Do I Need To Season The Outside And Handle?
Yes. Cover the entire pan—including outside and handle—with oil. This protects all surfaces from rust and wear.
What Should I Do If My Cast Iron Pan Gets Rusty?
Scrub the rust with steel wool until clean. Wash, dry, and re-season as described above. Rust is not the end; your pan can recover.
A new cast iron frying pan is a wonderful kitchen tool. Seasoning may seem tricky, but with the right steps, your pan will become an easy-to-use, long-lasting favorite. Take your time, use the right oil, and don’t stress about small mistakes.
The more you cook with it, the better it gets. Your well-seasoned cast iron pan can become a family treasure—ready for decades of delicious meals.
:max_bytes(150000):strip_icc()/__opt__aboutcom__coeus__resources__content_migration__serious_eats__seriouseats.com__images__2016__09__20160817-cast-iron-pan-vicky-wasik-3-c56f176298784fef9e60f6cea198e0e4.jpg)
Credit: www.seriouseats.com

Hello, This is Annie Walker, a 38-year-old blogger, founder, and editor of Cookware Guider from NY, USA. I am a cookware fanatic and passionate cooker. I love to cook with different types of cooking appliances (example: all types of cookware, rice cookers, slow cookers, etc) almost every day in my kitchen. I love to share my experience with my readers in my blog. Also, I enjoy helping people to solve their problems through my website. You can follow me on Twitter & Pinterest. To know details about my blog please check the about us page.