
If you use knives often, you know a sharp blade is safer and easier to use. Dull knives slip and make cutting harder, while a sharp edge gives you control. But sharpening knives can seem tricky, especially if you’re not sure how to use a sharpening tool correctly. One brand that makes sharpening easier is Smith’s Knife Sharpener. Whether you have a simple pull-through model or a more advanced sharpening system, learning how to use it properly will help you keep your knives in top shape. This guide will walk you through everything you need to know about using a Smith’s Knife Sharpener—from choosing the right model to step-by-step instructions, troubleshooting, safety tips, and expert advice.
Understanding Smith’s Knife Sharpeners
Smith’s has been making knife sharpeners for over 130 years. They offer a wide range of products, from basic pull-through sharpeners to electric models and guided sharpening systems. Each model serves a different purpose and works best for certain types of knives.
Types Of Smith’s Knife Sharpeners
- Manual Pull-Through Sharpeners: These are the most popular. You pull the knife through preset slots that have sharpening stones or carbide blades set at a fixed angle.
- Electric Sharpeners: These use motorized wheels to sharpen the blade quickly. They’re great for busy kitchens.
- Sharpening Stones (Whetstones): Smith’s offers stones in different grits for those who prefer traditional sharpening.
- Guided Sharpening Systems: These help users maintain the correct angle with every stroke. They are ideal for people who want precise control.
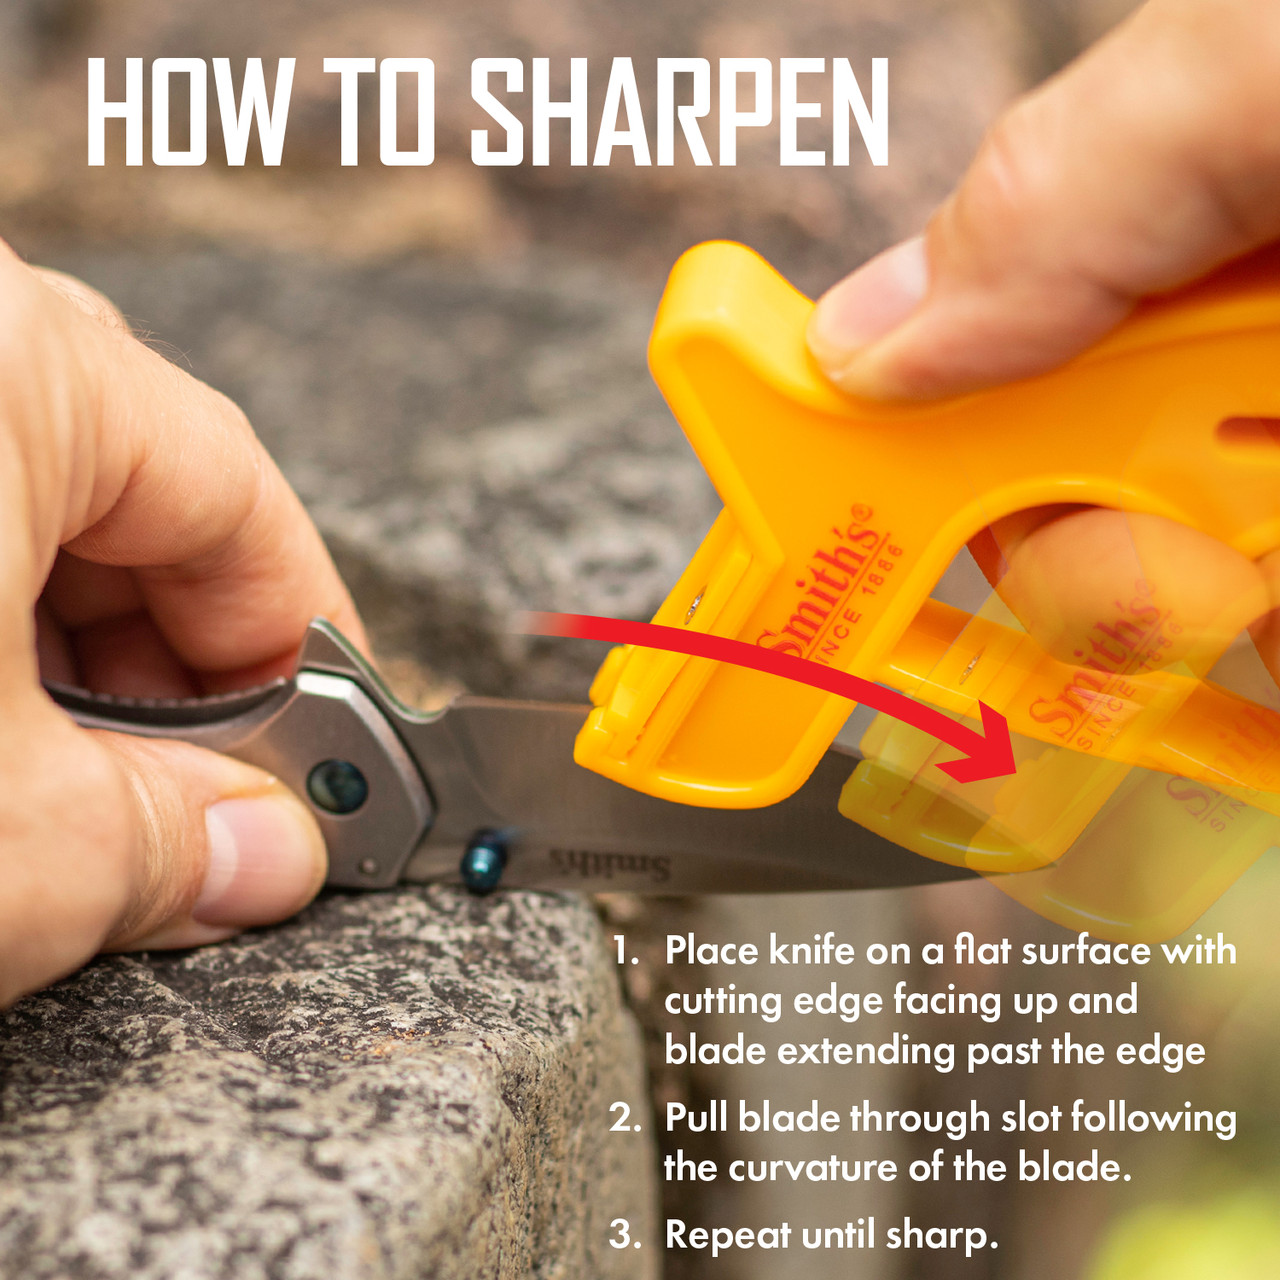
- Pocket Sharpeners: Small, portable sharpeners for outdoor use.
Each tool suits different needs. For example, pull-through sharpeners are fast and easy for beginners, while guided systems are best for detailed work.
Which Model Is Right For You?
Choosing the right sharpener depends on your knives and how often you use them. Here’s a quick comparison:
| Sharpener Type | Best For | Ease of Use | Price Range |
|---|---|---|---|
| Manual Pull-Through | Home cooks, beginners | Very Easy | $10-$30 |
| Electric | Busy kitchens, quick sharpening | Easy | $40-$100 |
| Whetstone | Experienced users, custom edges | Moderate | $15-$50 |
| Guided System | Precision sharpening | Easy to Moderate | $30-$70 |
Most people use manual pull-through sharpeners for their kitchen knives. If you have expensive or specialty knives, consider a guided system or whetstone for more control.
Preparing Your Knife And Sharpener
Before you sharpen, you need to prepare both your knife and the sharpener. This step is often skipped by beginners, but it can make a big difference.
- Clean the Knife: Wipe off any dirt, food, or oil. A clean blade sharpens more evenly.
- Check for Damage: If the knife has chips or cracks, sharpening may worsen the problem.
- Inspect the Sharpener: Make sure the sharpening slots or stones are clean and free of debris.
- Read the Instructions: Each Smith’s sharpener model has slightly different instructions. If you have the manual, check it for tips.
A clean setup helps the sharpener work better and keeps your knives in good condition.
Step-by-step Guide: Using A Smith’s Manual Pull-through Sharpener
Most people start with Smith’s manual pull-through sharpeners. They’re simple, effective, and safe. Here’s how to use one:
1. Place The Sharpener On A Stable Surface
Find a flat, non-slip surface. Some Smith’s sharpeners have rubber feet to prevent sliding. Always sharpen away from the edge of a table or counter.
2. Identify The Sharpening Slots
Most Smith’s pull-through models have two slots:
- Coarse Slot: For dull or damaged blades. Uses carbide blades to reshape the edge.
- Fine Slot: For finishing and polishing. Uses ceramic rods for a smooth edge.
Some advanced models may have extra slots for serrated knives.
3. Hold The Sharpener And Knife Correctly
Grip the sharpener handle firmly. Hold the knife by the handle, keeping your fingers away from the blade.
4. Insert The Knife Into The Slot
Start with the heel of the blade (the part closest to the handle). Place it into the slot at a slight angle, following the preset guide.
5. Pull The Knife Through
Apply gentle, even pressure. Pull the knife straight through from heel to tip. Do not twist or force the blade.
6. Repeat As Needed
- For a dull blade: 3–6 passes through the coarse slot.
- For finishing: 2–4 passes through the fine slot.
Never over-sharpen. Too many passes can wear out the blade.
7. Clean The Knife
Wipe off any metal shavings or dust with a damp cloth.
8. Test The Edge
Cut a piece of paper or a tomato. If the knife slices smoothly, you’re done.
Practical Example
Let’s say your chef’s knife is dull after months of use. You clean it, then run it through the coarse slot four times, followed by three passes through the fine slot. The blade easily cuts through a sheet of paper—your knife is now sharp.
Using Smith’s Electric Knife Sharpener
Electric models offer speed and convenience. Here’s how to use one:
- Plug in the Sharpener: Make sure it’s on a stable surface.
- Select the Right Slot: Most models have separate slots for sharpening and honing.
- Insert the Knife: Hold the blade steady and insert into the slot.
- Let the Sharpener Work: The motor pulls the blade through. Follow the instructions for timing—usually 3–5 seconds per pass.
- Repeat as Needed: Check the edge after each pass.
- Clean Up: Wipe the blade and empty the sharpener’s debris tray if needed.
Electric sharpeners are perfect for high-volume kitchens. But they can remove more metal, so avoid overuse.

Credit: www.youtube.com
Using Smith’s Whetstone And Guided Sharpening Systems
If you prefer more control, Smith’s whetstones and guided systems let you set the sharpening angle and adjust your technique. Here’s how:
Using Smith’s Whetstone
- Soak the Stone: If it’s a water stone, soak for 5–10 minutes.
- Place the Stone on a Stable Surface: Use a non-slip base.
- Set the Angle: 15–20 degrees is ideal for most kitchen knives.
- Sharpen the Blade: Glide the knife across the stone, keeping the angle steady. Sharpen each side evenly.
- Switch Grits: Start with coarse, then move to fine.
- Clean Up: Wipe the knife and stone.
Using Smith’s Guided Sharpening System
- Assemble the System: Follow the manual for setup.
- Set the Angle Guide: Use the preset guides for your knife type.
- Sharpen the Knife: Follow the guide rails, making consistent strokes.
- Check the Edge: Test with paper or food.
Guided systems help beginners avoid uneven sharpening.
Sharpening Serrated Knives And Specialty Blades
Serrated knives, like bread knives, require a different approach. Many Smith’s sharpeners have a special slot or rod for serrated blades.
- Find the Serrated Slot or Rod: It’s usually marked.
- Sharpen Each Serration: Use gentle, back-and-forth motions. Do not force the blade.
- Check for Burrs: Serrated knives may develop small burrs—remove them with a fine rod.
Specialty blades, like hunting knives, may need a different angle. Check your sharpener’s manual.
Common Mistakes And How To Avoid Them
Even experienced users make mistakes. Here are some common errors and how to fix them:
- Pressing Too Hard: More pressure removes more metal, but can damage the edge.
- Using the Wrong Slot: Always start with coarse, finish with fine.
- Sharpening Dirty Knives: Dirt can scratch the sharpening stones.
- Ignoring the Angle: Not following the preset angle leads to uneven edges.
- Over-Sharpening: Too many passes wear out the blade.
If you notice your knife is getting thinner or the edge feels rough, you may be sharpening too aggressively.
Maintenance And Cleaning Tips
Keeping your Smith’s sharpener clean helps it last longer and work better.
Cleaning Manual Sharpeners
- Wipe Slots: Use a dry cloth after each session.
- Deep Clean: Remove debris using a soft brush every few weeks.
Cleaning Electric Sharpeners
- Empty Debris Tray: Most models have a removable tray.
- Wipe Exterior: Use a damp cloth.
Cleaning Whetstones
- Rinse After Use: Wash with water and let dry completely.
- Avoid Oil Buildup: If using oil, clean regularly to prevent clogging.
Sharpening Rods And Guides
- Clean Guides: Remove metal shavings after use.
- Check for Wear: Replace worn-out rods.
Proper maintenance extends the life of your sharpener and keeps your knives in top shape.

Credit: www.youtube.com
Safety Tips For Sharpening Knives
Sharpening can be dangerous if you’re not careful. Follow these tips:
- Keep Fingers Clear: Always hold the handle, never touch the blade.
- Use a Stable Surface: Prevent slips and accidents.
- Sharpen Away From Your Body: Always pull the knife away from you.
- Don’t Rush: Take your time to avoid mistakes.
- Store Sharpener Safely: Keep out of reach of children.
Many accidents happen because of rushing or improper grip. Stay focused and careful.
How Often Should You Sharpen Your Knife?
Frequency depends on use and knife type. Here’s a guideline:
| Knife Type | Use Frequency | Sharpening Interval |
|---|---|---|
| Chef’s Knife | Daily | Every 2–4 weeks |
| Paring Knife | Weekly | Every 4–8 weeks |
| Serrated Knife | Occasional | Every 3–6 months |
| Outdoor Knife | Variable | After heavy use |
You can also use a honing rod between sharpening sessions to keep the edge aligned.
Credit: smithsproducts.com
Advanced Sharpening Techniques
If you want an extra-sharp edge or need to restore a damaged blade, try these advanced methods:
Creating A Micro-bevel
After sharpening, run the edge at a slightly higher angle (about 1–2 degrees) through the fine slot. This micro-bevel increases durability.
Sharpening High-end Steel
Some knives are made from hard steel (like VG-10 or S30V). These need slower, more careful sharpening. Use fine grit and fewer passes.
Fixing A Chipped Edge
If your blade is chipped, start with the coarse slot or stone. Sharpen until the chips disappear, then finish with fine grit.
These techniques help you get the most out of your knives.
Comparing Smith’s Knife Sharpeners To Other Brands
Smith’s is a trusted name, but how does it compare to other brands? Here’s a quick look:
| Brand | Ease of Use | Price | Features | Durability |
|---|---|---|---|---|
| Smith’s | Very Easy | Low–Medium | Wide range, preset angles | High |
| Lansky | Moderate | Medium | Guided system, custom angles | High |
| Chef’sChoice | Easy | Medium–High | Electric, multiple stages | High |
| Work Sharp | Easy | Medium–High | Electric, belt systems | Very High |
Smith’s stands out for affordability, ease of use, and reliability. Other brands offer more advanced features, but often at a higher price.
Real-life Examples And User Insights
Many home cooks and chefs use Smith’s sharpeners. Here are some insights:
- Home Cook: “My Smith’s pull-through sharpener is simple and fast. I sharpen my chef’s knife every month, and it stays sharp.”
- Outdoor Enthusiast: “I use the Smith’s pocket sharpener on camping trips. It’s small and works well on my hunting knife.”
- Professional Chef: “For expensive knives, I prefer a guided system, but Smith’s makes it easy for basic kitchen knives.”
One non-obvious insight: Many beginners think sharpening is only for dull knives. In reality, regular sharpening prevents dullness and keeps knives safer.
Another common mistake: Using too much force or too many passes. Most knives only need a few gentle pulls to restore the edge.
Troubleshooting: If Your Knife Isn’t Getting Sharp
If your knife still feels dull after sharpening, try these steps:
- Check the Angle: Make sure you’re following the preset angle. If not, the edge won’t form correctly.
- Try More Passes: If the blade is very dull, you may need extra passes through the coarse slot.
- Clean the Sharpener: Debris can reduce effectiveness.
- Test with Different Materials: Try cutting paper, food, or rope to check sharpness.
- Inspect for Damage: Chips or cracks can prevent a sharp edge.
If all else fails, consider professional sharpening or replacing the blade.
Expert Tips For Better Results
- Use Light Pressure: Sharp edges form best with gentle, consistent pressure.
- Sharpen Regularly: Don’t wait for knives to get dull.
- Follow the Manual: Each Smith’s model has unique features—read the guide.
- Store Knives Properly: A sharp knife stays sharp longer if stored in a block or sheath.
- Avoid Hard Surfaces: Never cut on glass or stone, as these dull the blade quickly.
Sharpening is a skill, but Smith’s sharpeners make it easy for anyone to learn.
Frequently Asked Questions
How Do I Know If My Knife Is Sharp Enough?
A sharp knife should slice through paper easily and cut food smoothly. If it struggles, it needs more sharpening.
Can I Sharpen All Types Of Knives With Smith’s Sharpener?
Most Smith’s sharpeners work for kitchen and outdoor knives. Specialized models handle serrated blades and scissors.
How Long Does Sharpening Take?
Manual sharpening takes about 1–3 minutes per knife. Electric sharpeners are faster—often less than a minute.
Is It Safe To Use A Smith’s Knife Sharpener?
Yes, as long as you follow safety guidelines. Keep fingers clear, use a stable surface, and don’t rush.
Where Can I Find More Information About Smith’s Sharpeners?
You can learn more at the official Smith’s website: Smith’s Products.
Keeping your knives sharp is one of the best ways to make cooking easier and safer. With Smith’s Knife Sharpener, you can sharpen blades quickly and confidently. Whether you use a manual pull-through, electric model, or guided system, following the steps above will help you get a razor-sharp edge every time. Remember to clean your tools, follow safety tips, and sharpen regularly. With practice, you’ll be able to keep all your knives in top condition—ready for any kitchen task.

Hello, This is Annie Walker, a 38-year-old blogger, founder, and editor of Cookware Guider from NY, USA. I am a cookware fanatic and passionate cooker. I love to cook with different types of cooking appliances (example: all types of cookware, rice cookers, slow cookers, etc) almost every day in my kitchen. I love to share my experience with my readers in my blog. Also, I enjoy helping people to solve their problems through my website. You can follow me on Twitter & Pinterest. To know details about my blog please check the about us page.