Cooking chicken breast on a frying pan can feel tricky, especially if you want it juicy and full of flavor. Maybe you’ve tried before, only to end up with dry or unevenly cooked meat.
But what if you could master a simple technique that guarantees perfect chicken every time? In this guide, you’ll discover easy steps and insider tips to cook chicken breast that stays tender and delicious. Keep reading, and you’ll never worry about dry chicken again.
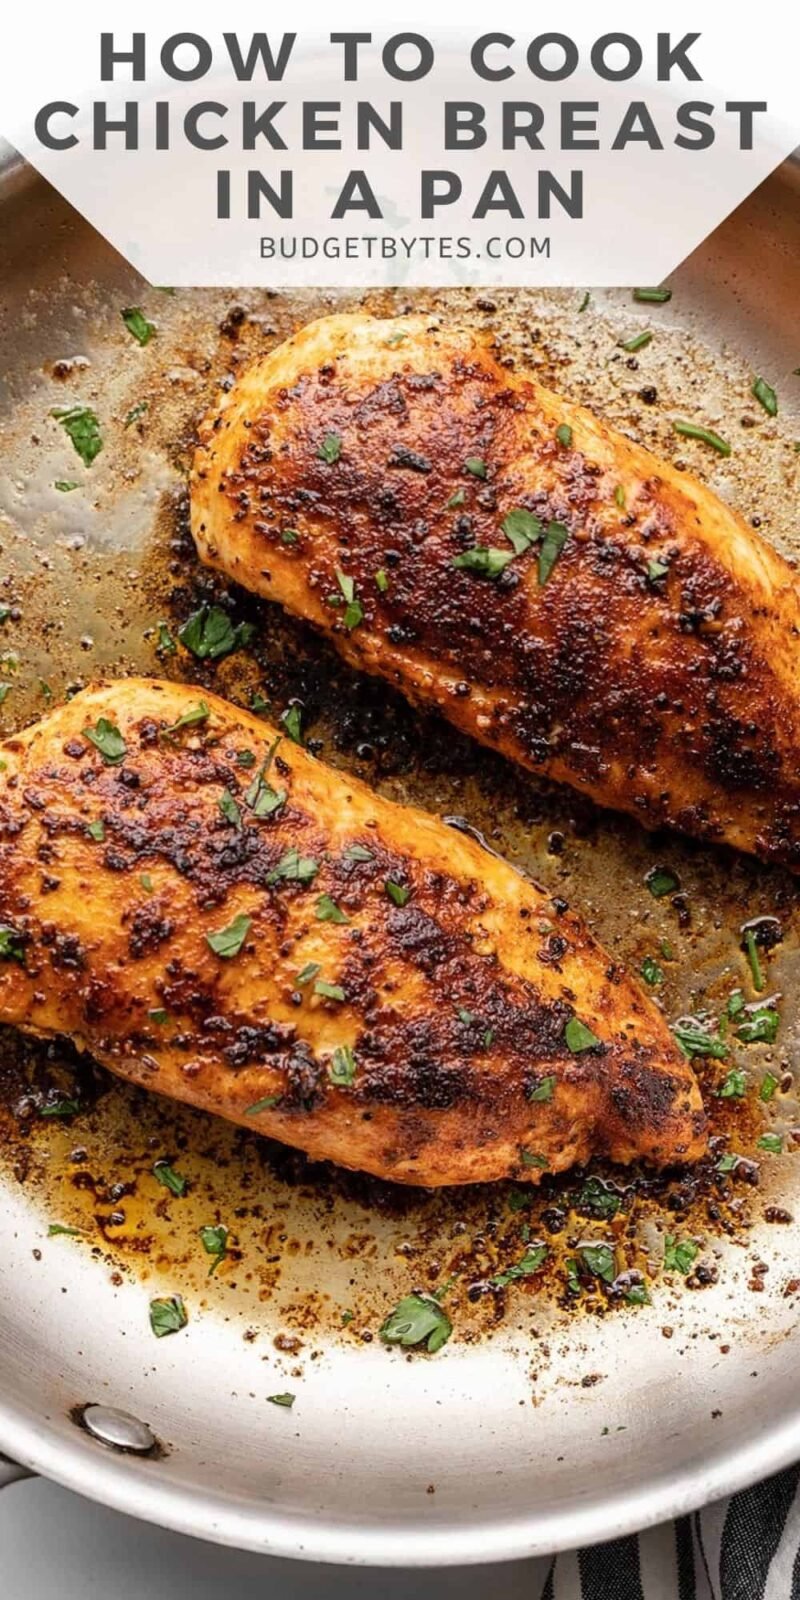
Credit: www.budgetbytes.com
Choosing The Right Chicken Breast
Choosing the right chicken breast is the first step to cooking a delicious meal on a frying pan. The quality and type of chicken breast affect the taste, texture, and cooking time. Picking fresh, well-sized chicken breasts helps achieve even cooking and juicy results. Understanding the differences between fresh and frozen chicken and selecting the correct size and thickness will make cooking easier and more enjoyable.
Fresh Vs Frozen
Fresh chicken breast often tastes better and cooks more evenly than frozen. It usually has a softer texture and retains natural juices well. Fresh chicken should be pale pink with no strong smell. Use it within 1-2 days of purchase for best results.
- Fresh chicken: Softer texture, quicker to cook, better flavor.
- Frozen chicken: Lasts longer, convenient for storage, needs thawing.
Frozen chicken breasts need careful thawing to avoid uneven cooking. Thaw in the fridge for 24 hours or use cold water for faster thawing. Avoid thawing at room temperature to prevent bacteria growth.
| Factor | Fresh Chicken | Frozen Chicken |
|---|---|---|
| Texture | Soft and tender | May be slightly tougher |
| Flavor | More natural and juicy | Flavor can be less intense |
| Storage Time | 1-2 days in fridge | Several months in freezer |
| Preparation | Ready to cook | Requires thawing |
Choose fresh chicken for quicker cooking and better taste. Frozen chicken works well for meal planning and longer storage.
Size And Thickness
Size and thickness of chicken breast affect cooking time and texture. Thicker pieces take longer to cook and may dry out if overcooked. Thin, even pieces cook faster and stay juicy.
Consider these tips:
- Use uniform pieces: Cut chicken to similar thickness for even cooking.
- Butterfly thick breasts: Slice horizontally to reduce thickness.
- Flatten with a meat mallet: Pound chicken gently to even thickness.
Use a kitchen scale to check size if exact cooking time matters. Generally, 6 to 8 ounces per breast works well for frying pan cooking.
| Thickness | Cooking Time (per side) | Notes |
|---|---|---|
| ½ inch (thin) | 3-4 minutes | Quick cooking, juicy |
| ¾ inch (medium) | 5-6 minutes | Good balance of texture |
| 1 inch or more (thick) | 7-8 minutes | Needs careful cooking to avoid dryness |
Choose chicken breasts that fit your cooking time and recipe. Even thickness is key for juicy, tender chicken from the frying pan.
Preparing The Chicken
Preparing the chicken breast properly is key to cooking it perfectly on a frying pan. This step ensures the meat cooks evenly and tastes delicious. It starts with trimming and cleaning, followed by marinating and seasoning. Taking time here will improve the texture and flavor of your chicken breast. Let’s explore how to get your chicken ready for the pan.
Trimming And Cleaning
Begin by removing any extra fat, skin, or tendons from the chicken breast. These parts can burn or cause uneven cooking. Use a sharp knife to carefully trim these off. Cleaning the chicken is also important to remove any surface bacteria and ensure food safety.
- Rinse the chicken under cold running water. This helps remove any loose bits or residue.
- Pat dry with paper towels. Dry chicken browns better on the pan.
- Trim off white tendons and excess fat. These parts can be tough and chewy.
Use this simple table as a guide for trimming:
| Part | Reason to Remove | How to Remove |
|---|---|---|
| Excess fat | Burns easily, alters flavor | Trim with a sharp knife |
| Skin | Can make dish greasy | Peel off before cooking |
| Tendons | Tough texture | Cut away carefully |
Trimmed and cleaned chicken cooks evenly and looks better on the plate. This step also helps the seasoning stick well. Never skip it for best results.
Marinating And Seasoning
Marinating adds flavor and tenderizes the chicken breast. Seasoning brings out the natural taste and makes the dish more enjoyable. Both steps are simple but important for a juicy, tasty chicken breast.
Use basic marinade ingredients such as:
- Olive oil or any cooking oil
- Acidic ingredient like lemon juice or vinegar
- Salt and pepper
- Garlic or onion powder
- Optional herbs like thyme, rosemary, or paprika
Follow these tips to marinate and season:
- Mix marinade ingredients in a bowl.
- Place chicken breast in the marinade. Make sure it is well coated.
- Cover and refrigerate for 30 minutes to 2 hours. This helps flavors soak in.
- Before cooking, pat chicken dry slightly. Too much moisture can stop browning.
- Season with extra salt and pepper if needed.
Try this simple marinade recipe:
| Ingredient | Quantity | Purpose |
|---|---|---|
| Olive oil | 2 tablespoons | Keeps chicken moist |
| Lemon juice | 1 tablespoon | Tenderizes meat |
| Garlic powder | 1 teaspoon | Adds flavor |
| Salt | 1 teaspoon | Enhances taste |
| Black pepper | ½ teaspoon | Adds mild heat |
Marinating and seasoning prepare the chicken for cooking. It makes every bite flavorful and tender. Do not rush this step for the best frying pan chicken breast.
Selecting The Pan And Oil
Cooking chicken breast on a frying pan starts with choosing the right pan and oil. These two elements affect the taste, texture, and cooking time of your chicken. Picking the right pan ensures even heat and prevents sticking. Selecting the best oil helps achieve a crispy outside and juicy inside. Understanding different pan types and oils will make your cooking easier and better.
Pan Types
The pan you use can change the way your chicken cooks. Some pans heat evenly, while others may cause hot spots or sticking. Here are the most common types:
- Non-stick pans: Great for easy cooking and cleaning. They need less oil and prevent chicken from sticking.
- Stainless steel pans: Durable and good for browning chicken. They require more oil to stop sticking and need careful heat control.
- Cast iron pans: Hold heat very well and give a nice crust. They take longer to heat but keep temperature steady.
- Ceramic pans: Non-stick and free from chemicals. They heat evenly but can be less durable than others.
Here is a quick comparison of pan types:
| Pan Type | Heat Distribution | Stick Resistance | Cleaning Ease |
|---|---|---|---|
| Non-stick | Good | Excellent | Easy |
| Stainless Steel | Fair | Low (needs oil) | Moderate |
| Cast Iron | Excellent | Good (with seasoning) | Harder |
| Ceramic | Good | Good | Moderate |
Tip: Preheat your pan before adding oil and chicken. This helps to cook evenly and prevents sticking.
Best Oils For Frying
Choosing the right oil affects flavor and how well the chicken cooks. Oils have different smoke points, which means the temperature at which they start to burn. Use oils with a high smoke point for frying chicken breast. This keeps the oil stable and the chicken tasty.
Common oils for frying chicken breast:
- Canola oil: Neutral flavor and high smoke point (about 400°F). Good for frying and healthy.
- Vegetable oil: Affordable and neutral taste. Smoke point around 400°F.
- Avocado oil: High smoke point (about 520°F). Light flavor and healthy fats.
- Peanut oil: Great for frying with a smoke point near 450°F. Adds a mild nutty flavor.
- Olive oil (light or refined): Moderate smoke point (about 465°F). Adds a slight flavor but should be used carefully to avoid burning.
Avoid oils with low smoke points, like unrefined olive oil or butter. They burn quickly and give a bitter taste.
Here is a summary of popular frying oils:
| Oil | Smoke Point (°F) | Flavor | Health Notes |
|---|---|---|---|
| Canola Oil | 400 | Neutral | Low in saturated fat |
| Vegetable Oil | 400 | Neutral | Common and affordable |
| Avocado Oil | 520 | Mild | Rich in healthy fats |
| Peanut Oil | 450 | Mild nutty | Good for high heat |
| Light Olive Oil | 465 | Light fruity | Contains antioxidants |
Tip: Pour enough oil to coat the pan evenly. Too little oil can cause sticking and uneven cooking.
Cooking Techniques
Cooking chicken breast on a frying pan requires simple but effective techniques to get juicy, flavorful results. Understanding the right steps helps avoid dry or unevenly cooked chicken. Focus on how to prepare the pan, how to sear the meat, and how to control the heat. These techniques work together to create a perfect chicken breast every time.
Preheating The Pan
Preheating the pan is the first and most important step. A hot pan ensures the chicken cooks evenly and develops a nice crust. Start by placing your frying pan on medium heat. Let it warm up for about 3 to 5 minutes before adding any oil or chicken.
- Use a heavy-bottomed pan: It holds heat better and distributes it evenly.
- Test the heat: Flick a few drops of water on the pan. If they sizzle and evaporate quickly, the pan is ready.
- Add oil after heating: Pour a small amount of oil, like olive or vegetable oil, and let it warm for 30 seconds.
Preheating prevents the chicken from sticking and helps seal in juices. Avoid adding cold chicken to a cold pan; this causes uneven cooking and soggy texture. A well-preheated pan starts the cooking process immediately, giving the chicken a golden color and better flavor.
Searing The Chicken
Searing means cooking the chicken breast quickly on high heat to create a brown crust. This step locks in moisture and adds flavor. Place the chicken breast in the hot pan without moving it for 3 to 5 minutes. Let the surface brown before flipping.
Important tips for searing:
- Pat the chicken dry: Use paper towels to remove moisture. This helps get a crisp crust.
- Do not overcrowd the pan: Leave space between pieces for even heat distribution.
- Use tongs to flip: Avoid piercing the meat to keep juices inside.
| Step | Action | Time |
|---|---|---|
| 1 | Place chicken in pan | 0 minutes |
| 2 | Cook without moving | 3-5 minutes |
| 3 | Flip and sear other side | 3-5 minutes |
Searing creates a delicious outer layer that seals the juices inside. This method helps the chicken stay tender and flavorful.
Adjusting Heat Levels
Controlling heat is key to cooking chicken breast perfectly. After searing on high heat, reduce the temperature to medium or medium-low. This allows the inside to cook through without burning the outside.
Follow these heat tips:
- Start high: For searing and browning.
- Lower heat: To finish cooking gently and evenly.
- Use a lid: Cover the pan to trap heat and cook faster.
- Check doneness: Use a meat thermometer. Chicken is safe at 165°F (74°C).
Adjusting heat prevents dry chicken and ensures a juicy texture. Too high heat burns the outside; too low heat dries out the meat. Finding the right balance keeps chicken tender and tasty.
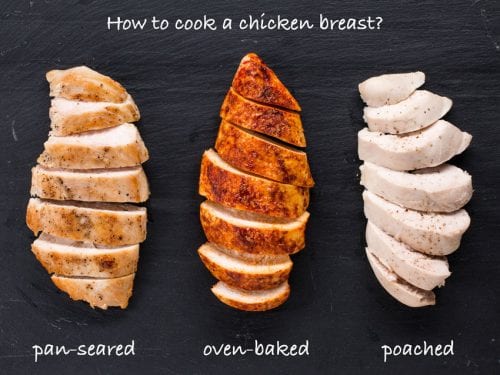
Checking For Doneness
Checking for doneness is a key step in cooking chicken breast on a frying pan. It ensures the chicken is safe to eat and tastes juicy, not dry. Knowing how to tell when the chicken is cooked saves time and avoids guesswork. This section explains simple ways to check if your chicken breast is done, using internal temperature and visual cues.
Internal Temperature
Using a meat thermometer is the most reliable way to check if chicken breast is fully cooked. The safe internal temperature for chicken is 165°F (74°C). Insert the thermometer into the thickest part of the breast, avoiding bones or fat. Once it reads 165°F, the chicken is safe and ready to eat.
Here are tips for using a thermometer:
- Insert the probe straight into the center of the thickest part.
- Wait a few seconds for the reading to stabilize.
- Check multiple spots if the breast is uneven in thickness.
The table below shows temperature levels and what they mean:
| Temperature (°F) | Status | Texture |
|---|---|---|
| Below 160°F | Undercooked | Soft, raw-like, unsafe |
| 165°F | Fully Cooked | Firm, juicy, safe to eat |
| Above 170°F | Overcooked | Dry, tough |
Checking the internal temperature stops guesswork and helps keep chicken moist. Always use a clean thermometer to avoid contamination.
Visual Cues
Visual signs can guide doneness without a thermometer. Look for these changes in the chicken breast:
- Color: The inside should be white or very light pink, not red or dark pink.
- Juices: Clear juices mean the chicken is cooked; pink or red juices mean it needs more time.
- Texture: Cooked chicken feels firm but still slightly springy. Raw chicken is soft and squishy.
Cut the thickest part of the chicken to check inside. The meat should be opaque and easy to slice. If the texture is too rubbery, cook a bit longer.
Here is a quick guide to visual cues:
| Visual Cue | Cooked | Undercooked |
|---|---|---|
| Color | White/light pink inside | Dark pink/red inside |
| Juices | Clear or no juices | Pink or red juices |
| Texture | Firm, springy | Soft, squishy |
Visual checks work well with practice. Combine them with temperature checks for best results. This way, chicken breast stays safe and tasty every time.
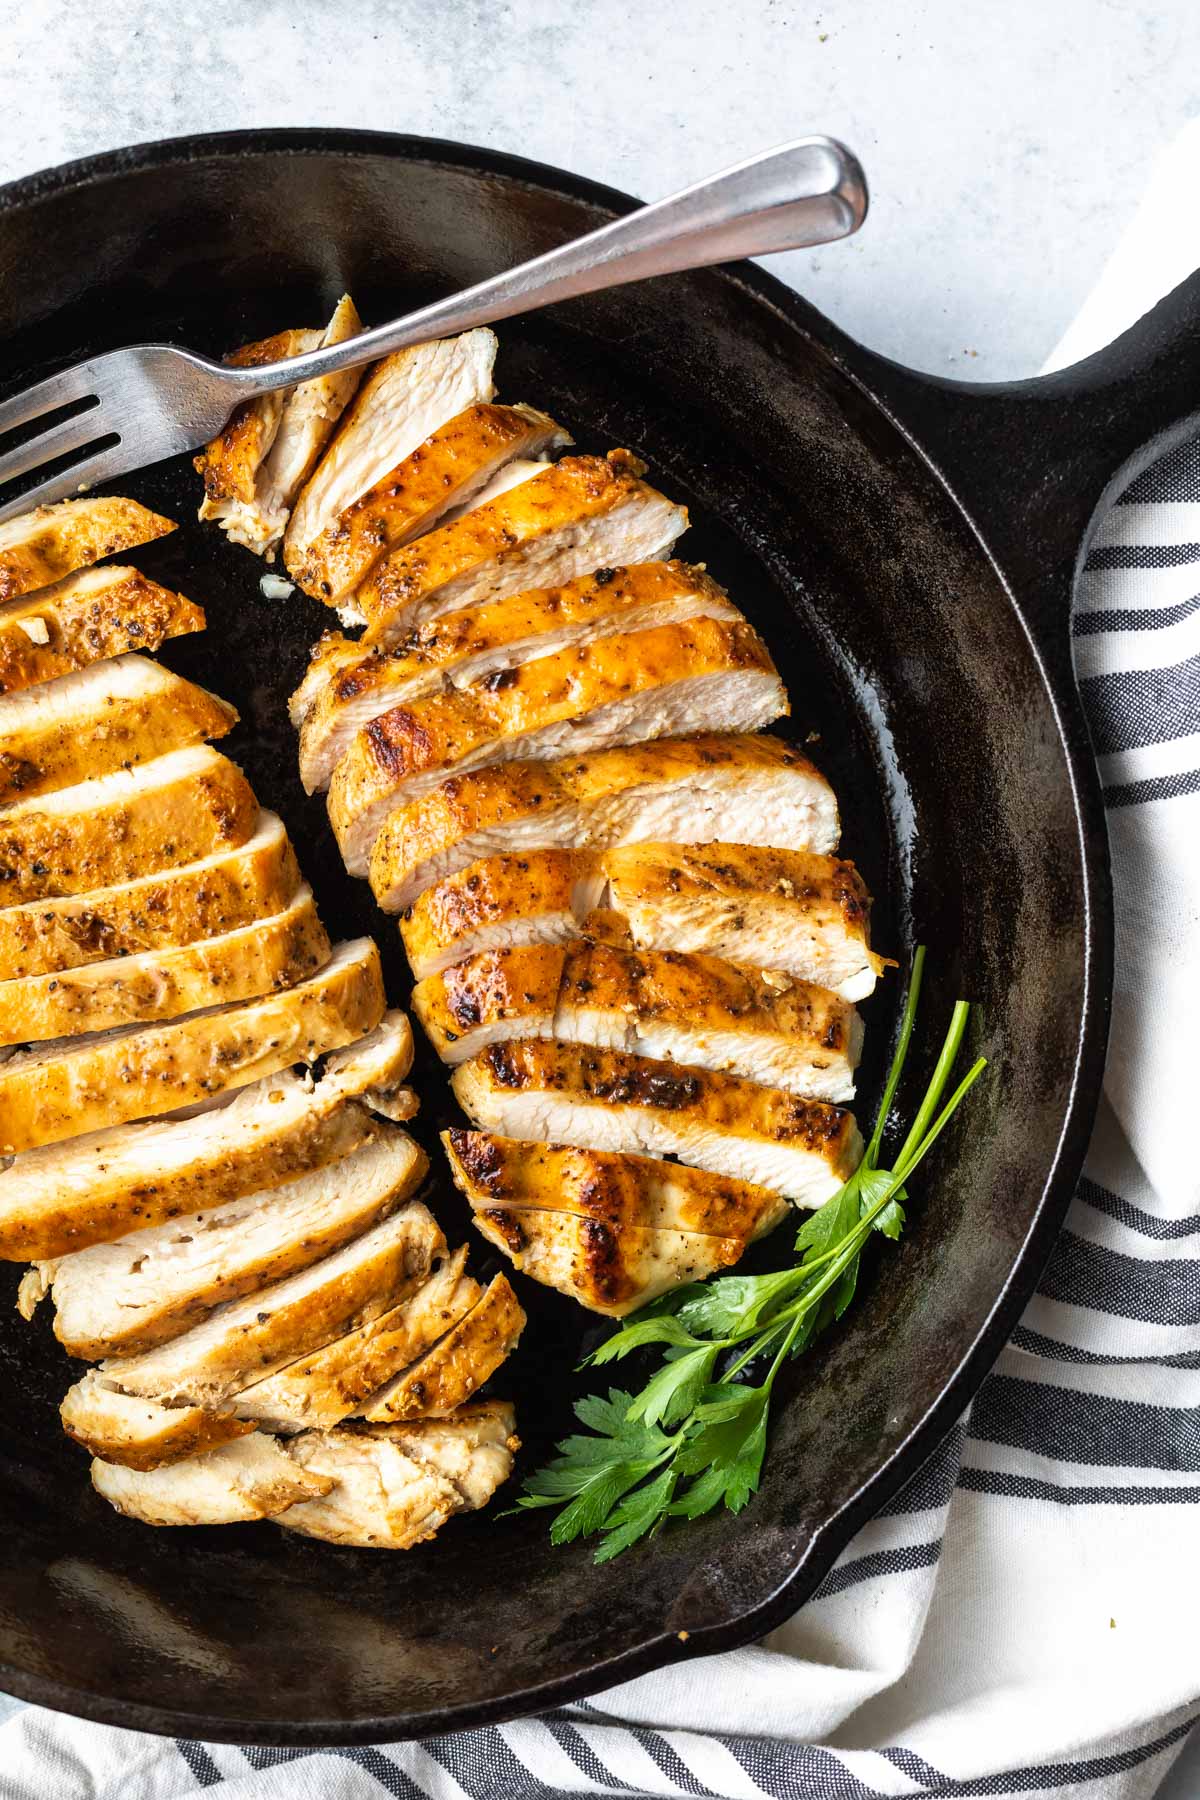
Resting And Serving
Cooking chicken breast on a frying pan is simple, but resting and serving make a big difference. After cooking, the chicken needs time to rest. This step helps the juices spread inside the meat. Resting keeps the chicken juicy and tender. Serving the chicken the right way also enhances the meal. This part explains how long to rest and the best ways to serve chicken breast for a tasty dish.
Resting Time
Resting chicken breast after frying lets the juices move back into the meat. This makes the chicken moist and soft. If you cut the chicken right away, the juices will spill out and the meat will be dry.
How long to rest:
- Rest the chicken for at least 5 minutes.
- For thicker pieces, rest for 7 to 10 minutes.
- Cover the chicken lightly with foil to keep it warm.
The resting time depends on the size of the chicken breast. A small breast needs less time, and a large one needs more. Use this table as a guide:
| Chicken Breast Size | Resting Time |
|---|---|
| Small (4 oz) | 5 minutes |
| Medium (6 oz) | 7 minutes |
| Large (8 oz or more) | 10 minutes |
Resting also helps the chicken finish cooking if it is slightly underdone. The heat inside keeps cooking the chicken gently. Avoid skipping resting because it improves flavor and texture. Take this simple step to make your chicken breast taste better.
Serving Suggestions
Serving chicken breast well makes your meal more enjoyable. The cooked chicken pairs well with many sides and sauces. Choose simple and fresh options to balance the flavors.
Popular serving ideas:
- Vegetables: Steamed broccoli, roasted carrots, or a fresh salad.
- Carbs: Rice, mashed potatoes, or quinoa for energy.
- Sauces: Light lemon butter, garlic sauce, or a simple herb dressing.
Try to slice the chicken breast thinly before serving. Thin slices look nice and cook evenly on the pan. This also helps when you add the sauce, so it covers every bite.
Here is a quick serving guide table:
| Side Dish | Why It Works |
|---|---|
| Steamed Vegetables | Keeps the meal light and healthy |
| Mashed Potatoes | Adds creamy texture and comfort |
| Quinoa Salad | Offers a nutty flavor and protein boost |
| Lemon Butter Sauce | Brightens and enhances chicken flavor |
Arrange the chicken on the plate with sides on the side. Garnish with fresh herbs like parsley or basil for color and extra taste. Serve immediately after resting for the best experience.
Common Mistakes To Avoid
Cooking chicken breast on a frying pan is quick and easy. Many people try it but make simple errors that affect taste and texture. Avoiding common mistakes helps make juicy, flavorful chicken every time. Two key errors are overcooking and underseasoning. Knowing how to avoid these improves your cooking skills and meal quality.
Overcooking
Overcooking chicken breast is a frequent issue. Chicken cooks fast, so leaving it on the pan too long makes it dry and tough. Overcooked chicken loses its natural juices, resulting in a bland texture.
Signs of overcooking:
- Chicken feels very firm or rubbery.
- The meat looks white and dry inside.
- The surface appears burnt or very dark.
How to avoid overcooking:
- Use medium heat to cook evenly without burning.
- Cook each side for 5-7 minutes depending on thickness.
- Use a meat thermometer; the ideal internal temperature is 165°F (75°C).
- Let the chicken rest for 5 minutes after cooking to keep juices inside.
| Cooking Time | Thickness | Result |
|---|---|---|
| 4-5 minutes each side | Thin (1/2 inch) | Juicy, tender |
| 6-7 minutes each side | Medium (3/4 inch) | Well cooked, moist |
| 8+ minutes each side | Thick (1 inch or more) | Risk of drying out |
Use these tips to avoid overcooking. Keep a close watch on the chicken while frying. Avoid very high heat as it cooks the outside too fast but leaves the inside raw or dry.
Underseasoning
Underseasoning chicken breast is a common mistake. Plain chicken tastes bland without enough salt, spices, or herbs. Proper seasoning enhances flavor and makes the dish enjoyable.
Why seasoning matters:
- Salt brings out natural chicken taste.
- Spices add aroma and layers of flavor.
- Herbs create freshness and balance.
Simple seasoning tips:
- Salt the chicken breast well on both sides before cooking.
- Add pepper and your favorite spices like paprika, garlic powder, or cumin.
- Marinate chicken for 30 minutes for deeper flavor.
- Use fresh herbs like thyme or rosemary after cooking for aroma.
| Seasoning | Purpose | When to Use |
|---|---|---|
| Salt | Enhances natural taste | Before cooking |
| Spices (paprika, garlic powder) | Add flavor and color | Before or during cooking |
| Fresh herbs (thyme, rosemary) | Add aroma and freshness | After cooking or in marinade |
Do not skip seasoning. It transforms plain chicken into a tasty meal. Even simple salt and pepper make a big difference. Taste as you go and adjust seasonings to your liking.
Credit: www.flavcity.com
Credit: www.simplywhisked.com
Frequently Asked Questions
How Long To Cook Chicken Breast On Frying Pan?
Cook chicken breast on medium heat for 6-7 minutes each side. Ensure internal temperature reaches 165°F (74°C) for safety. Avoid overcooking to keep it juicy and tender.
Should I Use Oil Or Butter To Cook Chicken Breast?
Use oil with a high smoke point like olive or canola oil. Butter adds flavor but can burn quickly. Combining both offers taste and prevents sticking.
How To Prevent Chicken Breast From Drying Out?
Pound chicken breast to even thickness for uniform cooking. Cook on medium heat and avoid flipping frequently. Rest meat for 5 minutes after cooking to retain juices.
Can I Cook Frozen Chicken Breast On Frying Pan?
It’s best to thaw chicken breast before frying. Cooking frozen chicken leads to uneven cooking and dryness. Use a microwave or fridge to thaw safely.
Conclusion
Cooking chicken breast on a frying pan is simple and quick. Use medium heat to keep it juicy and tender. Season the chicken well to add flavor. Flip the breast only once to cook evenly. Check the inside to avoid undercooking.
Serve it with your favorite sides for a complete meal. Practice these steps to build confidence in cooking. Enjoy tasty, healthy chicken made right at home. Cooking can be easy and fun with a little care.

Hello, This is Annie Walker, a 38-year-old blogger, founder, and editor of Cookware Guider from NY, USA. I am a cookware fanatic and passionate cooker. I love to cook with different types of cooking appliances (example: all types of cookware, rice cookers, slow cookers, etc) almost every day in my kitchen. I love to share my experience with my readers in my blog. Also, I enjoy helping people to solve their problems through my website. You can follow me on Twitter & Pinterest. To know details about my blog please check the about us page.