
Slicing food by hand can be time-consuming and inconsistent, especially when you need even results for salads, stir-fries, or meal prep. A food processor changes this routine, making slicing fast, uniform, and less stressful. Yet, many people don’t use the slicing feature to its full potential. Some even struggle with uneven slices, food jams, or wasted ingredients. Learning how to slice with a food processor is not just about pushing a button—it’s about understanding the right techniques, choosing the best foods, and using the correct attachments. This guide will walk you through everything you need to know to become confident at slicing with your food processor, whether you’re new to kitchen gadgets or looking to improve your results.
Understanding The Food Processor’s Slicing Feature
Most food processors come with a slicing disc, also called a slicing blade. This disc sits at the top of the processor bowl and spins rapidly, cutting food as it passes through. The thickness of your slices depends on the disc type or its adjustable settings. Some machines offer several discs for different thicknesses, while others have a reversible disc with two options.
Not all food processors are created equal. High-end models often have more precise slicing, better power, and extra safety features. In contrast, basic models may come with only one disc and limited speed settings. Before slicing, always check your user manual to know which disc to use and how to assemble it correctly.
How Slicing Discs Work
The slicing disc typically has a sharp, circular blade. When you place food in the feed tube and press it down, the disc slices through the food and spins it into the bowl. The size of the feed tube affects what you can slice efficiently. Wider tubes allow larger vegetables, like potatoes or onions, while narrow tubes are best for carrots or celery.
Some processors also include an adjustable slicing disc, where you can twist a knob or dial to choose your slice thickness. These discs can range from paper-thin (about 1mm) to thick cuts (up to 8mm or more).
Key Differences: Slicing Vs. Shredding
Many beginners confuse the slicing disc with the shredding (grating) disc. Slicing creates flat, round pieces—think cucumber circles. Shredding creates small, thin strips, like grated cheese or carrots for salad. Always double-check which disc you’ve installed to avoid surprises.
Why Slice With A Food Processor?
There are several reasons to use your food processor for slicing:
- Speed: It takes only seconds to slice a whole cucumber or a pound of potatoes.
- Consistency: Uniform slices cook evenly, look better, and help with food presentation.
- Safety: The processor’s design keeps your fingers away from blades, reducing the risk of cuts.
- Less Effort: It reduces hand fatigue, especially when prepping large batches or tough vegetables.
- Versatility: Slicing works for fruits, vegetables, cheese, and even cooked meats.
Professional kitchens rely on food processors to save time and maintain high quality. At home, this tool can help you prepare recipes like au gratin potatoes, coleslaw, or ratatouille with less hassle.
Preparing Your Food Processor For Slicing
Before you start, make sure your machine is clean, assembled correctly, and placed on a stable surface. Here’s how to get ready:
- Unplug the Food Processor: Safety first—always unplug before inserting discs or cleaning.
- Insert the Slicing Disc: Place the disc on the drive shaft, following your machine’s instructions. Lock the bowl and lid in place.
- Choose the Right Disc: Select the disc thickness based on your recipe. For salad, thin slices are usually best. For roasting, thicker slices hold up better.
- Check the Feed Tube: Remove any attachments that aren’t needed. Make sure the feed tube is clear and the pusher fits properly.
Food Preparation Tips
Clean and dry all ingredients before slicing. Trim food to fit the feed tube. For example, halve a large onion or cut potatoes into chunks. Peeling is optional, but it can improve texture and appearance for some recipes.
Stacking several small items together (like radishes or mushrooms) in the feed tube can help you slice more at once and waste less time.
What Foods Can You Slice?
A food processor can handle a wide variety of foods, but some work better than others. Here are the most common options:
| Food | Best Disc Thickness | Special Tips |
|---|---|---|
| Cucumbers | Thin (1-3mm) | Chill before slicing for crispness |
| Potatoes | Medium to thick (3-6mm) | Peel for smoother slices |
| Carrots | Thin (1-3mm) | Cut to fit feed tube vertically |
| Onions | Medium (3-4mm) | Peel and halve for even slices |
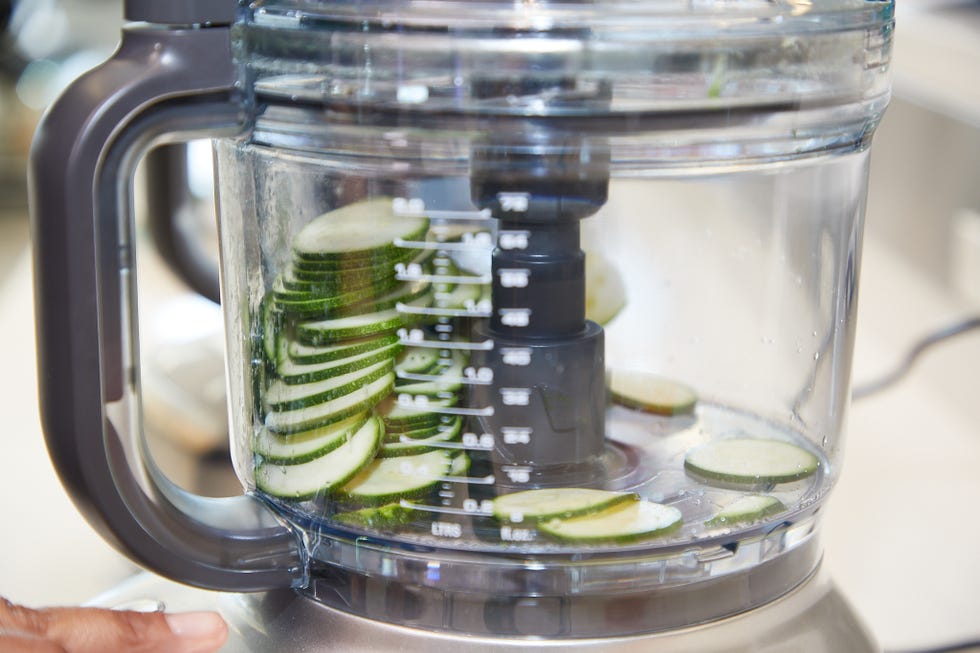
| Zucchini | Thin to medium (2-4mm) | Trim ends for better stability |
| Cheese (semi-hard) | Medium (3-5mm) | Chill before slicing to prevent sticking |
| Cooked meats | Thin (1-2mm) | Slice when cold for clean cuts |
Foods That Don’t Slice Well
Some foods are not ideal for the food processor’s slicing disc:
- Very soft or mushy foods (e.g., ripe tomatoes, bananas)
- Hard seeds or pits (they can damage the disc)
- Foods with bones
- Large, fibrous items like whole pineapples (cut into pieces first)

Credit: www.youtube.com
Step-by-step Guide: How To Slice With Food Processor
Slicing with a food processor is simple but benefits from good habits. Follow these steps for consistent results:
1. Prepare Food And Machine
Wash, peel, and cut your ingredients to fit the feed tube. Dry foods like cheese or cooked meat slices best when chilled. Assemble your processor, lock in the bowl, and insert the correct slicing disc.
2. Stack Food In The Feed Tube
Place food vertically for round slices (like carrots, cucumbers), or horizontally for long slices (like zucchini strips). For smaller items, group them together in the tube to minimize waste.
3. Secure The Lid And Food Pusher
Lock the lid tightly. Use the food pusher to hold ingredients firmly but don’t force them. Let the machine do most of the work.
4. Power On And Slice
Turn on the processor. Some machines have a “pulse” button—use this for delicate foods or if you want more control. For large batches, use the continuous setting.
5. Collect Sliced Food
Once finished, turn off and unplug the processor. Carefully remove the lid and disc. Scoop out your evenly sliced food with a spatula or tongs.
6. Clean Up
Remove and wash the slicing disc immediately to prevent dried food from sticking. Wipe down the bowl and other parts as needed.
Example: Slicing Potatoes For Gratin
- Peel and cut potatoes to fit the feed tube.
- Insert the medium slicing disc (about 4mm).
- Stack potatoes in the tube vertically.
- Use the food pusher and slice.
- Layer the uniform slices in your baking dish.
This method saves time and guarantees even cooking in the oven.
Advanced Slicing Tips For Best Results
Even experienced cooks sometimes get uneven slices or food jams. Here’s how to avoid these issues and get the most from your food processor:
Chill Or Freeze Ingredients First
Slightly cold or firm foods slice better and are less likely to mush. For example, semi-hard cheese can be frozen for 15 minutes before slicing.
Use The Pulse Button For Delicate Foods
Soft vegetables like mushrooms can be crushed if sliced at full speed. Short bursts with the pulse button give better results and prevent damage.
Avoid Overloading The Feed Tube
Stuffing too much food at once can jam the disc or cause uneven slices. Process in small batches for best results.
Alternate Directions For Even Slices
If you want perfect rounds, rotate the food halfway through slicing. This is useful for long items like zucchini or eggplant.
Watch Out For Small End Pieces
The last bit of food may not get sliced and can end up as waste. Save these pieces for soups, stocks, or salads instead of throwing them away.
Credit: www.goodhousekeeping.com
Common Slicing Mistakes And How To Fix Them
Even with a good food processor, mistakes can happen. Here are some common issues and how to fix them:
Uneven Slices
- Cause: Food is not held firmly in the feed tube or the disc is dull.
- Solution: Use the pusher with steady, gentle pressure and sharpen or replace the disc if needed.
Food Gets Stuck
- Cause: Overloading the tube or slicing sticky foods.
- Solution: Slice in smaller batches and chill sticky foods before processing.
Food Turns To Mush
- Cause: Using the wrong disc or slicing very soft foods.
- Solution: Chill soft foods, use the pulse button, or slice by hand if needed.
Disc Won’t Spin
- Cause: Incorrect assembly or a jammed piece of food.
- Solution: Unplug, reassemble, and clear jams before restarting.
Processor Leaks
- Cause: Bowl not locked or too much liquid in food.
- Solution: Always lock the bowl and avoid slicing very wet foods in large batches.
Comparing Slicing Discs And Settings
Different processors offer different slicing options. Here’s a quick comparison of common disc types:
| Disc Type | Slice Thickness Range | Best For |
|---|---|---|
| Standard Slicing Disc | 1-4mm (fixed) | Most vegetables, fruits |
| Adjustable Slicing Disc | 1-8mm (adjustable) | Custom thickness, cheese, cooked meats |
| Julienne Disc | N/A (creates sticks) | French fries, carrot sticks |
| Reversible Disc | Usually 2 options | General slicing, shredding |
If your processor has only one disc, you can still get good results—just adjust your recipe or cooking time to fit the slice size.
How Slicing With A Food Processor Compares To Other Methods
Hand slicing, mandolines, and specialized slicers are common alternatives. Here’s how they compare to the food processor:
| Method | Speed | Consistency | Safety | Best Use |
|---|---|---|---|---|
| Food Processor | Very Fast | High | Safe (with proper use) | Large batches, multiple foods |
| Mandoline Slicer | Fast | Very High | Moderate (risk of cuts) | Thin, precise slices |
| Knife | Slow | Varies by skill | Safe (if careful) | Small amounts, odd shapes |
| Specialty Slicer | Moderate | Medium to High | Usually safe | Single-purpose (e.g., eggs, apples) |
The food processor stands out for speed and volume. Mandolines offer the most precise slices but can be risky. Knives are best for small jobs or when you need custom shapes.
Cleaning And Maintaining Your Slicing Disc
A sharp, clean slicing disc makes all the difference. Here’s how to keep yours in top condition:
- Wash immediately after use. Soaking prevents dried food from sticking.
- Use a brush to clean inside the disc’s slots and around the blade.
- Dry thoroughly before storing to prevent rust.
- Sharpen or replace dull discs. A dull blade can crush food instead of slicing it.
- Store safely—keep discs in a protective holder, out of reach of children.
Avoid the dishwasher if your manual recommends hand washing. Some discs can warp or lose sharpness in the dishwasher’s heat.
Non-obvious Insights For Better Slicing
Most beginners miss a few tricks that make slicing easier and the results better:
- Layering Flavors: Try stacking different vegetables (like onion and pepper) in the feed tube for mixed slices in salads or stir-fries.
- Making Chips: Use the thinnest disc to slice potatoes or sweet potatoes, then bake or fry for homemade chips.
- Batch Prepping: Slice extra vegetables and store them in airtight containers for several days. This saves time on busy weekdays.
- Controlling Slice Direction: Turn vegetables lengthwise or crosswise for different slice shapes—important for recipes like ratatouille or gratin.
- Using Ice Baths: For crispier, fresher slices (like for cucumbers or onions), drop them into ice water right after slicing.
Troubleshooting Slicing Problems
If you’re not getting the results you want, consider these advanced troubleshooting tips:
- Food tears instead of slicing: Likely too soft or the disc is dull. Chill food or sharpen/replace the disc.
- Food flies around the bowl: Use the food pusher more steadily, or slice larger pieces.
- Slices are too thick/thin: Check your disc setting or swap to a different disc.
- Processor vibrates heavily: Make sure it’s on a stable surface and not overloaded.
Don’t ignore unusual noises or resistance—these can signal jams or assembly errors.
How To Choose The Best Food Processor For Slicing
If you haven’t bought a food processor yet, here’s what to look for:
- Disc Variety: More discs mean more control over slice thickness.
- Feed Tube Size: Wide tubes fit more shapes and sizes.
- Power: At least 400 watts for efficient slicing.
- Easy Assembly: Look for clear markings and simple locking mechanisms.
- Safety Features: Lid lock and non-slip base are musts.
- Good Reviews: Check for feedback on slicing performance, not just general use.
Avoid buying based on price alone. Some budget models have weak motors or limited disc options.
Slicing For Special Diets And Needs
Slicing isn’t just for basic salads and side dishes. If you follow a special diet, the food processor can help you:
- Make zucchini noodles or thin vegetable ribbons for low-carb meals.
- Slice fruits for dehydrating—thin, even pieces dry more quickly and evenly.
- Prep large amounts of veggies for freezing—slice, blanch, and freeze for quick meals.
- Create even slices for baby-led weaning or soft-cooked veggies for toddlers.
If you meal prep, slicing a week’s worth of vegetables saves time and encourages healthier eating.
Credit: www.kitchenaid.com
Safety Tips When Slicing With Food Processor
Even though food processors are safer than mandolines or knives, you should still follow these safety tips:
- Unplug before cleaning or changing discs.
- Never push food with your fingers—always use the food pusher.
- Secure the lid and check all parts before turning the machine on.
- Don’t force hard foods—cut large or tough vegetables into manageable pieces first.
- Keep children away from the machine and discs.
If a disc is damaged, don’t use it. Replace it to avoid injury or damaging your machine.
Frequently Asked Questions
How Do I Know Which Slicing Disc To Use For Different Foods?
Most processors come with a standard slicing disc (about 2-4mm), which works for most vegetables and fruits. Use thinner discs for salads or garnishes, and thicker ones for gratins or roasting. Your user manual usually provides a guide for best results.
Can I Slice Cheese With My Food Processor?
Yes, but use semi-hard cheeses (like cheddar or Swiss) and chill them first. Soft cheeses can gum up the blade. Always use the medium or thick slicing disc, and clean the disc immediately after slicing to prevent sticking.
Why Are My Slices Uneven Or Ragged?
This usually means the food is too soft, the disc is dull, or the food wasn’t held firmly in the feed tube. Chill soft foods, replace or sharpen the disc, and use steady pressure with the food pusher.
Is A Food Processor Better Than A Mandoline For Slicing?
A food processor is faster and safer for large batches, while a mandoline gives ultra-thin, precise slices but comes with a higher risk of cuts. For most home cooks, the food processor is the better all-around tool, especially for meal prep.
Where Can I Learn More About Food Processor Types And Uses?
To compare different models and slicing features, visit the Wikipedia page on food processors for an overview, or check detailed reviews on reputable cooking websites.
Slicing with a food processor is more than just a time-saver—it gives you consistent, professional results with less effort and more safety. Whether you’re prepping vegetables for a family meal or slicing cheese for a party platter, following the right steps and tips will help you get the most out of your machine.
With practice and attention to detail, you’ll slice faster, waste less, and enjoy your kitchen time more.

Hello, This is Annie Walker, a 38-year-old blogger, founder, and editor of Cookware Guider from NY, USA. I am a cookware fanatic and passionate cooker. I love to cook with different types of cooking appliances (example: all types of cookware, rice cookers, slow cookers, etc) almost every day in my kitchen. I love to share my experience with my readers in my blog. Also, I enjoy helping people to solve their problems through my website. You can follow me on Twitter & Pinterest. To know details about my blog please check the about us page.