
A sharp knife is more than a kitchen tool—it’s essential for safety, speed, and precision. But knives don’t stay sharp forever. If you cook often, you’ve probably noticed your knife blade feels dull after some use. That’s where a knife sharpening stick comes in. This tool, also called a honing rod or sharpening steel, keeps your knives in top shape with just a few minutes of care. Many people don’t use sharpening sticks correctly or don’t understand their real purpose. This guide shows you exactly how to use a knife sharpening stick, explains the different types, and shares expert tips that most beginners miss.
What Is A Knife Sharpening Stick?
A knife sharpening stick is a long, thin rod made of steel, ceramic, or diamond-coated metal. It’s designed to realign the blade’s edge, not grind away metal like a sharpening stone. That means it’s ideal for regular maintenance, helping your knife stay sharper longer.
You’ll usually see sharpening sticks in professional kitchens, and chefs use them daily. Home cooks can benefit too. The rod’s surface is hard and slightly textured, allowing you to straighten the blade’s microscopic edge. This process is called honing.
Types Of Sharpening Sticks
There are three main types:
- Steel honing rods: Most common, made from hardened steel. Good for most kitchen knives, especially softer stainless steel blades.
- Ceramic rods: Harder than steel, can slightly sharpen while honing. Better for harder knives and keeping a fine edge.
- Diamond-coated rods: The most abrasive, can sharpen and hone. Suitable for very dull blades but can wear down softer knives quickly.
Here’s a quick comparison:
| Type | Main Use | Best For | Durability |
|---|---|---|---|
| Steel | Honing | Stainless steel knives | High |
| Ceramic | Honing & light sharpening | Harder knives | Medium |
| Diamond | Sharpening & honing | Very dull blades | Medium |
Many beginners think all rods are the same. In fact, ceramic and diamond rods can remove some metal, so you should use them less often. Steel rods are best for daily or weekly use.
Why Use A Sharpening Stick?
Using a sharpening stick keeps your knife’s edge aligned. When you cut, the blade’s microscopic edge bends and folds. Honing straightens it, restoring sharpness. Sharpening with a stone or grinder removes metal, which you only need a few times per year.
Regular honing means:
- Safer cutting: Sharp knives are less likely to slip and cause injury.
- Faster prep: Slicing tomatoes, onions, and meat becomes easier.
- Longer knife life: Less frequent sharpening means your knives last longer.
A study published in the Journal of Food Engineering found that knife sharpness can reduce cutting force by up to 50%. That means you use less effort and get cleaner results.
How Often Should You Hone Your Knives?
The right frequency depends on how much you cook and what you cut. For most home kitchens:
- Daily cooks: Hone after every cooking session.
- Weekly cooks: Hone once per week.
- Professional chefs: Hone multiple times per day.
It’s a common mistake to wait until your knife feels very dull. Honing doesn’t restore a severely blunted blade—it maintains sharpness. If your knife won’t cut paper easily, you need a sharpening stone.
Choosing The Right Sharpening Stick
Before you start, pick the right stick for your knives. Here’s a quick guide:
| Knife Type | Best Stick | Notes |
|---|---|---|
| Stainless steel (soft) | Steel rod | Daily honing |
| High-carbon steel (hard) | Ceramic rod | Light sharpening |
| Very dull blade | Diamond rod | Use sparingly |
Length matters—choose a stick longer than your longest knife. Most rods are 10–12 inches. Handles should be comfortable and non-slip.
Preparing To Use A Sharpening Stick
Before honing, inspect your knife. Make sure it’s clean and dry. Wash the blade after honing to remove any tiny metal particles.
Find a stable surface. Some rods have a non-slip tip for vertical honing, while others are used horizontally. Place a towel under the rod if you’re worried about slipping.
Step-by-step: How To Use A Knife Sharpening Stick
1. Hold The Rod Securely
Grip the handle firmly in your non-dominant hand. Point the tip downward, resting it on a cutting board or towel. The rod should be vertical and stable.
2. Hold The Knife Correctly
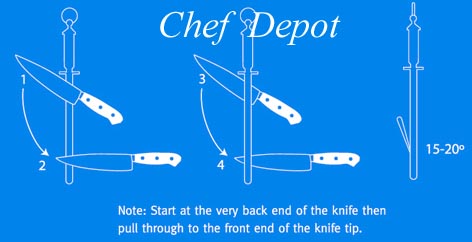
With your dominant hand, hold the knife by the handle. Place the heel of the blade (closest to the handle) against the top of the rod.
3. Set The Angle
The most important detail: angle. For most kitchen knives, aim for a 15–20 degree angle between the blade and the rod. Imagine a thin slice of pizza—this is narrower than you might think.
If your knife is Japanese (like a Santoku or Gyuto), go closer to 15 degrees. For Western knives (like a chef’s knife), 20 degrees is typical.
4. Draw The Knife Down The Rod
Sweep the blade down and across the rod, moving from heel to tip. The motion should be smooth, not jerky. Maintain the angle throughout.
Repeat this process for the other side of the blade. Alternate sides with each stroke.
5. Repeat Strokes
Do 6–10 strokes per side. Some chefs recommend more, but too many passes can damage soft blades. Listen for a consistent sound—if it changes, your angle is off.
6. Check The Edge
After honing, wipe the blade clean. Test sharpness by slicing a sheet of paper or a tomato. If it feels better, you’ve honed correctly.
7. Store Your Knife Safely
Don’t forget to store your knife properly. Use a knife block or magnetic strip. Avoid tossing it in a drawer, which can damage the edge.
Common Mistakes When Using A Sharpening Stick
Even experienced cooks make errors. Here are some to avoid:
- Wrong angle: Most people use too wide an angle, blunting the edge.
- Too much force: Pressing hard can damage the blade. Gentle pressure is best.
- Uneven strokes: Not alternating sides leads to a lopsided edge.
- Using a dirty rod: Dirt and metal particles can scratch your knife.
- Skipping regular honing: Waiting until knives are dull means you need to sharpen, not hone.
One non-obvious tip: It’s better to hone briefly but regularly than to do long sessions infrequently.
Advanced Honing Techniques
As you gain confidence, you might want to try advanced methods:
- Horizontal honing: Hold the rod horizontally and sweep the blade across. This gives more control but requires practice.
- Air honing: Some chefs hone without touching the rod to a surface, holding both vertically. This is fast but risky for beginners.
- Double-bevel honing: For knives with two edge angles, hone each at its specific angle.
If you use serrated knives, use a rod designed for serrations. Most sharpening sticks aren’t suitable for bread knives.
Credit: chefdepot.net
Comparing Sharpening Sticks To Other Tools
Sharpening sticks are often confused with sharpening stones and electric sharpeners. Here’s a quick comparison:
| Tool | Main Function | Ease of Use | Frequency |
|---|---|---|---|
| Sharpening stick | Honing | Easy | Weekly/daily |
| Sharpening stone | Sharpening | Moderate | Monthly/annually |
| Electric sharpener | Sharpening | Easy | As needed |
Sharpening sticks are for maintenance, stones for restoration, and electric sharpeners for convenience. For best results, combine regular honing with occasional sharpening.
How To Clean And Maintain Your Sharpening Stick
A clean rod gives better results. After each use, wipe it with a damp cloth. For deeper cleaning:
- Use a soft brush and mild soap.
- Rinse and dry thoroughly.
- Avoid soaking ceramic rods—they can crack.
Diamond rods need gentle care. Don’t use harsh chemicals, and store them away from moisture.
Safety Tips For Using A Sharpening Stick
Always pay attention to safety:
- Keep your fingers behind the blade.
- Use a stable surface.
- Don’t rush—take slow, steady strokes.
- Keep the stick out of reach of children.
If your rod has a guard (a metal ring near the handle), use it. It protects your hand from slips.
When To Sharpen, Not Just Hone
Honing keeps your blade aligned, but eventually, you’ll need to sharpen. Signs it’s time:
- The knife won’t cut paper or soft foods easily.
- Honing has no effect.
- The blade feels rough or has visible nicks.
Sharpening removes metal and restores the edge. Use a whetstone or professional service. Don’t rely solely on a rod for deep sharpening.

Credit: www.americastestkitchen.com
Real-life Example: Chef’s Routine
Professional chefs often hone knives before every shift. Chef Maria, who runs a busy restaurant, says, “I use a steel rod every morning and before each rush. It keeps my knives ready for prep and reduces accidents. ”
She also sharpens knives monthly with a stone. This routine extends the life of her expensive knives.
Two Insights Most Beginners Miss
- Honing is not sharpening: Many people believe a rod sharpens a dull knife. It only aligns the edge. If your knife is blunt, honing will not help.
- Angle control matters more than speed: Fast, flashy strokes look impressive, but maintaining the correct angle is the key. Slow, careful passes produce better results.
Practical Tips For Beginners
- Practice with an old knife first.
- Mark the blade with a marker to see if you’re hitting the edge.
- Watch videos to visualize the angle and motion.
- Don’t be afraid to check your progress often.
If you’re unsure, ask a local chef or knife store for a demonstration.
Sharpening Stick Care And Storage
Store your rod in a dry place. Hang it from a hook or keep it in a drawer with protective padding. Avoid dropping it—ceramic rods can shatter.
Check for wear every few months. If the rod’s surface feels smooth, it’s time to replace it.

Credit: togknives.com
Myth-busting: Common Misconceptions
Many people believe myths about sharpening sticks:
- “All rods sharpen knives.” Only diamond and ceramic rods remove metal; steel rods do not.
- “Honing ruins knives.” Proper technique preserves the blade.
- “You must hone daily.” Most home cooks can hone weekly unless they cook often.
For more background on knife sharpening, see this Wikipedia article.
Frequently Asked Questions
How Do I Know If My Knife Needs Honing Or Sharpening?
If your knife slices paper or tomatoes easily after honing, you don’t need sharpening. If it still struggles, sharpening is needed.
Can I Use A Sharpening Stick On All Knives?
Most kitchen knives can be honed with a stick. Avoid using it on serrated knives or very hard specialty blades unless the rod is designed for them.
How Long Does It Take To Hone A Knife?
It usually takes less than two minutes per knife. With practice, you’ll finish even faster.
What’s The Difference Between Honing And Sharpening?
Honing aligns the edge, while sharpening removes metal to create a new edge. Honing is for maintenance; sharpening is for restoration.
How Do I Choose The Right Honing Rod?
Pick a rod longer than your longest knife. Steel rods work for most home cooks; ceramic or diamond rods are for advanced users or hard knives.
Knife maintenance is simple once you understand the difference between honing and sharpening. Using a sharpening stick keeps your knives ready for every meal and extends their life. With regular care, you’ll notice smoother cuts, safer cooking, and less frustration.
The most important skill is learning the correct angle and making gentle, even strokes. Try these steps, and your kitchen knives will always perform at their best.

Hello, This is Annie Walker, a 38-year-old blogger, founder, and editor of Cookware Guider from NY, USA. I am a cookware fanatic and passionate cooker. I love to cook with different types of cooking appliances (example: all types of cookware, rice cookers, slow cookers, etc) almost every day in my kitchen. I love to share my experience with my readers in my blog. Also, I enjoy helping people to solve their problems through my website. You can follow me on Twitter & Pinterest. To know details about my blog please check the about us page.