
Sharpening your kitchen knife can feel confusing, especially when you see a coarse fine knife sharpener with two different slots or surfaces. Which side do you use first? How do you avoid damaging your blade? Many beginners struggle with these questions, but learning the right method is simple and safe. A sharp knife is not only easier to use—it is safer and can make cooking more enjoyable. This guide will show you, step by step, how to use a coarse fine knife sharpener, explain common mistakes, and offer tips that even experienced cooks sometimes miss. Whether you use a manual or electric sharpener, these techniques work for most double-sided models.
What Is A Coarse Fine Knife Sharpener?
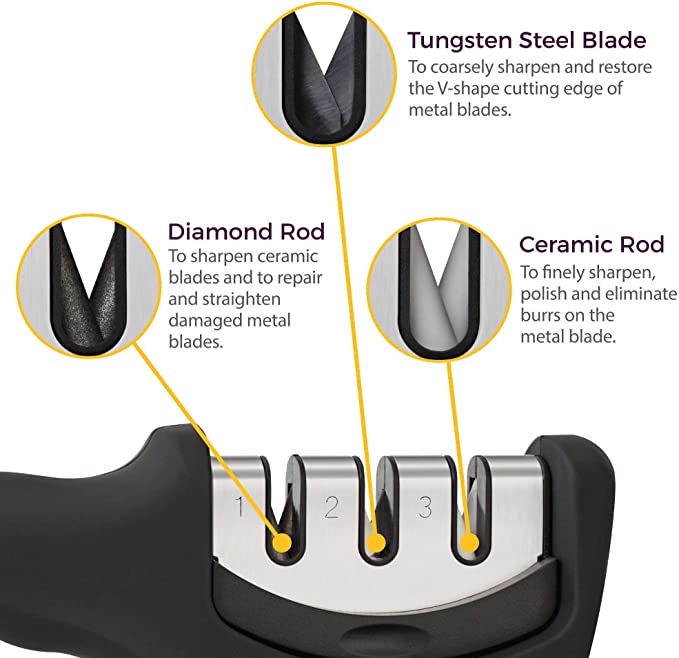
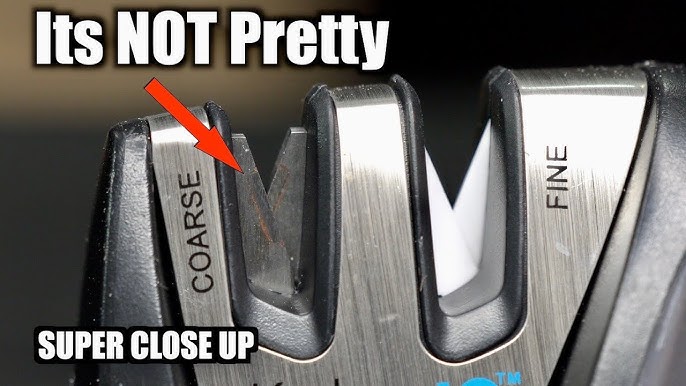
A coarse fine knife sharpener is a tool with two sharpening surfaces—one coarse and one fine. The coarse side removes more metal and fixes dull or damaged blades. The fine side smooths and polishes the edge, making it razor-sharp. These sharpeners are often found in manual pull-through models, electric units, and some whetstones.
Most sharpeners have clearly marked slots for coarse and fine. The coarse slot is used first if your knife is dull or chipped. The fine slot is for regular maintenance or finishing after coarse sharpening.
Common Types
- Pull-through sharpeners – You pull the knife through the slot.
- Electric sharpeners – The machine pulls or rotates abrasives.
- Whetstones – Each side has different grit (coarse/fine).
Why Dual-sided Matters
Using both sides helps maintain the knife and prevents damage. Only using the coarse side can leave the edge rough, while only using the fine side does not fix a dull blade. This two-step process is key for a lasting sharp edge.
How Knife Sharpeners Work
Knife sharpeners use abrasive materials to shape the metal at the blade’s edge. The coarse side has larger particles and removes more metal, while the fine side has smaller particles and polishes the edge. This difference is called “grit”—lower grit numbers are coarse, higher numbers are fine.
Sharpeners work by creating a new edge. The coarse stage fixes chips and heavy dullness; the fine stage refines and smooths. This method is used by chefs, hunters, and anyone who values a sharp knife.
Grit Numbers Explained
- Coarse grit: 200–600 (removes metal quickly)
- Fine grit: 1000–3000 (smooths and polishes)
Higher grit numbers mean a smoother finish. Knowing the grit helps you pick the right tool for your needs.

Credit: www.reddit.com
Preparing To Sharpen
Before you start sharpening, it’s important to prepare your workspace and tools. A little planning helps you avoid accidents and makes the process faster.
- Clean the knife. Remove any food or dirt. A dirty blade can clog the sharpener.
- Check the sharpener. Make sure it’s stable. If it’s a manual sharpener, place it on a flat surface.
- Read the instructions. Different sharpeners may have unique steps. If you’re unsure, check the manual or look for markings.
- Get safety gear. Gloves are helpful, especially for beginners. Some people use cut-resistant gloves for extra safety.
Common Beginner Mistake
Many people skip cleaning their knife, but a dirty blade can damage the sharpener or leave scratches. Always wipe your knife before sharpening.
Step-by-step Guide: Using A Coarse Fine Knife Sharpener
Let’s break down the process for a typical manual pull-through sharpener. These steps also apply to most electric models.
Step 1: Place The Sharpener
Put the sharpener on a stable, flat surface. If it has a non-slip base, make sure it’s engaged. Some sharpeners have suction cups or clamps for extra stability.
Step 2: Start With The Coarse Slot
The coarse slot is for fixing dull or damaged knives.
- Insert the knife blade into the coarse slot at the heel (the base, closest to the handle).
- Hold the handle firmly. Use gentle pressure.
- Pull the knife slowly through the slot, from heel to tip. Do not use a sawing motion.
- Repeat this 3–6 times, depending on how dull the knife is. For very dull or chipped blades, you may need up to 10 passes.
Step 3: Move To The Fine Slot
The fine slot polishes and finishes the edge.
- Insert the blade into the fine slot at the heel.
- Use gentle pressure. Too much force can damage the edge.
- Pull the knife through, heel to tip, just like before.
- Repeat 2–5 times. You should feel the blade getting smoother.
Step 4: Test The Edge
After sharpening, wipe the blade. Test the sharpness by slicing a sheet of paper or a tomato. If the knife cuts easily, you’re done. If not, repeat the fine stage 1–2 more times.
Step 5: Clean Up
Wipe the blade to remove any metal particles. Clean the sharpener if it has collected debris. Some models have removable trays for easy cleaning.
Comparing Manual Vs Electric Knife Sharpeners
Choosing between manual and electric sharpeners depends on your needs, budget, and knife types. Here’s a quick comparison:
| Feature | Manual Sharpener | Electric Sharpener |
|---|---|---|
| Speed | Slower (2-5 minutes) | Faster (1-2 minutes) |
| Control | High (you control pressure and angle) | Medium (machine controls angle) |
| Price | $10–$50 | $40–$200 |
| Skill Required | Easy for beginners | Very easy |
| Maintenance | Minimal | Clean trays and parts |
Manual sharpeners are simple and affordable, while electric models offer speed and convenience. Both use the coarse fine process, so the basic method is similar.
Using A Whetstone: Coarse And Fine Sides
Whetstones are popular for those who want more control. Each side has a different grit, usually marked on the stone.
- Soak the stone. Most whetstones need water for 10–15 minutes.
- Place the stone. Put it on a non-slip mat or towel.
- Start with coarse side. Hold the knife at a 15–20 degree angle. Slide the blade across the stone, from heel to tip, using gentle pressure. Repeat 6–10 times per side.
- Switch to fine side. Flip the stone. Repeat the process, but use lighter pressure.
- Test and clean. Wipe the blade and stone. Test sharpness as before.
Whetstones take more practice but offer the best results for high-end knives.
Sharpening Different Types Of Knives
Not all knives are the same. Some need special care. Here’s how to sharpen common types:
Chef’s Knife
The most used kitchen knife. Use standard coarse fine sharpening.
Serrated Knife
Do not use regular sharpeners. These knives need special tools or professional sharpening.
Japanese Knife
Often made with harder steel. Use a fine grit only, unless the blade is chipped.
Pocket Knife
Manual sharpeners work well. For outdoor knives, use more passes on the coarse side.
Ceramic Knife
Most coarse fine sharpeners cannot handle ceramic. Use a diamond sharpener or send to a professional.
Safety Tips For Sharpening Knives
Sharpening can be dangerous if you’re not careful. Here are key safety rules:
- Always hold the sharpener and knife securely.
- Never rush. Fast movements increase the risk of accidents.
- Use gloves if you are new to sharpening.
- Keep fingers away from the blade.
- Clean up metal particles—they can cause cuts.
Many beginners forget to check the angle. If you sharpen at the wrong angle, the blade can become dull or damaged. Most kitchen knives work best at a 15–20 degree angle.
Common Mistakes And How To Avoid Them
Even experienced users make mistakes. Here are five you should watch for:
- Using only the coarse side. This leaves the blade rough and can damage food.
- Applying too much pressure. Heavy force removes too much metal and shortens the knife’s life.
- Not cleaning the sharpener. Metal particles build up and reduce effectiveness.
- Sharpening too often. Over-sharpening wears out the blade. Most home cooks only need to sharpen every 1–3 months.
- Wrong angle. Sharpening at too steep or too shallow an angle will not create a proper edge.
A useful tip: If you’re unsure, start with fewer passes. You can always repeat, but it’s hard to fix an over-sharpened blade.
How Often Should You Sharpen?
The best sharpening schedule depends on how often you use your knives. Here are some guidelines:
- Daily use (home cook): Sharpen every 1–2 months.
- Professional chef: Sharpen weekly.
- Rarely used knives: Sharpen every 6 months.
Using a honing rod between sharpening keeps the edge aligned and reduces the need for full sharpening.
Comparing Sharpening Results
Testing your knife after sharpening is important. Here’s how different methods compare:
| Method | Sharpness Level | Edge Longevity | Ease of Use |
|---|---|---|---|
| Manual Coarse Fine Sharpener | Very sharp | 1-3 months | Easy |
| Electric Coarse Fine Sharpener | Razor sharp | 2-4 months | Very easy |
| Whetstone | Professional sharp | 3-6 months | Moderate |
Whetstones provide the best edge but take more skill. Manual and electric sharpeners are easier for most users.
Caring For Your Sharpeners
A sharpener lasts longer if you care for it. Here’s how:
- Clean after each use. Wipe away metal particles.
- Check for wear. If the abrasive material looks worn, replace the sharpener.
- Store in a dry place. Avoid moisture, which can damage the tool.
- Follow manufacturer instructions. Some sharpeners need oil or special cleaning.
Many people forget that a dirty sharpener can dull a blade. Regular cleaning is essential.
Credit: seidoknives.com
Choosing The Right Sharpener
Picking the right sharpener depends on your knives, budget, and skill. Here are the main factors:
- Type of knives. Standard sharpeners work for most kitchen knives. Specialty knives need special tools.
- Budget. Manual sharpeners are cheap, electric models cost more.
- Skill level. Beginners should start with manual or electric pull-through models.
- Space. Electric sharpeners are larger.
If you need more information, you can learn about knife sharpeners on Wikipedia.
Practical Tips For Best Results
Here are some non-obvious tips that even seasoned cooks often miss:
- Use light pressure. Sharpness comes from precision, not force.
- Alternate sides. If your sharpener lets you, sharpen both sides evenly.
- Keep the blade dry. Water can rust the edge or dull the sharpener.
- Don’t rush the fine stage. The polishing step is key for lasting sharpness.
- Practice on old knives. Try sharpening less valuable knives before using the sharpener on your best blade.
Credit: www.youtube.com
Frequently Asked Questions
How Do I Know Which Slot Is Coarse Or Fine?
Most sharpeners have clear markings. Coarse slots often feel rough or are labeled “COARSE.” Fine slots feel smoother or are marked “FINE.” If unsure, check the manual or look for grit numbers.
Can I Use A Coarse Fine Sharpener For All My Knives?
You can use it for most kitchen knives—chef’s, paring, and utility. Avoid using it for serrated or ceramic knives, as they need special tools.
Is Sharpening Bad For My Knife?
Proper sharpening with the right tool and technique is good for your knife. Over-sharpening or using too much force can wear out the blade. Stick to the recommended schedule and methods.
What’s The Difference Between Honing And Sharpening?
Honing aligns the blade’s edge but does not remove metal. Sharpening removes metal to create a new edge. Honing can be done weekly; sharpening is needed less often.
Can I Sharpen A Knife That Has Chips Or Nicks?
Yes. Start with the coarse slot. Make extra passes until the chips are gone. Then finish with the fine slot for a smooth edge.
A sharp knife makes cooking safer, easier, and more fun. Using a coarse fine knife sharpener is simple if you follow the right steps. Remember to start with the coarse side for dull blades, finish with the fine side, and test your edge.
Clean your tools after each use, and sharpen only as needed. With practice, you’ll gain confidence and keep your knives in top shape for years to come.

Hello, This is Annie Walker, a 38-year-old blogger, founder, and editor of Cookware Guider from NY, USA. I am a cookware fanatic and passionate cooker. I love to cook with different types of cooking appliances (example: all types of cookware, rice cookers, slow cookers, etc) almost every day in my kitchen. I love to share my experience with my readers in my blog. Also, I enjoy helping people to solve their problems through my website. You can follow me on Twitter & Pinterest. To know details about my blog please check the about us page.