
A sharp knife makes kitchen work faster, safer, and more enjoyable. Whether you cook daily or only sometimes, a dull blade slows you down and increases the risk of injury. Sharpening knives is not just for chefs—everyone can do it with the right tools. Today’s knife sharpening systems are easier to use than ever. But with so many choices, finding the best system can feel overwhelming. This guide will help you understand what matters most, compare top systems, and show you how to sharpen your knives like a pro.
What Is A Knife Sharpening System?
A knife sharpening system is a set of tools designed to make sharpening easier, more consistent, and safer. It usually includes guides, stones, or rods that help you hold the knife at the correct angle. Unlike simple sharpening stones, these systems reduce guesswork and help beginners get good results. Some systems use manual methods, while others are electric. The best choice depends on your skill level, knife type, and budget.
Why Not Just Use A Sharpening Stone?
Traditional stones require skill and practice to hold the knife at the correct angle. If you make a mistake, you can damage your knife or leave it dull. Sharpening systems are designed to solve this problem by guiding your hand or the blade.
They also speed up the process and make it more consistent. For most people, a sharpening system is a safer and more effective option.
Types Of Knife Sharpening Systems
Understanding the main types will help you choose the right system for your needs. Here’s a closer look:
Guided Sharpening Systems
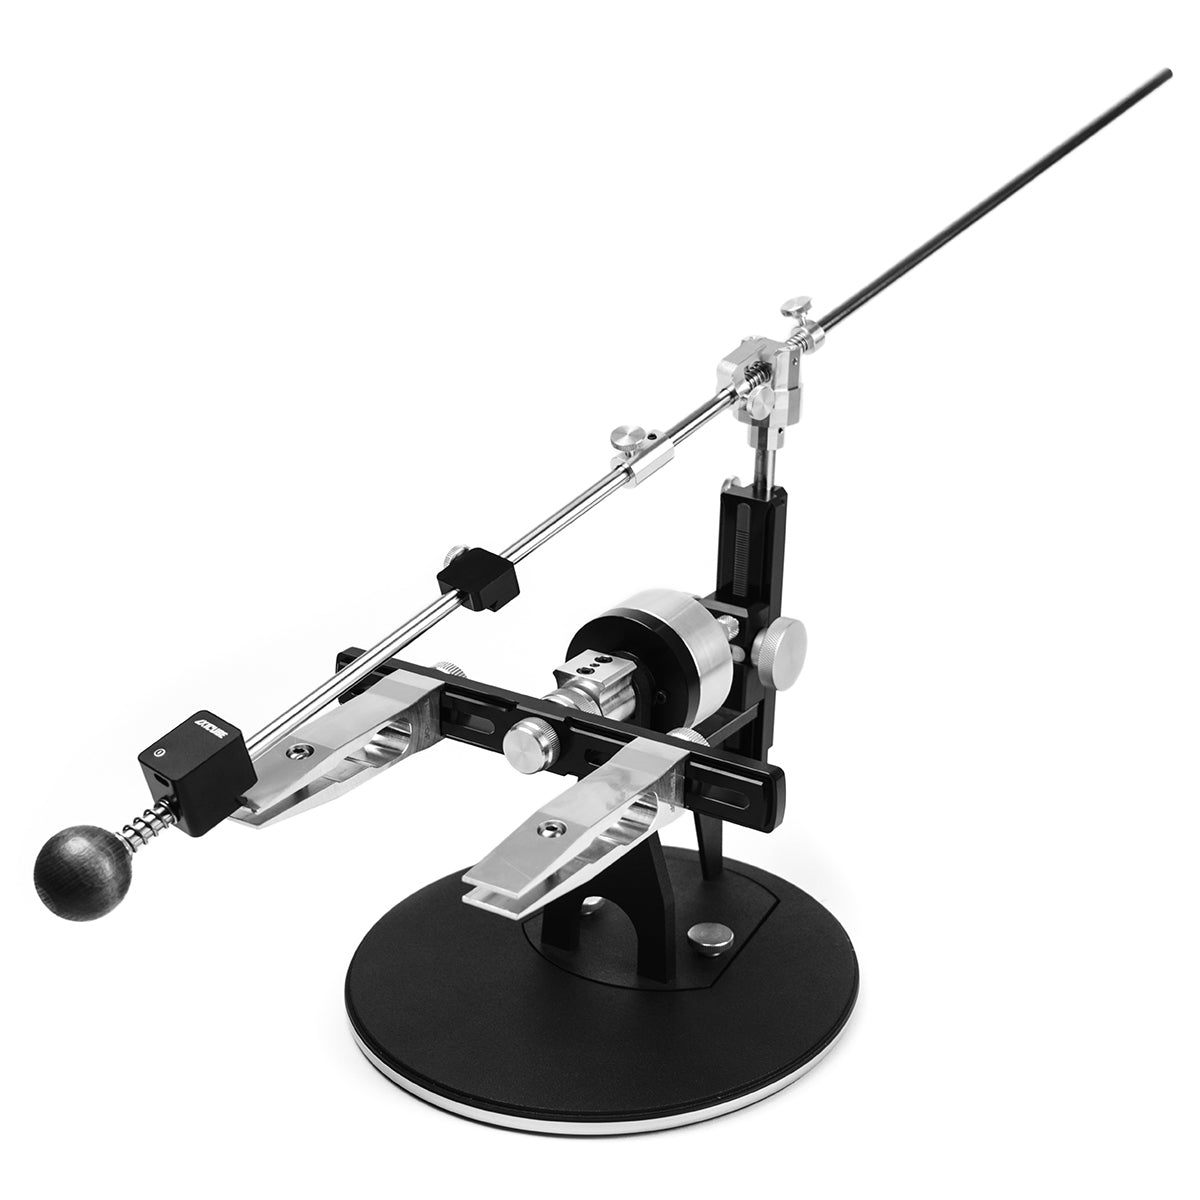
These systems use a clamp or guide to hold the knife. You move the sharpening stone or rod along the blade at a set angle. The Lansky Sharpening System is a popular example. Guided systems are great for beginners and produce reliable results.
Electric Sharpeners
Electric systems have spinning wheels or belts that sharpen the blade automatically. They are fast and easy but can be harsh on delicate knives. The Chef’sChoice electric sharpener is a well-known model. These are best for people who want quick results and have many knives to sharpen.
Manual Pull-through Sharpeners
These are simple devices with preset angles. You pull the knife through slots to sharpen the blade. They are easy to use but may not give the best edge for high-end knives. The KitchenIQ Edge Grip is a common pull-through sharpener.
Sharpening Stones With Angle Guides
Some stones come with angle guides that help you hold the knife correctly. The Work Sharp Guided Sharpening System uses this approach. It offers more control than pull-through sharpeners but requires more skill.
Honing Rods And Steel
Honing rods are not true sharpening systems. They realign the edge but do not remove metal. They are useful for maintaining sharpness between sharpening sessions.
Key Features To Look For
Choosing the best knife sharpening system means understanding the features that matter. Here are the most important factors:
Angle Control
The sharpening angle is critical for a sharp and strong edge. Systems with angle guides help you keep the correct angle, which is usually 15-20 degrees for kitchen knives.
Abrasive Type
Sharpening systems use different abrasives:
- Diamond: Fast, durable, good for hard steels
- Ceramic: Fine finish, gentle on knives
- Stone (Water/Oil): Traditional, offers a range of grit levels
Choose based on your knives and how often you sharpen.
Ease Of Use
Consider how easy the system is to set up and use. Guided systems are beginner-friendly, while stones require more skill.
Safety
Some systems have guards or clamps to prevent accidents. This is important for those new to sharpening.
Versatility
If you own different types of knives (chef’s, paring, serrated), look for a system that can handle them all.
Price
Sharpening systems range from $15 to over $200. More expensive systems are not always better for beginners. Match your budget to your needs.
Comparing The Best Knife Sharpening Systems
Below is a comparison of five top-rated sharpening systems. Each has unique strengths and weaknesses.
| Sharpening System | Type | Price Range | Best For | Key Feature |
|---|---|---|---|---|
| Lansky Deluxe | Guided | $40–$60 | Beginners | Multiple angle guides |
| Work Sharp Precision | Guided Stone | $70–$100 | Enthusiasts | Adjustable angles |
| Chef’sChoice 15 Trizor | Electric | $120–$180 | Busy kitchens | Three-stage sharpening |
| Spyderco Sharpmaker | Rod System | $60–$80 | All skill levels | Quick setup |
| KitchenIQ Edge Grip | Pull-Through | $15–$25 | Casual users | Compact design |

Credit: www.amazon.com
In-depth Reviews Of Top Knife Sharpening Systems
Let’s look closer at the strengths and weaknesses of each system.
Lansky Deluxe Sharpening System
The Lansky Deluxe is one of the most trusted guided systems. It includes five stones (extra-coarse to ultra-fine) and a clamp that locks your knife in place. You set the sharpening angle (17, 20, 25, or 30 degrees) and use the stones in sequence.
Pros:
- Great for beginners
- Consistent results
- Handles most kitchen and outdoor knives
Cons:
- Slower than electric systems
- Clamp can be tricky for thick knives
Example: Many home cooks report their knives cut tomatoes and bread more easily after using Lansky. The guided angle prevents mistakes that beginners often make.
Work Sharp Precision Adjust
Work Sharp’s Precision Adjust uses a rotating clamp and diamond stones. You can set the angle between 15 and 30 degrees. The system is fast, and the diamond abrasives cut through hard steel easily.
Pros:
- Adjustable angles for different knives
- Fast sharpening
- Handles pocket knives and kitchen blades
Cons:
- More expensive than basic models
- Takes up more space
Example: Users with Japanese knives appreciate the fine edge produced by Work Sharp. The adjustable angle is ideal for switching between chef’s knives and outdoor blades.
Chef’schoice 15 Trizor Xv Electric Sharpener
This electric sharpener is designed for busy kitchens. It uses diamond wheels and offers a three-stage process: sharpening, honing, and polishing. It works well for both straight and serrated knives.
Pros:
- Fast and easy
- Consistent results
- Handles many knife types
Cons:
- Higher price
- Not suitable for very thin blades
Example: Restaurant kitchens use Chef’sChoice for speed and reliability. The 15-degree angle is perfect for modern chef’s knives.
Spyderco Sharpmaker
Spyderco’s Sharpmaker uses ceramic rods set at preset angles. You hold the knife upright and move it down the rods. It works for both straight and serrated blades.
Pros:
- Simple setup
- Good for maintaining sharpness
- Lightweight and portable
Cons:
- Not ideal for very dull knives
- No angle adjustment
Example: People often use Sharpmaker for quick touch-ups before cooking. It’s gentle enough for delicate blades.
Kitcheniq Edge Grip
The Edge Grip is a compact pull-through sharpener. It has two slots: one for coarse sharpening and one for fine honing. It’s small enough to fit in a drawer.
Pros:
- Very affordable
- Easy to use
- Good for quick fixes
Cons:
- Not for high-end knives
- Limited angle options
Example: Busy parents use Edge Grip to keep everyday knives sharp. It’s popular for quick results.
How To Use A Knife Sharpening System
Sharpening is not hard if you follow the right steps. Here’s a simple guide for most systems.
1. Set Up The System
Read the instructions and assemble the system. For guided systems, clamp the knife securely. For electric sharpeners, plug in and select the stage.
2. Choose The Angle
Most kitchen knives use a 15-20 degree angle. If your system lets you adjust, match the original angle of the blade. This keeps the edge strong.
3. Select The Abrasive
Start with a coarse stone if the knife is very dull. Use finer stones to finish the edge. For touch-ups, begin with a medium or fine abrasive.
4. Sharpen The Blade
Move the stone or knife along the blade as directed. Keep the angle consistent. For guided systems, let the guide do the work.
5. Test The Edge
After sharpening, test the knife by slicing paper or a tomato. A sharp knife should cut smoothly without tearing.
6. Clean And Store
Wipe down the system and the knife. Store them safely away from children.
Credit: tsprof.us
Common Mistakes To Avoid
Even with a good system, mistakes can ruin your knife or the sharpening tool. Watch out for these:
- Wrong angle: Sharpening at the wrong angle makes the blade weak or dull.
- Too much pressure: Pressing too hard can damage the knife and the abrasive.
- Skipping grits: Jumping from coarse to fine too quickly leaves rough edges.
- Sharpening dirty knives: Dirt and oil reduce effectiveness and wear out stones.
- Not cleaning the system: Metal shavings can build up and affect performance.
How Often Should You Sharpen Knives?
Most home cooks should sharpen knives every 2-3 months. Professional kitchens sharpen daily or weekly. If you notice your knife struggling to cut food, it’s time to sharpen. Use a honing rod between sharpening to keep the edge aligned.
Data: Knife Sharpening Frequency By User Type
| User Type | Sharpening Frequency | Honing Frequency |
|---|---|---|
| Home Cook | Every 2–3 months | Weekly |
| Professional Chef | Weekly/Daily | Daily |
| Outdoor Enthusiast | After heavy use | Before each trip |
Advanced Tips For Sharpening Success
To get professional results, try these strategies:
Use Marker Technique
Draw a line with a permanent marker along the edge before sharpening. After a few strokes, check where the marker is removed. This helps you see if you’re hitting the correct angle.
Check Burr Formation
A burr is a small piece of metal that forms on one side when you sharpen. Feeling for the burr helps you know when to switch sides. This step is often missed by beginners but is key for sharpness.
Try Strop Finishing
After sharpening, use a leather strop to polish the edge. This removes tiny burrs and creates a razor-sharp finish. Many professionals use this final step.
Which System Is Best For Different Knife Types?
Different knives need different sharpening approaches. Here’s a quick guide:
- Chef’s knives: Guided systems or electric sharpeners work best.
- Japanese knives: Use fine stones or adjustable guided systems.
- Serrated knives: Rod systems (like Sharpmaker) are ideal.
- Outdoor knives: Diamond abrasives handle tough steel.
- Pocket knives: Compact systems like Lansky or Work Sharp are good.
How Knife Sharpening Systems Compare To Professional Services
Professional sharpening services use high-quality equipment and skill. They cost $5–$10 per knife and take a few days. Sharpening at home with a system is cheaper and faster. For most people, using a sharpening system gives results almost as good as professional services.
Practical Example
A home cook who switched from professional sharpening to the Lansky system saved over $100 per year and kept knives sharp for daily use. The main difference is convenience and speed.
The Science Behind Knife Sharpening
Sharpening works by removing metal to create a new edge. Most kitchen knives are made of stainless or carbon steel. The hardness of the steel affects how easy it is to sharpen. Softer steels sharpen quickly but lose their edge faster.
Harder steels stay sharp longer but need diamond abrasives.
Data: Steel Hardness And Sharpening Difficulty
| Steel Type | Hardness (HRC) | Sharpening Difficulty |
|---|---|---|
| Stainless Steel | 54–58 | Easy |
| High Carbon | 58–62 | Medium |
| Super Steel (e.g. S30V) | 62–65 | Hard |
Non-obvious Insights Beginners Miss
Many beginners believe sharpening means simply making the blade shiny. In reality, the edge angle and burr removal are more important than shine. Another common oversight is not using the right abrasive for the steel type. For example, hard super steels need diamond, not ceramic.
A second insight is that regular honing can extend the time between sharpening. Most knife owners only sharpen, but using a honing rod keeps the edge aligned and saves time.
Real-world Examples
- Home kitchen: A family who switched from a pull-through sharpener to a guided system noticed food prep was faster and safer. Tomato slices were cleaner, and bread did not tear.
- Outdoor enthusiast: After using Work Sharp, a camper found his pocket knife could cut rope and wood easily, even after heavy use.
- Professional chef: Using Chef’sChoice, a chef kept all knives sharp throughout service, reducing downtime and improving meal quality.
How To Choose The Best Knife Sharpening System For You
Choosing the right system depends on your knives, skill level, and budget. Ask yourself:
- How many knives do you own? For many knives, electric is faster.
- Do you have specialty knives? Guided and adjustable systems are best.
- How much time do you want to spend? Electric is quickest, guided gives control.
- What is your budget? Good systems start around $40. High-end models cost more.
- Are you a beginner? Guided systems or pull-through sharpeners are safest.
Always read reviews and watch demo videos before buying. Try the system in-store if possible.
Caring For Your Knife Sharpening System
Proper care extends the life of your system and your knives.
- Clean stones and abrasives after each use.
- Store in a dry place to prevent rust.
- Replace worn parts as needed.
- For electric systems, unplug and wipe down.
These small steps help you get the best results every time.
Where To Learn More
Many brands and experts share sharpening tips online. Videos show the correct technique and help you understand each system’s strengths. For deep knowledge, visit WikiHow for step-by-step guides.
Frequently Asked Questions
How Do I Know When My Knife Needs Sharpening?
If your knife squashes tomatoes, struggles to slice onions, or tears bread, it’s dull. Try slicing paper—if the blade cannot cut cleanly, it needs sharpening.
Can I Sharpen Serrated Knives With These Systems?
Yes, but not all systems are suitable. Rod-based systems like Spyderco Sharpmaker work best for serrated blades. Electric and pull-through sharpeners may damage serrations.
Are Electric Sharpeners Safe For Expensive Knives?
Electric sharpeners are safe if used correctly, but they can remove more metal than manual systems. For high-end knives, use guided or stone-based systems to preserve the blade.
How Long Does Sharpening Take?
Manual systems take 10–20 minutes per knife. Electric systems are faster, often finishing in under 5 minutes. The time depends on how dull the blade is.
What Is The Difference Between Honing And Sharpening?
Sharpening removes metal to create a new edge. Honing aligns the existing edge without removing metal. Use a honing rod regularly and sharpen only when needed.
A sharp knife is essential for every kitchen. The best knife sharpening system makes the process easy, safe, and effective. Choose a system that fits your skill level, knife collection, and budget. Learn the basics, avoid common mistakes, and use advanced tips for a professional edge.
With the right sharpening system, you’ll enjoy cooking more and keep your knives performing at their best for years.

Credit: www.youtube.com

Hello, This is Annie Walker, a 38-year-old blogger, founder, and editor of Cookware Guider from NY, USA. I am a cookware fanatic and passionate cooker. I love to cook with different types of cooking appliances (example: all types of cookware, rice cookers, slow cookers, etc) almost every day in my kitchen. I love to share my experience with my readers in my blog. Also, I enjoy helping people to solve their problems through my website. You can follow me on Twitter & Pinterest. To know details about my blog please check the about us page.