If you’ve ever wondered how long to pan fry chicken breast so it turns out juicy and perfectly cooked, you’re not alone. Cooking chicken breast can be tricky—too little time and it’s raw inside; too long and it becomes dry and tough.
Getting the timing just right is key to making your meals delicious and satisfying. You’ll discover exactly how long to pan fry chicken breast, plus simple tips to make your cooking foolproof every time. Keep reading, and you’ll never worry about undercooked or overcooked chicken again!
Choosing The Right Chicken Breast
Choosing the right chicken breast is key to cooking it perfectly. The quality and type of chicken affect cooking time and taste. Picking the best chicken breast ensures juicy and tender results. It also helps avoid overcooking or undercooking during pan frying. Understanding the differences between fresh and frozen chicken, as well as the size and thickness, guides you to better cooking outcomes.
Fresh Vs. Frozen Chicken
Fresh chicken breast often has a better texture and flavor than frozen. It cooks faster because it has no ice crystals inside. Fresh chicken usually feels soft and moist. Frozen chicken needs thawing before cooking. Thawing can take time but is important for even cooking.
- Fresh chicken: Cooks faster, stays juicy, tastes better.
- Frozen chicken: Needs thawing, may lose some texture and moisture.
Frozen chicken can be cooked without thawing but requires longer pan-fry time. This can make the outer part dry while the inside stays undercooked. Thaw frozen chicken in the fridge overnight or use cold water to speed up thawing safely.
| Factor | Fresh Chicken | Frozen Chicken |
|---|---|---|
| Texture | Soft and moist | Can be slightly dry |
| Cooking Time | Shorter | Longer (if not thawed) |
| Flavor | Richer | Mildly reduced |
| Storage | Use quickly | Longer shelf life |
Size And Thickness Impact
The size and thickness of chicken breast directly affect how long it takes to pan fry. Thick breasts need more time to cook through. Thin breasts cook faster but can dry out quickly. Even thickness helps cook the chicken evenly.
Use a meat mallet or rolling pin to flatten thick breasts. This creates a uniform thickness and avoids overcooking the edges. Smaller chicken breasts require less heat and less time. Larger pieces need medium heat and patience.
- Thicker breasts: 6-8 minutes per side on medium heat.
- Medium thickness: 4-6 minutes per side.
- Thin breasts or cutlets: 2-4 minutes per side.
| Thickness | Suggested Pan Fry Time (per side) | Notes |
|---|---|---|
| Less than 1/2 inch | 2-3 minutes | Cook quickly to avoid drying |
| 1/2 to 1 inch | 4-6 minutes | Ideal for even cooking |
| More than 1 inch | 6-8 minutes | Use medium heat, check doneness |
Using a meat thermometer helps check doneness. The internal temperature should reach 165°F (74°C). Let the chicken rest after cooking to keep juices inside. This step keeps the meat tender and flavorful.
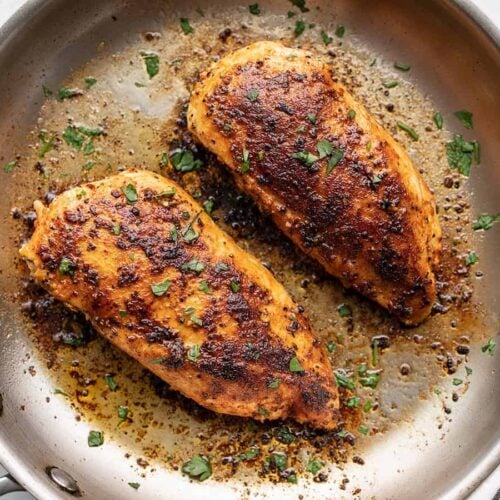
Credit: www.budgetbytes.com
Preparing Chicken For Pan Frying
Preparing chicken breast for pan frying is the first and most important step for a juicy, tender meal. Proper prep makes cooking faster and ensures even cooking. It helps the chicken cook evenly and stay moist. This section covers how to trim and pound chicken breast, plus simple seasoning tips to boost flavor.
Trimming And Pounding
Start by trimming the chicken breast to remove extra fat and tendons. These parts can burn during cooking and make the meat chewy. Use a sharp knife and cut away any white or yellowish fat and tough bits. A clean chicken breast cooks better and tastes fresher.
Next, pound the chicken breast to an even thickness. This helps the chicken cook evenly and prevents dry edges. Use a meat mallet or a rolling pin. Place the chicken between two pieces of plastic wrap or inside a ziplock bag to avoid mess.
- Start pounding from the center outwards.
- Try to make the breast about ½ inch thick.
- Do not over-pound to avoid tearing the meat.
Pounding also tenderizes the chicken, making it soft and juicy. Even thickness means the chicken cooks fully in the same time.
| Step | Tip |
|---|---|
| Trim | Remove visible fat and tendons carefully. |
| Pound | Use plastic wrap to keep it clean. |
| Thickness | Make it about ½ inch thick for even cooking. |
Seasoning Tips
Seasoning chicken breast before pan frying adds flavor and keeps it interesting. Use simple spices and herbs that bring out the chicken’s natural taste. Salt is the most important seasoning. It helps the chicken retain moisture and enhances taste.
Sprinkle salt evenly on both sides and let it rest for 10-15 minutes before cooking. This step allows salt to soak into the meat. Add pepper for a mild kick. Use other spices based on preference:
- Garlic powder for a rich aroma
- Smoked paprika for a smoky flavor
- Dried herbs like thyme or oregano for freshness
- Lemon zest to add brightness
For an easy seasoning blend, mix salt, pepper, garlic powder, and paprika in a small bowl. Rub this evenly on the chicken breast. Avoid heavy sauces before frying. They can burn easily and hide the chicken’s natural flavor.
| Seasoning | Purpose |
|---|---|
| Salt | Enhances flavor and retains moisture |
| Pepper | Adds mild heat |
| Garlic Powder | Boosts aroma |
| Smoked Paprika | Gives smoky taste |
| Dried Herbs | Freshens flavor |
Pan Selection And Oil Choice
Cooking chicken breast perfectly depends a lot on two key things: the pan you use and the oil you choose. Both affect how evenly the chicken cooks and how tasty it turns out. Picking the right pan and oil helps get a golden crust and juicy inside, without burning or sticking. This section covers what pans work best and which oils keep your chicken healthy and flavorful during pan frying.
Best Pan Types
Not all pans cook chicken breast the same way. The pan’s material and coating control heat distribution and how much the chicken sticks. Here are the best pan types for pan frying chicken breast:
- Non-stick pans: Great for beginners. They need less oil and prevent sticking. Easy cleanup. Best for delicate cooking.
- Cast iron skillets: Hold heat well for an even sear. Can give a crispy crust. Requires seasoning to keep non-stick properties.
- Stainless steel pans: Very durable and heats fast. May stick if not heated properly. Ideal for high-heat cooking and browning.
| Pan Type | Heat Distribution | Stick Resistance | Care |
|---|---|---|---|
| Non-stick | Good | High | Gentle cleaning, avoid metal tools |
| Cast Iron | Excellent | Medium (when well-seasoned) | Season regularly, avoid soap |
| Stainless Steel | Fast | Low (needs correct technique) | Dishwasher safe, sturdy |
Tip: Preheat the pan before adding chicken. This helps prevent sticking and promotes even cooking.
Choosing The Right Oil
The oil you use affects flavor, cooking temperature, and healthiness. Some oils burn fast and taste bitter. Others stay stable and add a nice aroma. Choose oil based on smoke point and flavor.
- High smoke point oils: Best for pan frying chicken breast. They handle heat without burning.
- Mild flavor oils: Do not overpower the chicken’s taste.
| Oil | Smoke Point (°F) | Flavor | Best Use |
|---|---|---|---|
| Canola Oil | 400 | Neutral | Pan frying, general cooking |
| Avocado Oil | 520 | Light, buttery | High heat frying |
| Olive Oil (Light) | 465 | Mild, fruity | Sautéing, moderate heat |
| Butter | 350 | Rich, creamy | Low heat, flavor boost |
Tip: Use a mix of oil and butter for flavor and higher heat tolerance. Add butter near the end to avoid burning.
Credit: www.flavcity.com
Optimal Heat And Cooking Time
Getting the right heat and cooking time is key to pan frying chicken breast perfectly. The goal is a juicy, tender inside with a golden brown outside. Too high heat burns the outside while leaving the inside raw. Too low heat makes the chicken dry and pale. Finding the optimal heat and timing lets you cook chicken breast evenly and safely. This section explains how medium heat works best and how cooking time changes with thickness.
Medium Heat Benefits
Cooking chicken breast on medium heat offers several advantages. It allows the meat to cook through without burning the outside. The moderate temperature helps the chicken stay juicy and tender. Here are the main benefits of using medium heat:
- Even cooking: Heat spreads gently, avoiding raw spots inside.
- Better texture: The outside crisps nicely without charring.
- Moisture retention: Slower cooking keeps the juices inside.
- Less smoke: Medium heat reduces burning and smoke formation.
Using medium heat means your pan should be hot but not smoking. It is best to preheat the pan for 2-3 minutes before adding oil and chicken. This creates a steady cooking environment. Keep adjusting the stove setting if the chicken browns too fast or too slow.
| Heat Level | Effect on Chicken Breast |
|---|---|
| High | Burns outside, raw inside, dry texture |
| Medium | Even cooking, juicy inside, golden crust |
| Low | Pale, uneven cooking, tough texture |
Timing For Different Thicknesses
Chicken breast thickness strongly affects cooking time. Thin pieces cook quickly, thick ones need more time. Correct timing ensures the meat is fully cooked and safe to eat. Here’s a simple guide for pan frying chicken breast at medium heat:
| Thickness | Cooking Time Per Side | Total Time |
|---|---|---|
| 1/2 inch (thin) | 3-4 minutes | 6-8 minutes |
| 3/4 inch (medium) | 5-6 minutes | 10-12 minutes |
| 1 inch (thick) | 6-7 minutes | 12-14 minutes |
Follow these tips for best results:
- Use a meat thermometer. Internal temperature should reach 165°F (74°C).
- Flatten thick breasts with a meat mallet for even cooking.
- Rest chicken for 5 minutes after cooking to keep juices inside.
- Flip only once to maintain a nice crust.
Adjust cooking time slightly if chicken breasts are larger or smaller than average. Remember, undercooked chicken is unsafe. Overcooked chicken becomes dry and tough. Medium heat and proper timing create the perfect balance.
Checking For Doneness
Cooking chicken breast perfectly requires more than just timing. Checking for doneness ensures the chicken is safe and tasty. Overcooked chicken becomes dry, and undercooked chicken can be unsafe to eat. This section explains how to check if the chicken breast is done using two simple methods: internal temperature and visual cues.
Internal Temperature Guide
The most reliable way to check if chicken breast is fully cooked is by measuring its internal temperature. Use a meat thermometer to get an accurate reading. Insert the thermometer into the thickest part of the breast without touching bone or the pan.
The safe internal temperature for cooked chicken breast is 165°F (74°C). At this temperature, harmful bacteria are killed, making the chicken safe to eat.
Here is a quick guide to temperatures and what they mean for your chicken breast:
| Temperature (°F) | Temperature (°C) | Doneness | Texture |
|---|---|---|---|
| 140°F | 60°C | Undercooked | Very soft, raw inside |
| 150°F | 65°C | Partially cooked | Still pink and soft |
| 165°F | 74°C | Fully cooked | Firm, juicy |
| 175°F and above | 80°C+ | Overcooked | Dry, tough |
Check the temperature near the end of cooking. If below 165°F, cook longer in small increments. Avoid guessing by color alone; temperature is the safest test.
Visual And Texture Cues
Sometimes a thermometer is not available. Use visual and touch cues to check chicken doneness. The appearance and feel of the chicken change as it cooks.
Look for these signs:
- Color: The chicken should be white or light tan inside. Pink or translucent parts mean it needs more time.
- Juices: Clear juices running from the meat show it is cooked. Pink or red juices mean it is undercooked.
- Texture: Press the chicken with your finger or tongs. Fully cooked chicken feels firm but still springy. If it feels soft or squishy, cook longer.
Use these simple tests together for better results:
- Cut a small piece from the thickest part and check the color.
- Press the chicken to test firmness.
- Watch for clear juices while cooking.
Practice improves your skill at judging doneness visually. Always check multiple signs before serving.
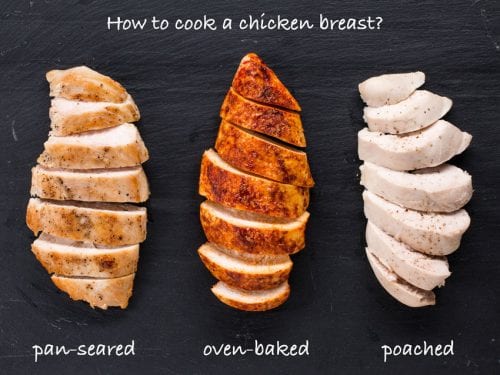
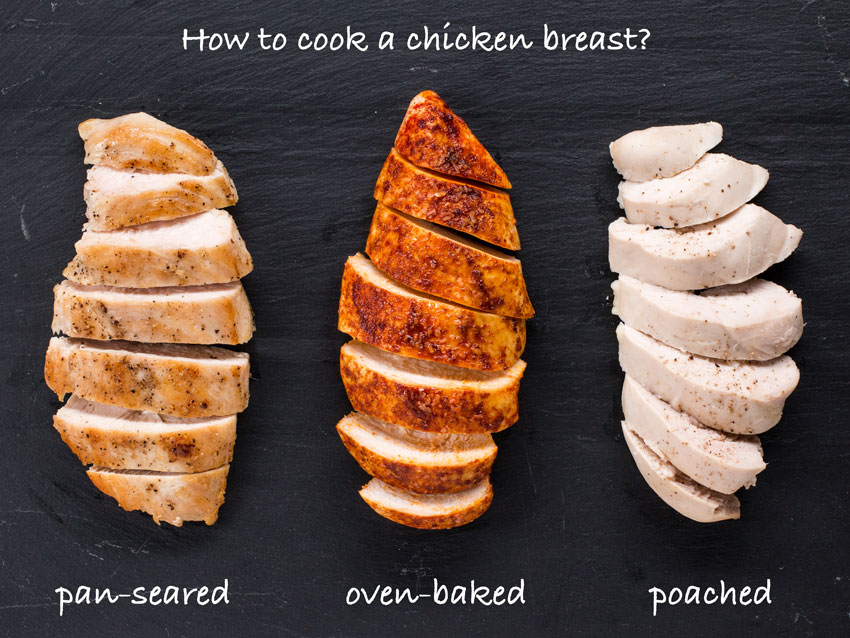
Credit: www.flavcity.com
Resting And Serving Tips
After pan frying chicken breast, resting and serving it properly makes a big difference. Resting allows the juices to settle inside the meat. Serving it right brings out the best flavors and texture. These simple steps help make your chicken breast juicy and tasty every time.
Why Resting Matters
Resting chicken breast after cooking is very important. When you cook chicken, the heat pushes the juices toward the center. Cutting or eating right away lets these juices run out. This makes the meat dry and less flavorful.
Resting lets the juices spread evenly inside the chicken. The meat becomes more tender and moist. Usually, let the chicken rest for about 5 to 10 minutes. Cover it loosely with foil to keep it warm.
Here are some key points about resting:
- Time: 5 to 10 minutes
- Cover: Use foil to keep heat
- Effect: Juices stay inside the meat
- Result: Juicy and tender chicken
| Step | What to Do | Why |
|---|---|---|
| 1 | Remove chicken from pan | Stop cooking to avoid dryness |
| 2 | Place on plate and cover loosely with foil | Keep warm and prevent moisture loss |
| 3 | Wait 5-10 minutes before cutting | Let juices redistribute evenly |
Skipping resting often leads to dry, tough chicken. Taking a few minutes makes your meal better. It is a small step with a big impact.
Serving Suggestions
Serving pan-fried chicken breast well enhances the eating experience. The right sides and sauces bring out the chicken’s flavor and texture. Simple, fresh ingredients work best to keep the meal balanced.
Try these serving ideas:
- Serve sliced chicken breast over a fresh green salad
- Pair with steamed or roasted vegetables like broccoli or carrots
- Add a side of mashed potatoes or rice for a filling meal
- Drizzle with lemon juice or a light garlic sauce for extra flavor
Here is a quick serving guide table:
| Side Dish | Flavor Profile | Preparation Tip |
|---|---|---|
| Steamed Vegetables | Light and fresh | Cook until tender, season lightly |
| Mashed Potatoes | Creamy and mild | Add butter and a pinch of salt |
| Green Salad | Crunchy and fresh | Use olive oil and lemon dressing |
| Garlic Sauce | Rich and flavorful | Mix garlic, yogurt, and herbs |
Presentation tips: Slice chicken across the grain for tenderness. Arrange sides neatly on the plate. A garnish of fresh herbs adds color and aroma.
Following these serving tips makes your pan-fried chicken breast more enjoyable. Simple touches bring out the best in your meal.
Frequently Asked Questions
How Long Does It Take To Pan Fry Chicken Breast?
Pan frying chicken breast usually takes 6 to 8 minutes per side. The total cooking time is about 12 to 16 minutes. Ensure the internal temperature reaches 165°F (75°C) for safety. Cooking time varies with thickness and heat level.
What Temperature Is Best For Pan Frying Chicken Breast?
Medium to medium-high heat is ideal for pan frying chicken breast. This temperature cooks the chicken evenly without burning the outside. It also helps retain moisture, keeping the chicken juicy and tender.
Should Chicken Breast Be Covered While Pan Frying?
No, chicken breast should not be covered while pan frying. Leaving it uncovered allows the surface to brown and crisp properly. Covering traps steam, which can make the chicken soggy instead of crispy.
How To Tell When Pan Fried Chicken Breast Is Done?
Use a meat thermometer to check doneness. The internal temperature should reach 165°F (75°C). The chicken should be white inside with clear juices. If unsure, cut into the thickest part to verify it’s fully cooked.
Conclusion
Pan frying chicken breast takes about 6 to 8 minutes per side. Cook on medium heat for even browning and juicy meat. Check the thickness to adjust cooking time. Use a meat thermometer to confirm it reaches 165°F (74°C). Rest the chicken for a few minutes before cutting.
This keeps it tender and flavorful. Simple steps lead to tasty results every time. Enjoy your perfectly pan-fried chicken breast!

Hello, This is Annie Walker, a 38-year-old blogger, founder, and editor of Cookware Guider from NY, USA. I am a cookware fanatic and passionate cooker. I love to cook with different types of cooking appliances (example: all types of cookware, rice cookers, slow cookers, etc) almost every day in my kitchen. I love to share my experience with my readers in my blog. Also, I enjoy helping people to solve their problems through my website. You can follow me on Twitter & Pinterest. To know details about my blog please check the about us page.