
Sharp knives make cooking safer, easier, and more enjoyable. But keeping your knives sharp is not just about running them over a stone—holding the correct sharpening angle is critical. If you sharpen a knife at the wrong angle, it can damage the edge or make it dull even faster. Many beginners struggle with this. That’s why a knife sharpening angle guide is so useful. It helps you maintain the right angle every time, leading to sharper, longer-lasting blades.
You don’t need to buy expensive tools to get this benefit. Making your own angle guide is simple, affordable, and can be customized for your favorite knives. Whether you’re new to sharpening or want to improve your results, this article will walk you through the process step by step.
Along the way, you’ll learn how sharpening angles affect your knife, compare materials for guides, and pick up some tips most people miss.
Why A Knife Sharpening Angle Guide Matters
If you sharpen a knife freehand, it’s easy to vary the angle from stroke to stroke. Even small changes—just a few degrees—can make the edge less effective. A guide helps you keep a consistent angle, improving both sharpness and blade life.
Most kitchen knives work best at angles between 15° and 20°. For outdoor knives, such as those used for camping or hunting, a wider angle (20°–25°) is often preferred for durability. The right angle depends on the type of knife and how you use it.
Here’s how angle affects performance:
| Angle | Sharpness | Durability | Common Use |
|---|---|---|---|
| 10°–15° | Very sharp | Low | Japanese knives, fillet knives |
| 15°–20° | Sharp | Medium | Kitchen knives |
| 20°–25° | Moderate | High | Outdoor, utility knives |
Trying to hold these angles by eye is tough, even for experienced sharpeners. That’s why a guide makes such a big difference.
Choosing The Right Angle For Your Knife
Before building your angle guide, decide which angle you need. The choice depends on:
- Knife type: Are you sharpening a chef’s knife, a pocket knife, or a cleaver?
- Blade thickness: Thinner blades benefit from lower angles.
- Use case: Cutting soft foods needs a sharper edge, while cutting tough materials needs durability.
Here’s a quick reference for popular knives:
| Knife Type | Recommended Angle |
|---|---|
| Chef’s knife | 15°–20° |
| Japanese chef’s knife (Gyuto) | 12°–15° |
| Pocket knife | 20°–25° |
| Cleaver | 20°–25° |
| Fillet knife | 12°–15° |
If you’re unsure, start with 17°–20° for most kitchen knives. This balances sharpness and durability.
Materials Needed For A Diy Angle Guide
You can make a sharpening angle guide with simple materials. Here are popular options:
- Wood: Easy to shape, affordable, and safe for the blade.
- Plastic: Durable and water-resistant.
- Metal (aluminum or steel): Very durable, but needs careful handling to avoid scratching knives.
- Cardboard: Good for temporary guides or testing angles.
You’ll also need:
- Protractor or angle finder: For measuring and marking the correct angle.
- Ruler: To measure lengths and check accuracy.
- Marker or pencil: For marking lines.
- Saw or cutter: To shape wood, plastic, or cardboard.
- Sandpaper: To smooth edges, especially for wood and plastic guides.
- Glue (optional): For assembling multi-piece guides.
For beginners, wood or plastic is recommended. They’re easy to work with and gentle on the blade.
Planning Your Knife Sharpening Angle Guide
There are many ways to make an angle guide. Two popular designs are:
- Simple wedge: A block cut at the desired angle. You rest the knife against the wedge as you sharpen.
- Clip-on guide: Attaches to the blade and sets the angle automatically.
For most home sharpeners, the simple wedge is easiest and works with any sharpening stone.
Calculating The Wedge Dimensions
To make a wedge that sets a specific angle, you need to know the height and base length. The wedge forms a right triangle, where the angle you want is at the base.
Suppose you want a 20° angle and a wedge base of 2 inches:
- Height = base × tan(angle)
- Tan(20°) ≈ 0.364
- Height = 2 × 0.364 ≈ 0.73 inches
This means your wedge should be 2 inches long and 0.73 inches tall at the thick end.
If you want a different angle, adjust the height using this formula.
Step-by-step Guide: Making A Wooden Sharpening Angle Guide
Let’s walk through the process of building a simple wooden wedge guide for a 20° angle.
Step 1: Gather Materials
- Small block of wood (2 × 1 × 1 inches is ideal)
- Protractor or angle finder
- Ruler
- Pencil
- Saw
- Sandpaper
Step 2: Mark The Angle
- Place the block of wood on a flat surface.
- Use the protractor to mark a 20° angle at one end.
- Draw a line from the base to the top, showing where you’ll cut.
Step 3: Cut The Wedge
- Use a saw to cut along the marked line.
- Check the cut with your protractor to ensure the angle is correct.
- Smooth the cut edge with sandpaper.
Step 4: Fine-tune The Guide
- Test the wedge by placing it next to your sharpening stone.
- Rest the knife against the wedge, checking the angle.
- Adjust with sandpaper if needed.
Step 5: Use The Guide
- Place the wedge beside your sharpening stone.
- Position the knife so the edge matches the wedge angle.
- Make a few strokes, then check the angle again.
- Repeat for the other side of the blade.
This simple tool helps you keep the blade at the correct angle with every stroke.
Making A Clip-on Guide: Step-by-step
Clip-on guides are popular for beginners. They attach to the knife and set the angle automatically. Here’s how to make a basic clip-on guide with plastic.
Step 1: Gather Materials
- Thick plastic strip (about 2 × 0.5 × 0.2 inches)
- Protractor
- Ruler
- Cutter or small saw
- Sandpaper
- Glue (optional)
Step 2: Cut The Angle
- Mark the desired angle (e.g., 20°) on one side of the plastic strip.
- Cut along the line to create a sloped surface.
Step 3: Shape The Clip
- Cut a notch in the middle of the strip, wide enough to fit your knife blade.
- Smooth all edges with sandpaper.
Step 4: Attach And Use
- Slide the clip onto the blade, keeping the angled surface facing down.
- Rest the angled surface on the sharpening stone as you make strokes.
Clip-on guides can be made for different angles and blade thicknesses. If you use glue, let it dry fully before use.

Credit: www.reddit.com
Comparing Diy And Commercial Angle Guides
Should you make your own or buy a commercial guide? Here’s a comparison:
| Feature | DIY Guide | Commercial Guide |
|---|---|---|
| Cost | Low (under $5) | Medium to high ($10–$50) |
| Customization | Flexible, any angle | Fixed, limited angles |
| Durability | Depends on material | Usually high |
| Ease of Use | Simple, hands-on | Plug-and-play |
| Learning Value | High, teaches angle basics | Low, does not teach angles |
For most home cooks, a DIY guide gives more control and a better understanding of sharpening.
How To Use Your Knife Sharpening Angle Guide Effectively
Having a guide is only half the story. The way you use it matters.
- Position the guide correctly: Place the wedge or clip-on guide next to your sharpening stone. Make sure it sits flat and stable.
- Align the blade: Set the knife so the edge matches the angle of the guide. This keeps your strokes consistent.
- Sharpen in both directions: Flip the knife and repeat for the other side of the blade.
- Check your progress: After a few strokes, inspect the edge. Look for even shine or use a magnifying glass.
- Clean the guide: After sharpening, wipe off any debris or water.
Pro tip: Start with light pressure. Too much force can change the angle, even with a guide.
Common Mistakes When Making Or Using Angle Guides
Many people make small errors that affect sharpening results. Here are the most frequent mistakes:
- Wrong angle calculation: Double-check your measurements before cutting.
- Uneven cutting: If the wedge isn’t smooth, your blade may wobble during sharpening.
- Guide slips during use: Secure the guide in place. A non-slip mat under the stone helps.
- Using a dirty guide: Dirt or metal filings can scratch the blade or alter the angle.
- Forgetting blade thickness: Clip-on guides must fit the blade snugly—not too loose or tight.
Beginners often overlook the importance of material choice. For example, metal guides can scratch softer knives if not sanded well.
Non-obvious Insights For Better Sharpening
- Use two guides for double-bevel knives: If your knife has two different angles (e.g., Japanese knives with a 70/30 bevel), make two wedges for each side. This helps keep the original factory shape.
- Check the angle with a smartphone app: Many apps measure angles using your phone’s camera. Use them to check your guide’s accuracy.
- Mark the edge with a permanent marker: Color the blade edge before sharpening. After a few strokes, see where the color is removed. If the color stays, your angle may be off.
Maintaining Your Angle Guide
A well-made guide can last for years, but it needs care.
- Store in a dry place: Wood and cardboard can warp if wet.
- Clean after each use: Wipe away metal filings and water.
- Check for wear: If the guide is chipped or warped, make a new one.
If you sharpen often, consider making several guides for different knives.
Sharpening Safety Tips
Sharpening knives is safe if you follow basic rules:
- Keep fingers away from the edge
- Use a stable surface
- Wear gloves if you’re new to sharpening
- Do not rush
A guide helps reduce accidents by keeping your blade steady.
:max_bytes(150000):strip_icc()/__opt__aboutcom__coeus__resources__content_migration__serious_eats__seriouseats.com__2020__08__20200812-Knife-Sharpening-Angle-Guides-daniel-gritzer-82b1539a7dc94ac6baf2f1ec5ecf7307.jpg)
Credit: www.seriouseats.com
Advanced Angle Guide Designs
If you want more precision, try these advanced designs:
- Adjustable angle guide: Make a two-piece wedge with a hinge. Adjust the angle for different knives.
- Magnetic guide: Embed small magnets in the wedge. They hold the knife in place for extra control.
- Multi-angle block: Cut a block with several angles on different sides (e.g., 15°, 20°, 25°). Rotate to use the angle you need.
These designs take more time but offer flexibility for serious sharpeners.
How To Sharpen With Your Guide: Practical Example
Let’s sharpen a chef’s knife using a 20° wooden wedge guide:
- Place the wedge next to your stone.
- Rest the knife against the wedge, matching the angle.
- Draw the knife across the stone, keeping contact with the guide.
- Do 5–10 strokes, then flip the knife and repeat.
- Check the edge—look for a fine, even shine.
- Finish with a few strokes on a finer stone or a honing rod.
This process works for all knives; just adjust the angle and guide as needed.
Sharpening Stones And Angle Guides: Compatibility
Not all sharpening stones work perfectly with every guide. Some stones are larger or smaller, which affects how you use your wedge.
Larger stones: More room to move the knife and guide together.
Smaller stones: You may need a smaller wedge or clip-on guide.
Diamond stones: These are harder and need gentle touch with guides to avoid scratching.
Water stones: Best used with wooden or plastic guides, as they won’t scratch or wear down the stone.
Using Angle Guides With Other Sharpening Tools
Angle guides aren’t just for stones. You can use them with:
- Honing rods: Hold the guide next to the rod for consistent angle.
- Sharpening systems: Many have built-in guides, but you can use your DIY wedge for more control.
Some electric sharpeners set the angle for you, but manual guides offer more versatility.
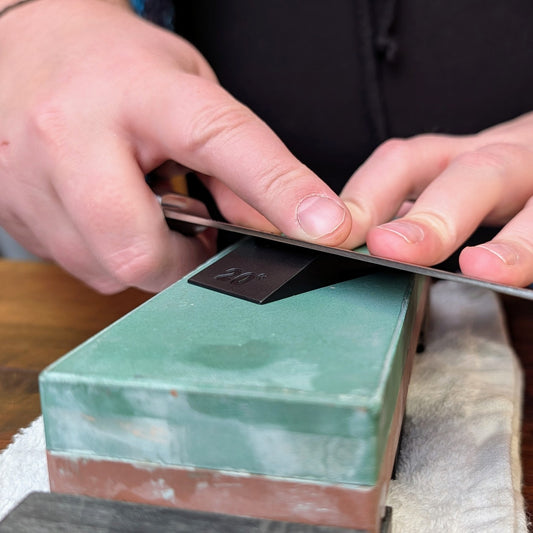
Credit: knifewear.com
Troubleshooting Sharpening Problems
If your knife isn’t getting sharp, check:
- Guide angle: Re-measure with a protractor.
- Stone condition: Clean and flatten your stone regularly.
- Sharpening technique: Make sure your strokes are smooth and consistent.
Expert tip: If your blade feels rough after sharpening, finish with a few strokes at a slightly higher angle. This creates a stronger edge.
Real-world Example: Improving Results With A Guide
A home cook reported that her chef’s knife dulled quickly after sharpening. She realized she was sharpening freehand, varying her angle with every stroke. After making a simple wooden wedge at 20°, she saw her knife stay sharp for much longer.
The guide helped her keep a consistent angle, improving both sharpness and edge life.
Where To Find Sharpening Angle Resources
For more information on sharpening angles and techniques, visit Wikipedia: Sharpening. This resource covers sharpening theory, tool choices, and safety tips.
Frequently Asked Questions
How Do I Choose The Right Angle For My Knife?
Most kitchen knives work best at 15°–20°. Japanese knives use 12°–15° for a sharper edge. Outdoor knives need 20°–25° for durability. Check your knife’s manufacturer or use a protractor to measure.
Can I Use The Same Angle Guide For Different Knives?
Yes, but only if the knives need the same angle. If you use different knives (chef, pocket, cleaver), make several guides for each angle.
How Accurate Does My Angle Guide Need To Be?
Within 2° is usually good enough for home cooks. Small variations won’t ruin your edge, but big mistakes can dull the blade.
Are Commercial Angle Guides Better Than Homemade Ones?
Commercial guides are durable and easy to use. DIY guides offer more customization and teach you about angles. Both work well if made correctly.
What Should I Do If My Guide Wears Out Or Breaks?
Make a new guide using the same steps. Check your measurements and materials, and store your guide in a dry place to avoid damage.
Making your own knife sharpening angle guide is a smart way to improve your sharpening results and learn more about knife care. It’s affordable, easy, and gives you control over your tools. With the right guide, your knives will stay sharp, safe, and ready for every meal.

Hello, This is Annie Walker, a 38-year-old blogger, founder, and editor of Cookware Guider from NY, USA. I am a cookware fanatic and passionate cooker. I love to cook with different types of cooking appliances (example: all types of cookware, rice cookers, slow cookers, etc) almost every day in my kitchen. I love to share my experience with my readers in my blog. Also, I enjoy helping people to solve their problems through my website. You can follow me on Twitter & Pinterest. To know details about my blog please check the about us page.