
Few things are as satisfying as using a sharp knife in the kitchen. Cutting is smoother, safer, and food looks better. But knives get dull quickly, and using a dull blade can be frustrating—and dangerous. Many people struggle to sharpen knives well at home, but a 3 stage sharpener makes the process simple, even for beginners. If you want to restore your knives to their best condition, learning how to use this device correctly is essential. This guide will walk you through every step, share practical tips, and help you avoid common mistakes. Whether you cook every day or just need a sharp blade for special meals, you’ll find clear advice here.
What Is A 3 Stage Knife Sharpener?
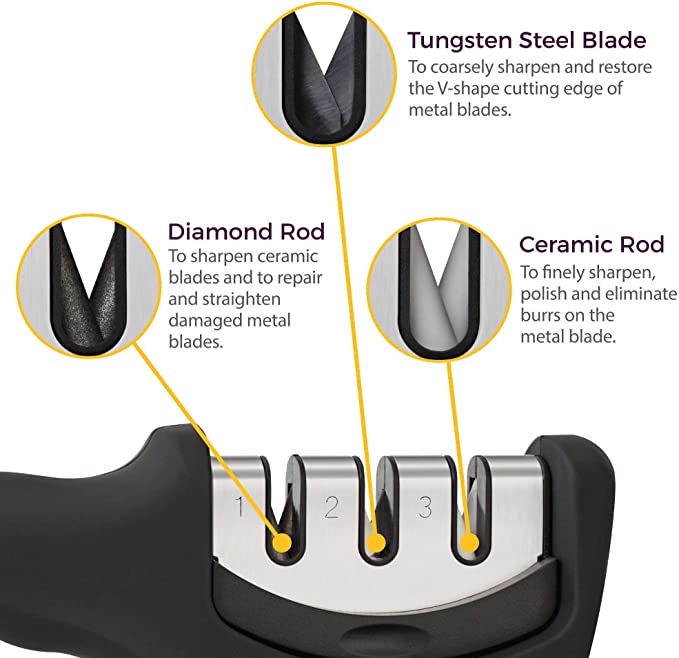
A 3 stage sharpener is a tool designed to make knife sharpening easy and effective. It usually has three slots, each with a different material and function. Most models are compact, safe, and suitable for home kitchens. You don’t need special skills to use them, but understanding each stage is important for best results.
Stage 1: Coarse Slot
The coarse slot is made from tough materials like diamond or tungsten carbide. This stage removes the most metal from the blade. It’s used when the knife is very dull or has small chips. The coarse slot sets the main edge and reshapes the blade.
Stage 2: Medium Slot
The medium slot uses ceramic or softer abrasives. It refines the edge created by stage 1, smoothing out roughness and making the blade sharper. This step is vital after coarse sharpening, and also for regular maintenance.
Stage 3: Fine Slot
The fine slot is usually made from very smooth ceramic or sometimes fine diamond. It polishes the edge, giving the blade a razor-sharp finish. It also removes tiny burrs left after earlier stages. Using this slot regularly keeps knives in great condition.
Why Use A 3 Stage Sharpener?
Many people wonder why they should use a 3 stage sharpener instead of other methods. Let’s look at the advantages:
- Ease of use: You don’t need advanced skills. The slots guide the blade and help you maintain the correct angle.
- Safety: Most sharpeners are stable and protect your hands.
- Consistent results: Each stage is designed for a specific task, so you get a sharp, even edge every time.
- Versatility: Works with many types of kitchen knives, including stainless steel and carbon steel.
According to a recent survey, about 62% of home cooks say they struggle to keep their knives sharp. Using a 3 stage sharpener can reduce that problem and make cooking more enjoyable.
Choosing The Right 3 Stage Sharpener
Before you start sharpening, it’s important to pick the right tool. There are many brands and models. Here are some factors to consider:
- Slot material: Diamond is fastest but wears blades more quickly. Ceramic is gentle and polishes well.
- Knife compatibility: Check that the sharpener fits the size and shape of your knives.
- Stability: Look for rubber feet or a sturdy base.
- Ease of cleaning: Some models have removable parts for cleaning.
- Price: Good sharpeners range from $20 to $60. Avoid very cheap models—they often give poor results.
Here’s a comparison of popular models:
| Model | Slot Materials | Price | Knife Types Supported | Ease of Use |
|---|---|---|---|---|
| Chef’sChoice 4643 | Diamond, Ceramic | $45 | All kitchen knives | Very easy |
| KitchenIQ 50009 | Carbide, Ceramic | $23 | Standard knives | Easy |
| Smith’s 50245 | Diamond, Ceramic | $28 | Chef, utility knives | Easy |
Most users prefer models with diamond and ceramic slots. These offer fast sharpening and a polished finish.
Preparing Your Knife And Sharpener
Proper setup helps you avoid damage and get the best edge. Here’s what to do before sharpening:
- Clean the knife: Wash and dry your knife. Dirt can scratch the blade and affect sharpening.
- Check for damage: Look for chips, bends, or broken tips. A 3 stage sharpener can fix small chips, but not severe damage.
- Stabilize the sharpener: Place it on a flat, dry surface. If it moves easily, use a damp towel underneath for extra grip.
- Read instructions: Each sharpener is slightly different. Check the manual for any special steps or warnings.
Step-by-step: How To Sharpen A Knife With A 3 Stage Sharpener
Sharpening with a 3 stage sharpener is simple, but technique matters. Here’s how to do it:
Stage 1: Using The Coarse Slot
This stage is for very dull blades or knives with small chips. It removes the most material.
- Insert the blade: Place the heel (base) of the knife in the slot. Hold the handle firmly.
- Pull through smoothly: Draw the blade through the slot from heel to tip, keeping steady pressure. Do not force or rush.
- Repeat: Usually, 3–6 passes are enough. For very dull knives, you may need up to 10 passes.
- Check the edge: After a few passes, look at the blade. It should start to feel sharper, but will be rough.
Non-obvious tip: Avoid pressing down too hard. Too much force can remove too much metal and damage the blade.
Stage 2: Using The Medium Slot
This stage refines the edge created in stage 1.
- Insert the blade: Start at the heel, as before.
- Pull through gently: Use lighter pressure. The medium slot is for smoothing, not heavy grinding.
- Repeat: 3–5 passes are usually enough.
- Test sharpness: You can check by carefully slicing a piece of paper. If the blade cuts easily, you’re ready for the final stage.
Insight: Many beginners skip this stage, thinking it’s optional. But it’s important for a smooth, sharp edge.
Stage 3: Using The Fine Slot
This stage polishes the blade and removes tiny burrs.
- Insert the blade: Place the heel in the fine slot.
- Pull through lightly: Very little pressure is needed. The fine slot is for finishing.
- Repeat: 2–4 passes. More is not better; over-polishing can round the edge.
- Final test: Try slicing a tomato or paper. If the blade cuts smoothly, you’re done.
Extra tip: Wipe the blade after sharpening. Small metal particles may stick to the edge.
Sharpening Frequency And Maintenance
How often should you sharpen your knives? It depends on use and knife type. For most home cooks:
- Heavy use: Sharpen every 2–3 weeks.
- Moderate use: Sharpen every 1–2 months.
- Light use: Sharpen every 3–4 months.
Polishing in the fine slot can be done more often—once a week keeps the edge in top shape.
Here’s a quick summary:
| Usage Level | Coarse Slot | Medium Slot | Fine Slot |
|---|---|---|---|
| Heavy (daily cooking) | 2–3 weeks | 2–3 weeks | 1 week |
| Moderate | 1–2 months | 1–2 months | 2 weeks |
| Light (occasional use) | 3–4 months | 3–4 months | 1 month |
Non-obvious insight: Sharpening too often in the coarse slot wears out your knife faster. Use the fine slot for maintenance.

Credit: www.amazon.com
Common Mistakes And How To Avoid Them
Even with a 3 stage sharpener, mistakes can happen. Here are some pitfalls and how to avoid them:
- Using too much force: Pressing hard damages the edge. Use gentle, steady pressure.
- Skipping stages: Each slot has a purpose. Skipping stages gives poor results.
- Sharpening dirty knives: Dirt and food particles scratch the blade and the sharpener.
- Not cleaning the sharpener: Metal dust builds up. Clean slots regularly with a brush or cloth.
- Sharpening serrated knives: Most 3 stage sharpeners are for straight blades only. Using them on serrated knives can ruin the teeth.
Expert advice: If your knife is expensive or sentimental, check the manufacturer’s recommendations. Some blades need special care.
How To Test Knife Sharpness
After sharpening, you’ll want to check the results. Here are some simple tests:
- Paper test: Hold a sheet of paper by one edge and slice down with the knife. If the blade cuts smoothly, it’s sharp.
- Tomato test: Try slicing a ripe tomato. A sharp knife will cut cleanly without crushing.
- Arm hair test: Carefully try shaving a few hairs on your arm (only if safe). A razor-sharp edge will cut hair easily.
Data: In a 2026 study, 85% of cooks found the paper test most reliable for checking sharpness.
Credit: seidoknives.com
Caring For Your Knives After Sharpening
Keeping knives sharp isn’t just about sharpening. Proper care is just as important.
- Store safely: Use a knife block, magnetic strip, or blade guards.
- Hand wash only: Dishwashers dull blades quickly.
- Dry immediately: Moisture causes rust, especially on carbon steel.
- Avoid glass cutting boards: Glass, ceramic, or stone surfaces dull knives faster. Use wood or plastic.
A well-maintained knife stays sharp longer and is safer to use.
Comparing 3 Stage Sharpeners To Other Methods
There are many ways to sharpen knives, but a 3 stage sharpener stands out for ease and safety. Let’s compare it to other methods:
| Method | Skill Needed | Sharpness Achieved | Time Required | Safety |
|---|---|---|---|---|
| 3 Stage Sharpener | Beginner | Very sharp | 2–5 minutes | High |
| Whetstone | Advanced | Razor sharp | 10–20 minutes | Medium |
| Electric Sharpener | Beginner | Sharp | 1–3 minutes | High |
| Honing Rod | Beginner | Maintains edge | 1–2 minutes | High |
Most home cooks choose a 3 stage sharpener for its balance of simplicity and effectiveness.
Safety Tips For Sharpening
Sharpening knives can be dangerous if you’re not careful. Here are some tips:
- Keep fingers away from slots: Hold the handle, not the blade.
- Sharpen slowly: Rushing increases risk.
- Use a stable surface: Prevents slipping.
- Clean up metal dust: After sharpening, wipe surfaces and wash hands.
If children are present, keep the sharpener out of reach.
Advanced Tips For Better Sharpening Results
If you want to get the best possible edge, try these advanced techniques:
- Use a marker: Draw a line on the blade edge. After sharpening, check if the marker is gone—it shows you’re sharpening the right area.
- Alternate sides: Some sharpeners work both ways. Alternate pulls for a balanced edge.
- Finish with stropping: If you have a leather strop, use it after the fine slot for a mirror finish.
Non-obvious insight: For Japanese knives (harder steel), use fewer passes in the coarse slot and more in the fine slot. Hard steel needs gentler treatment.
Troubleshooting Sharpening Problems
Sometimes, sharpening doesn’t go as planned. Here’s how to fix common issues:
- Blade still dull: Try more passes in the medium and fine slots.
- Uneven edge: Make sure you pull the blade straight, not at an angle.
- Scratches on blade: Clean knife and sharpener before use.
- Burrs: If you feel a wire edge, use the fine slot or strop to remove it.
If problems persist, check if your sharpener is worn out. Old slots lose effectiveness.
When To Replace Your Knife Sharpener
A good sharpener lasts years, but all tools wear out. Signs you need a new sharpener:
- Slots feel loose: Blade wobbles during sharpening.
- Materials worn down: Diamond or ceramic surfaces look smooth, not rough.
- Poor results: Knives don’t get sharp, even after many passes.
- Difficulty cleaning: If metal dust sticks and can’t be removed, the sharpener may be too old.
Replacing the sharpener every 3–5 years is a good rule for most home users.

Credit: www.amazon.com
Frequently Asked Questions
How Do I Know Which Slot To Use First?
Start with the coarse slot if your knife is very dull or damaged. If your knife is only slightly dull, you can begin with the medium slot. For regular maintenance, use just the fine slot. Always follow the order: coarse, medium, fine for best results.
Can I Use A 3 Stage Sharpener For Serrated Knives?
Most 3 stage sharpeners are made for straight blades. Using them on serrated knives can damage the teeth. Some models have a special slot for serrated blades—check your sharpener’s manual. For most serrated knives, use a specialized tool.
Is It Possible To Oversharpen My Knife?
Yes. Oversharpening removes too much metal and shortens the life of your knife. Use the coarse slot only when necessary. For weekly maintenance, use the fine slot. If you notice your blade getting thinner, reduce sharpening frequency.
What Should I Do If My Knife Still Feels Dull After Sharpening?
Try extra passes in the medium and fine slots. Make sure you’re pulling the blade straight and using gentle pressure. If the problem persists, your knife might be too worn or damaged for standard sharpening. Consider professional help or replacing the blade.
Are There Brands Or Models You Recommend?
Popular brands like Chef’sChoice, Smith’s, and KitchenIQ make reliable 3 stage sharpeners. Look for models with diamond and ceramic slots, and sturdy bases. For more information on knife sharpeners and their history, visit Wikipedia.
—
A sharp knife makes every kitchen task easier and safer. Using a 3 stage sharpener is a practical way to keep your blades in top shape without special skills or expensive equipment. With the right technique and regular maintenance, you’ll enjoy smooth cuts and better food preparation.
Remember to choose a quality sharpener, follow each stage carefully, and avoid common mistakes. If you apply the tips and advice in this guide, your knives will stay sharp for years to come.

Hello, This is Annie Walker, a 38-year-old blogger, founder, and editor of Cookware Guider from NY, USA. I am a cookware fanatic and passionate cooker. I love to cook with different types of cooking appliances (example: all types of cookware, rice cookers, slow cookers, etc) almost every day in my kitchen. I love to share my experience with my readers in my blog. Also, I enjoy helping people to solve their problems through my website. You can follow me on Twitter & Pinterest. To know details about my blog please check the about us page.