
Sharpening a pocket knife is one of those skills that feels old-school, yet it’s still useful every day. Maybe you’re out camping, your knife starts to get dull, and you realize — you forgot your sharpener. Or maybe you’re at home, need a quick fix, and don’t want to buy a fancy tool.
The good news is, you can sharpen a pocket knife without a sharpener if you know a few tricks. This guide will walk you through practical methods, explain what really works, and help you avoid common mistakes beginners often make.
Why A Sharp Knife Matters
A dull knife is not just annoying. It can be dangerous. When a blade isn’t sharp, you need more force to cut things. That can lead to slips and accidents. With a sharp pocket knife, you cut easily and safely. Whether you use your knife for food prep, opening packages, or woodwork, keeping it sharp lets you work faster and cleaner.
Surprisingly, some studies show dull knives cause more injuries than sharp ones. The National Safety Council found that most kitchen accidents happen with dull blades because people try to force cuts. This is true for pocket knives too. So sharpening your knife is about safety, not just convenience.
How Does Sharpening Work?
Sharpening means removing tiny bits of metal from the blade edge. You create a new, sharper edge. Most sharpeners use abrasive materials like ceramic, diamond, or stone. But you don’t need these tools to do the job. Anything harder or rougher than the knife steel can work.
You just need the right surface and technique.
Many beginners think sharpening means just rubbing the blade on something. But the angle matters. You must keep the blade at a consistent angle (usually 20 degrees for pocket knives) and use even pressure. If you change the angle or press too hard, you can make the edge worse.
Credit: www.youtube.com
Choosing A Substitute Sharpening Surface
The world is full of surfaces you can use. Some work better than others. Below is a table comparing common household and outdoor items as substitute sharpening tools.
| Surface | Effectiveness | Risk of Damage | Availability |
|---|---|---|---|
| Ceramic mug bottom | High | Low | Common |
| Window glass edge | Medium | Medium | Common |
| Natural stone | Medium | Medium | Outdoor |
| Car window | Low | Low | Common |
| Sandpaper | High | Low | Common |
| Leather belt | Low (for honing) | Very low | Common |
Many people skip sandpaper, but it’s a very effective substitute. Even a worn-out belt can help polish the edge after sharpening.
Step-by-step Sharpening Methods (without A Sharpener)
Let’s dive into specific methods. Each one uses a different surface. You don’t need special skills, just follow the steps and keep safety in mind.
1. Sharpening With A Ceramic Mug
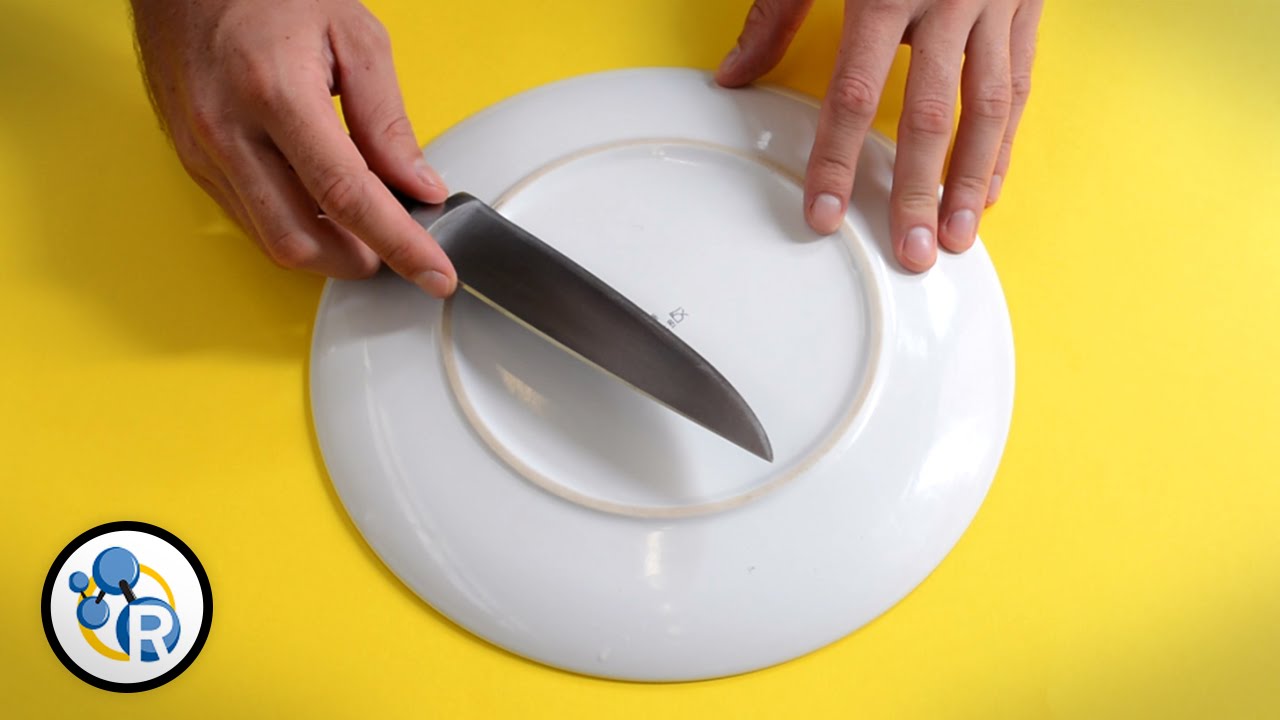
Ceramic is harder than most knife steels. The unglazed ring on the bottom of a mug is rough enough to act like a sharpening stone.
- Find a ceramic mug with an unglazed bottom ring.
- Clean the mug to remove dirt and oils.
- Hold the knife at a 20-degree angle to the mug edge.
- Draw the blade across the mug ring, from heel to tip, using light pressure.
- Repeat on both sides, alternating strokes.
- Wipe the blade clean.
Most beginners press too hard. Don’t force the blade. Light, even strokes give better results.
2. Using Sandpaper
Sandpaper is cheap and easy to find. You want medium grit (400–600) for sharpening.
- Lay sandpaper flat on a hard surface.
- Hold the knife at a 20-degree angle.
- Draw the blade across the sandpaper as you would with a stone.
- Alternate sides, using 8–10 strokes per side.
- Wipe the blade to remove grit.
Avoid using coarse sandpaper (below 400 grit), as it can scratch the blade badly.
3. Sharpening With A Natural Stone
If you’re outdoors, rocks can work. Not all stones are equal. Look for a smooth, flat stone.
- Wet the stone if possible — water helps remove debris.
- Hold the knife at the correct angle.
- Draw the blade along the stone, using the whole edge.
- Alternate sides.
- Rinse and wipe the blade.
Some stones can leave rough marks. Always check the stone’s surface first.
4. Using A Car Window Edge
The top edge of car windows is often unpolished and rough. It’s not as effective as ceramic, but works in an emergency.
- Lower the window halfway.
- Hold the knife at a 20-degree angle to the glass edge.
- Use gentle strokes along the glass.
- Alternate sides.
Don’t use too much pressure — glass can chip, and you don’t want to damage your knife or window.
5. Honing With A Leather Belt
A leather belt doesn’t sharpen, but it polishes and straightens the edge (called stropping). After sharpening, it removes tiny burrs.
- Find a thick, smooth leather belt.
- Lay it flat.
- Draw the blade backward (not forward) along the belt, keeping the edge angled away.
- Repeat several times.
This step improves sharpness and helps prevent rust.
Credit: www.businessinsider.com
Proper Sharpening Angle: Why It Matters
The angle you use affects sharpness and durability. Most pocket knives should be sharpened at 20 degrees. Some hunting knives use 25–30 degrees for a tougher edge.
Below is a comparison of sharpening angles.
| Angle | Sharpness | Edge Strength | Best Use |
|---|---|---|---|
| 15 degrees | Very sharp | Low | Precision cutting |
| 20 degrees | Sharp | Medium | Pocket knives |
| 25 degrees | Moderate | High | Outdoor knives |
| 30 degrees | Less sharp | Very high | Heavy-duty knives |
Many beginners sharpen at random angles. This makes the blade uneven and dull. Try to keep the same angle for every stroke.
Testing Your Knife’s Sharpness
After sharpening, you need to test the blade. There are simple ways to check if your knife is sharp enough.
- Paper test: Hold a piece of paper by one end. Slice through the edge. A sharp blade cuts easily.
- Thumb test: Lightly drag your thumb across (not along) the blade. You should feel a “bite.”
- Tomato test: Try slicing a tomato. If the blade cuts cleanly without squishing, it’s sharp.
Avoid testing with your finger along the edge. This is risky and can lead to cuts.

Credit: www.knafs.com
Cleaning And Maintaining Your Knife
Sharpening leaves metal shavings and grit on the blade. Clean your knife after every sharpening.
- Wipe the blade with a damp cloth.
- Dry it completely to prevent rust.
- Apply a drop of oil to the hinge and blade (mineral oil works well).
Regular cleaning keeps your knife smooth and makes sharpening easier next time.
Common Mistakes Beginners Make
It’s easy to make mistakes when sharpening without a sharpener. Here are some to avoid:
- Using too much force: This damages the blade and the surface.
- Wrong angle: Leads to a dull or uneven edge.
- Sharpening on dirty surfaces: Dirt scratches the blade.
- Forgetting to strop: Leaves burrs, which reduce sharpness.
- Not cleaning after sharpening: Causes rust and pitting.
If you remember these points, you’ll get better results and a longer-lasting knife.
What To Avoid When Sharpening Without A Sharpener
Some surfaces and methods can do more harm than good. Avoid these:
- Brick or concrete: Too rough, damages blade.
- File or rasp: Removes too much metal, uneven edge.
- Knife against another knife: Can ruin both blades.
- Sandpaper above 1000 grit: Only polishes, doesn’t sharpen.
Many online guides suggest sharpening knives against each other. This is a bad idea — it ruins both edges and can cause chips.
Practical Tips For Sharpening In The Field
If you’re outdoors, improvising is key. Here are some tips:
- Choose the smoothest stone you can find.
- If you use water, avoid saltwater — it can cause rust.
- Dry the knife well after sharpening.
- If you don’t have a belt, a sturdy canvas strap can help with stropping.
- Use leaves to wipe metal dust in emergencies.
Outdoor sharpening is never perfect, but you can get a usable edge with patience.
Real-world Example: Outdoor Knife Sharpening
Let’s say you’re hiking. Your pocket knife won’t slice rope anymore. You don’t have a sharpener, but you do have a ceramic mug in your camping gear.
- Find the mug’s rough bottom.
- Use water to clean the surface.
- Sharpen at 20 degrees, alternating sides.
- Wipe blade with a leaf, then dry.
- Use your belt to strop.
This method brings the knife back to working condition. You don’t get a mirror polish, but the edge is sharp enough for most tasks.
Sharpening For Different Knife Types
Not all pocket knives are the same. Some have serrated edges. For these, use the tip of a ceramic rod or mug to sharpen each serration. Smooth blades are easier — just follow the steps above.
If you have a multi-tool knife, sharpen each blade separately. Don’t try to sharpen scissors or saws with these methods.
Below is a table comparing sharpening methods for different pocket knife types.
| Knife Type | Best Method | Difficulty | Edge Result |
|---|---|---|---|
| Smooth edge | Ceramic mug, sandpaper | Easy | Sharp |
| Serrated edge | Ceramic rod, mug edge | Medium | Moderately sharp |
| Multi-tool | Sandpaper, mug | Medium | Sharp |
Serrated knives need more patience. Focus on sharpening the points and valleys separately.
When Should You Sharpen Your Knife?
You don’t need to sharpen your knife every day. Most pocket knives should be sharpened every few weeks, or when you notice them slipping or tearing instead of slicing.
Signs your knife needs sharpening:
- Struggles to cut paper or rope.
- Blade looks shiny (dull) instead of sharp.
- Feels rough when slicing food.
Honing with a belt or strop can keep your edge sharper for longer. Sharpen only when necessary — too much sharpening wears out the blade.
Safety Tips For Diy Sharpening
Sharpening without a tool can be risky. Always follow these safety rules:
- Keep fingers away from the blade edge.
- Use a stable surface.
- Don’t rush. Fast sharpening leads to mistakes.
- Clean up metal shavings — they can cause cuts.
If you’re outdoors, sharpen away from your body and others. Take breaks if your hand feels tired.
Non-obvious Insights Most Beginners Miss
- The cleanliness of the sharpening surface matters. Dirt or grit can scratch your blade. Always clean before you start.
- Stropping is not just for barbers. It removes tiny burrs left after sharpening, making your knife much sharper and smoother.
- Alternating strokes is essential. If you sharpen only one side, the edge becomes uneven and loses sharpness quickly.
Experienced sharpeners know that the edge quality depends as much on the finishing steps as the sharpening itself.
Sharpening Without A Sharpener: Myth Vs. Reality
Some people believe you can get a razor-sharp edge with any rough surface. In reality, the quality depends on:
- The hardness of the surface.
- How consistent your angle is.
- Whether you finish with stropping.
You won’t get a factory-perfect edge, but you can make your pocket knife sharp enough for most tasks. If you need extreme sharpness (like for shaving), you’ll need proper tools.
For more technical details on knife sharpening basics, you can check Wikipedia’s sharpening article.
Frequently Asked Questions
How Do I Sharpen A Pocket Knife If I’m Camping And Have No Tools?
Find a flat stone or use the bottom of a ceramic mug if you have one. Wet the stone if possible, keep a 20-degree angle, and use gentle strokes. Finish by stropping on a leather belt.
Can I Use Sandpaper To Sharpen A Pocket Knife?
Yes. Medium grit sandpaper (400–600) works well. Lay it flat, hold the knife at a proper angle, and use smooth strokes. Avoid coarse sandpaper, as it can damage the blade.
Is It Safe To Use A Car Window To Sharpen A Knife?
It’s safe if you use light pressure and don’t force the blade. The rough edge of the glass works in emergencies but isn’t as effective as ceramic or sandpaper. Always check the glass for chips before starting.
How Often Should I Sharpen My Pocket Knife?
Sharpen when the blade starts to slip or tear instead of slice. For regular use, every few weeks is enough. Honing (stropping) can keep the edge sharp longer without full sharpening.
What’s The Best Angle For Sharpening A Pocket Knife?
For most pocket knives, 20 degrees is best. This gives a good balance between sharpness and durability. Use a consistent angle for every stroke to avoid a dull or uneven edge.
Sharpening a pocket knife without a sharpener is not just possible — it’s practical. You can use everyday items, from mugs to sandpaper, to restore your blade and keep it ready for action. With the right angle, careful strokes, and a bit of patience, you get a sharp edge anytime, anywhere.
Remember, safety comes first, and finishing with a strop makes all the difference. Whether at home or in the wild, these skills keep your knife — and your hands — safe.

Hello, This is Annie Walker, a 38-year-old blogger, founder, and editor of Cookware Guider from NY, USA. I am a cookware fanatic and passionate cooker. I love to cook with different types of cooking appliances (example: all types of cookware, rice cookers, slow cookers, etc) almost every day in my kitchen. I love to share my experience with my readers in my blog. Also, I enjoy helping people to solve their problems through my website. You can follow me on Twitter & Pinterest. To know details about my blog please check the about us page.